Want to see Raider King content first? Add us as a preferred source.
If you want to complete all the Riddler puzzles but for some reason it’s taking you longer than you’d have hoped, don’t worry! Here are all the Riddler Puzzles locations, as well as solutions.
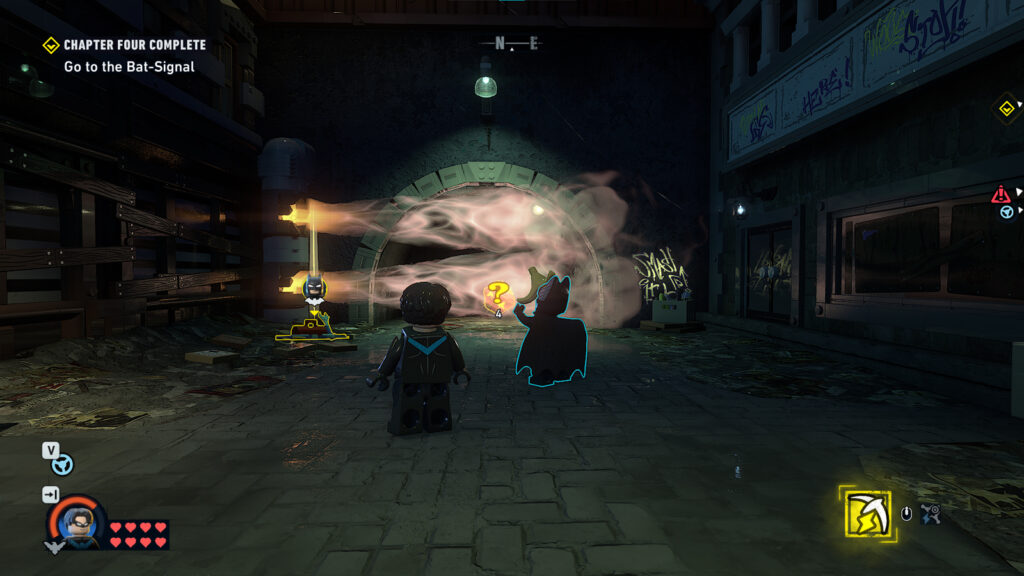
I’ve put them in the order I completed them, but some of them will have character restrictions, so either go for the ones you can at the moment, or wait until you unlock Nightwing in Chapter 4. You can also unlock Batgirl in Chapter 4, which can use a specific mechanism to access signal towers, revealing the locations of all important objectives on the map.
Tricorner
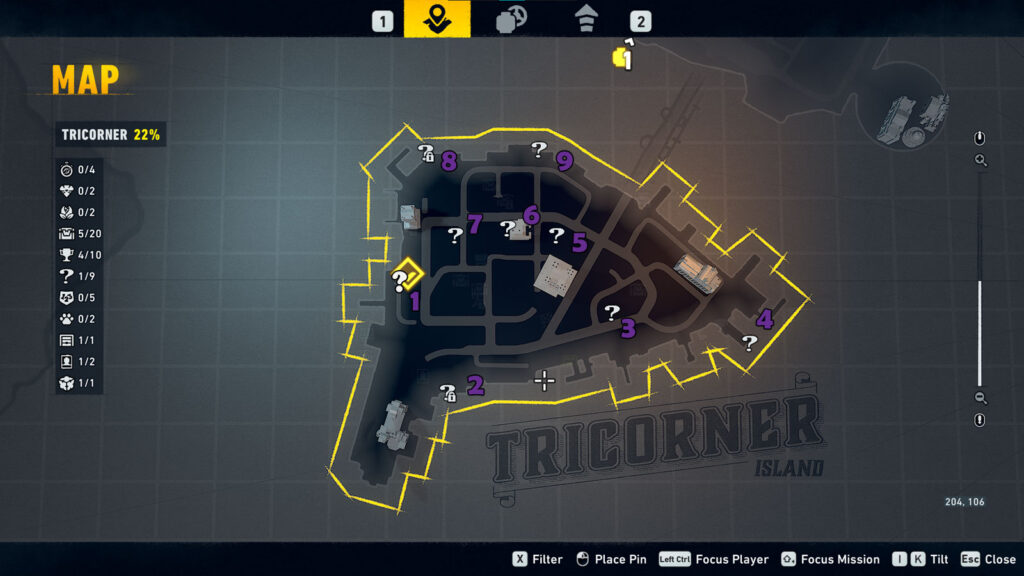
There are 9 puzzles in Tricorner (the first zone you can unlock on the map).
Riddler Puzzle 1
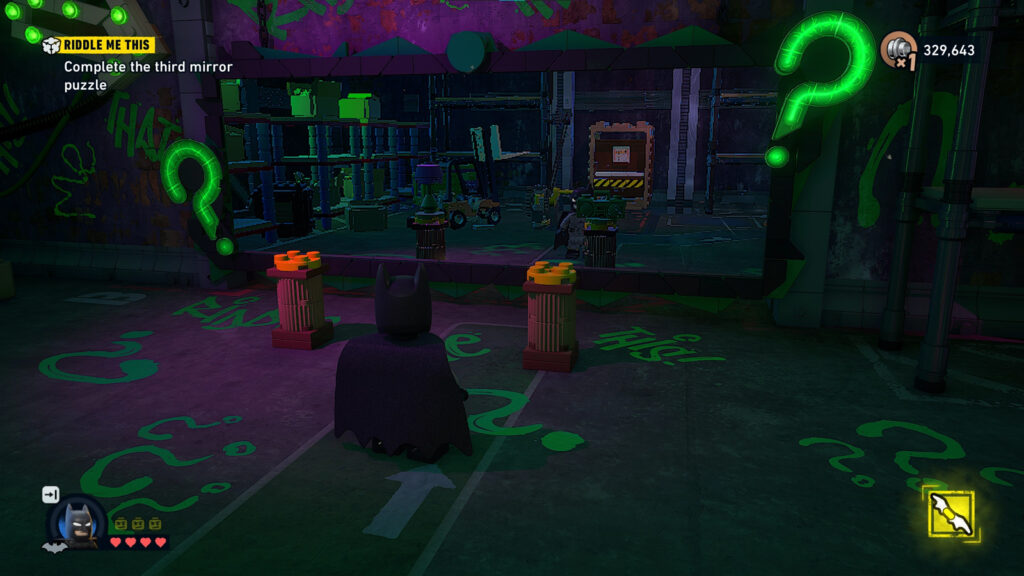
The 1st one is more of a tutorial and introduction to the Riddler puzzles. There will be 3 Mirror puzzles you will have to figure out to complete the mission ‘Riddle Me This’.
Mirror Puzzle 1

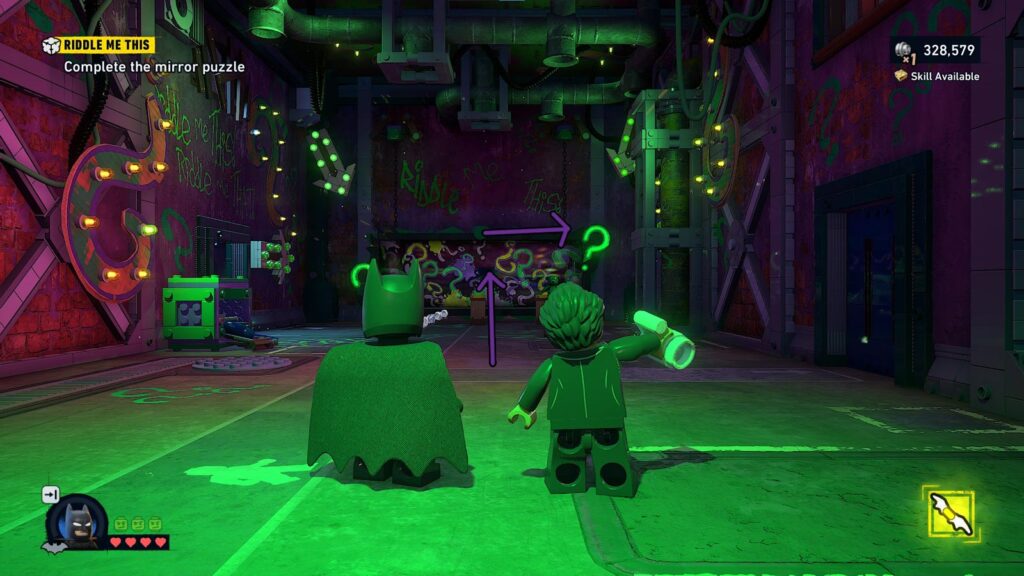
As you can see, there are three pedestals in front of a mirror. If you take a closer look, you will notice that the image in the mirror is different from what’s actually on the pedestal. You basically have to recreate thhe mirror image on the physical pedestals by adding the bear on the first one. The bear is located slightly ahead of the pedestals, on the right side of where you came in from.
Mirror Puzzle 2
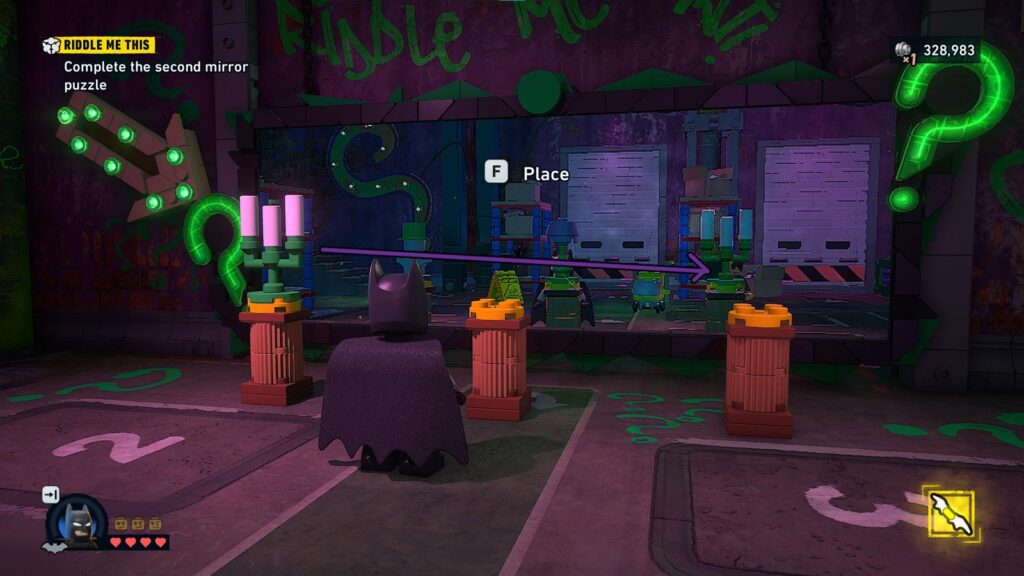
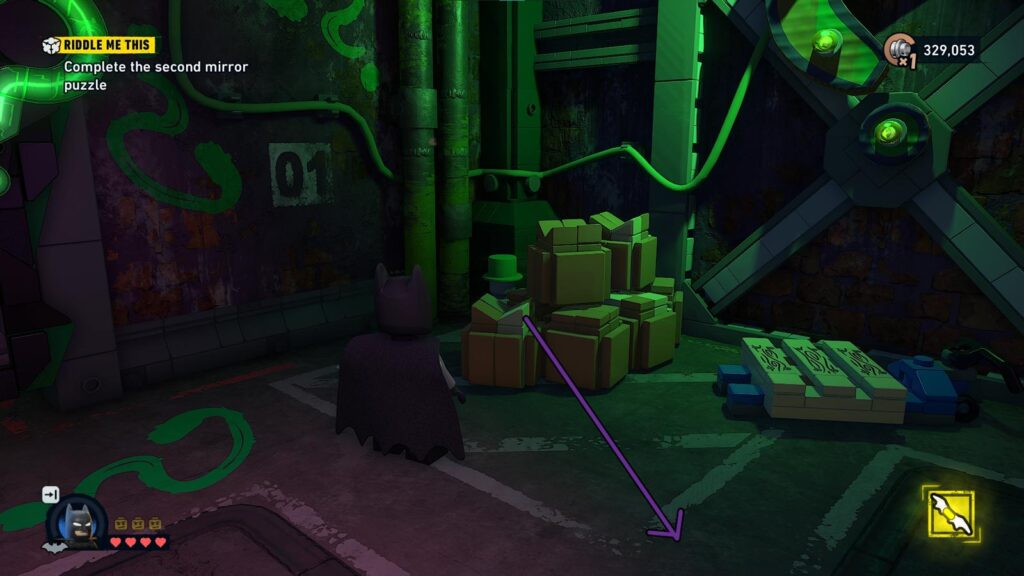
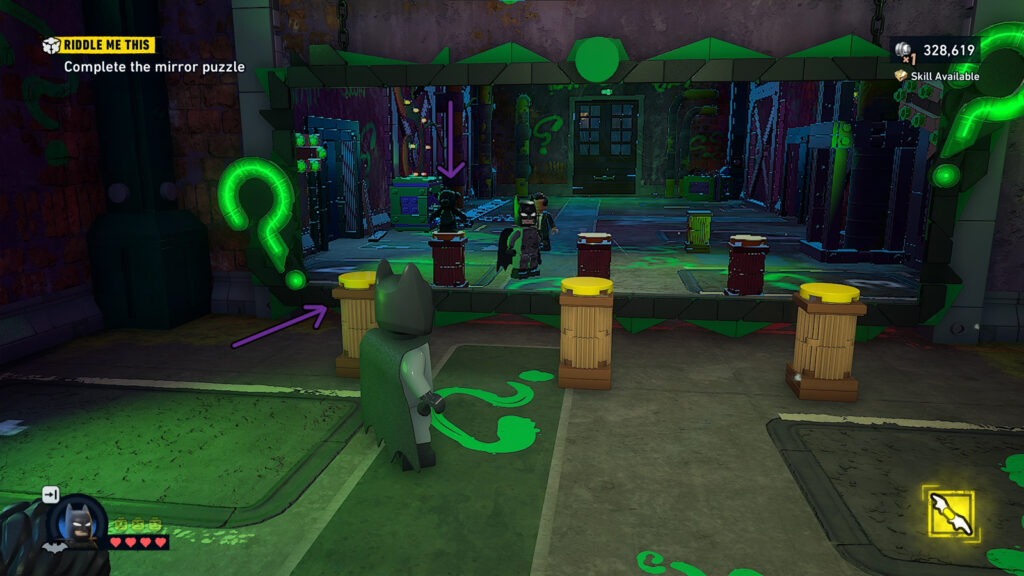
The second puzzle has the same idea as the first one, meaning you have to recreate the mirror image. First of all, switch the candles from the first to the third pedestal. Afterwards, if you turn around and break the boxes next to the wall that shows the number 1, you will find the little human with the hat. Place the statue on the first pedestal.
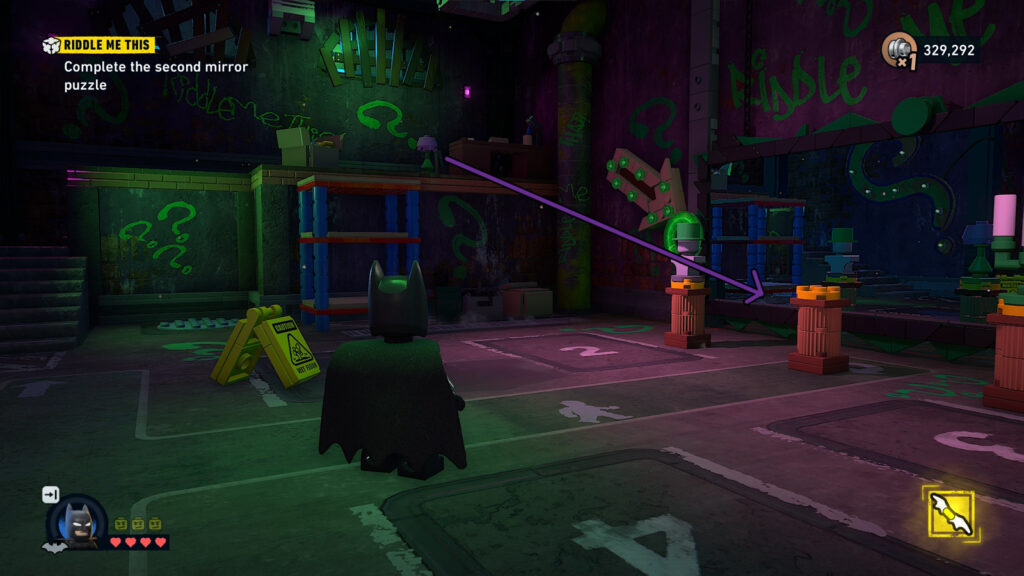
The last object is a flower vase. If you go up the stairs and at the end of the ledge, you will find the flower. Place it on the middle pedestal to finish the puzzle.
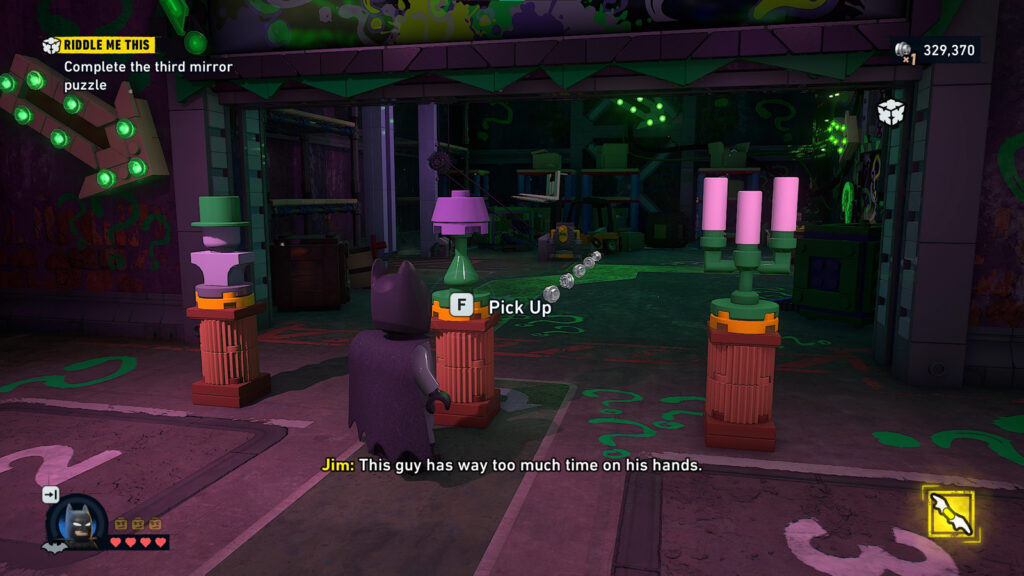
Mirror Puzzle 3
The last puzzle has to objects: a flower and a stereo. Same as before, replicate the mirror image. The stereo will be to your left. Turn around and break all the stuff around the left wall from the pedestals and you’ll find it. Place it on the 2nd pedestal. The flower you will have to pick up from the previous room, where you did the the second puzzle. Take it from the 2nd puzzle’s middle pedestal and put it on the first pedestal of the third puzzle. That will get you to complete the mission and the first Riddle puzzle.
Riddler Puzzle 2
Required Character: Nightwing
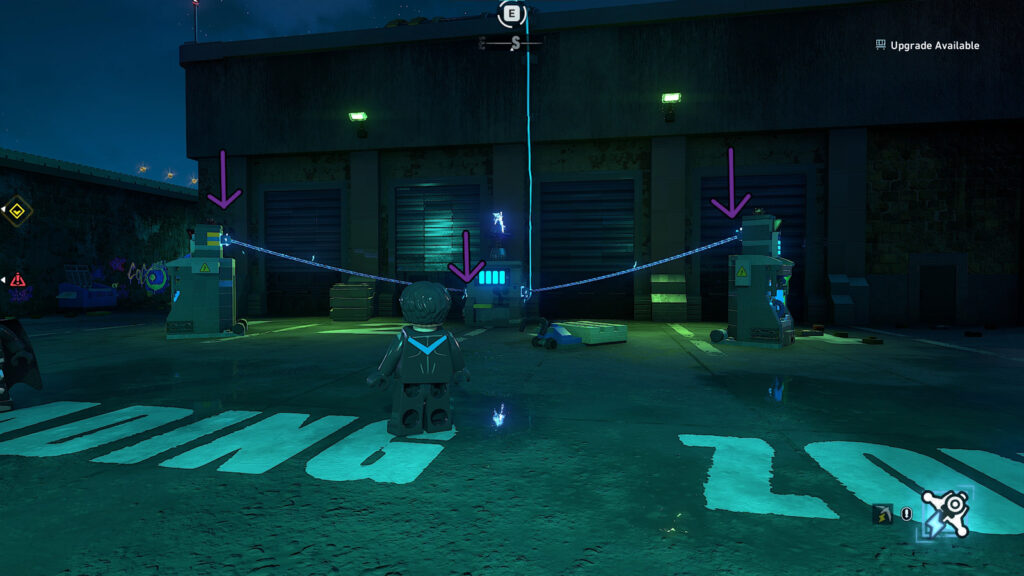
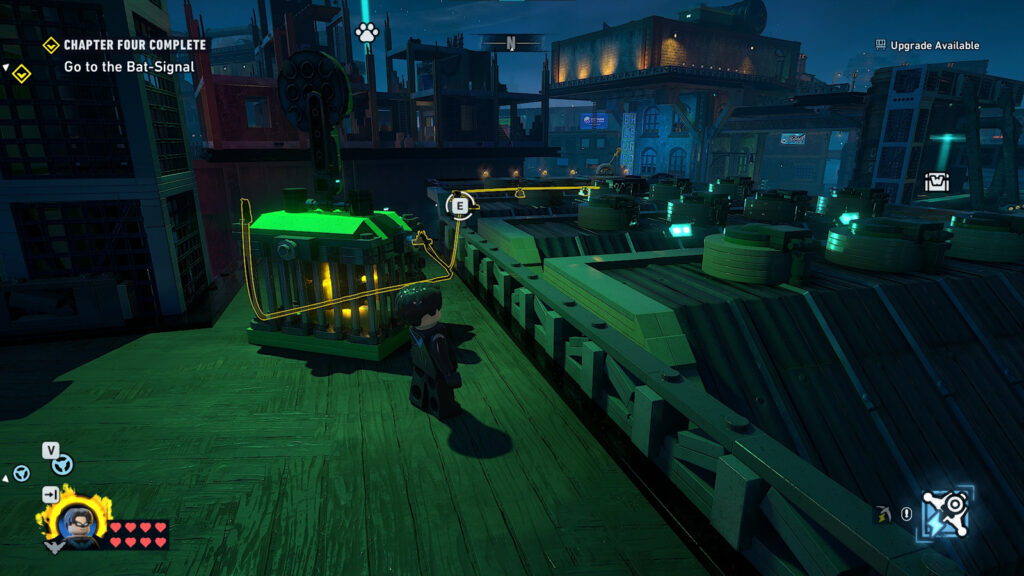
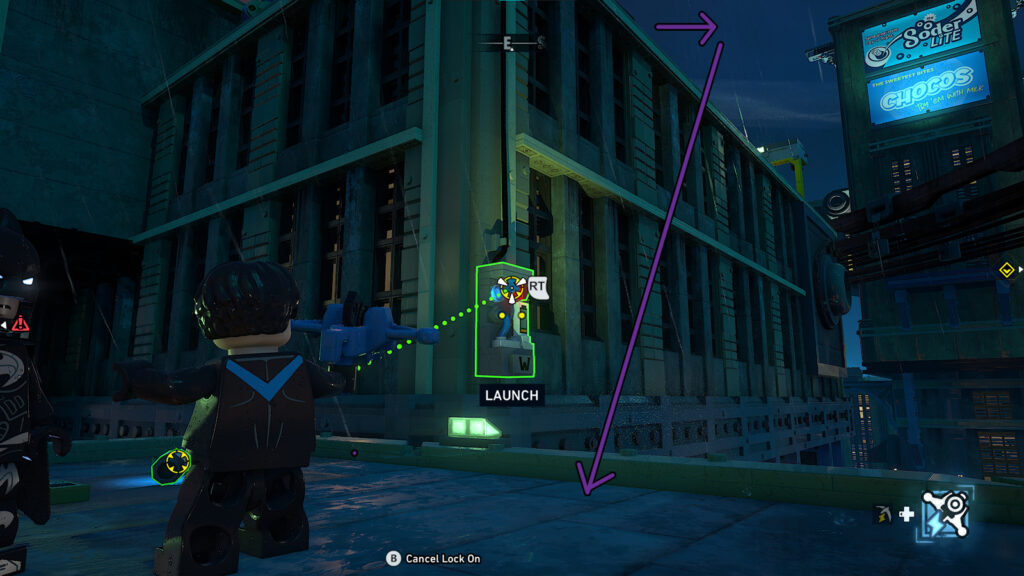
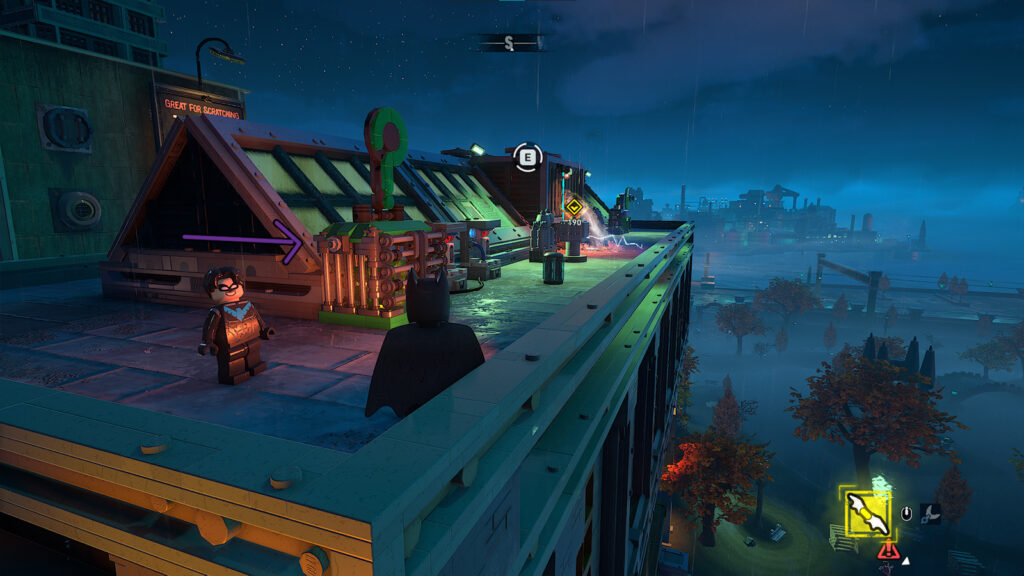
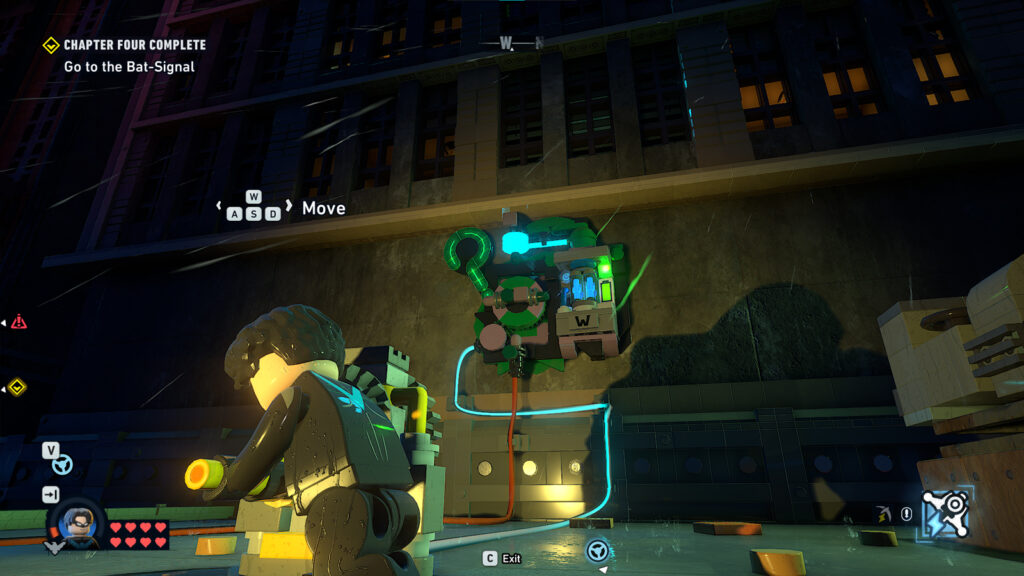
For the 2nd Riddler puzzle, the puzzle piece will be on the roof of a building. First, break the safety box and rebuild it. There will be a mechanism where Nightwing can use his baton but first it needs electricity. Use the special vision and follow the wire below. You will need two types of batteries: a small 1-cylinder, and a bigger 4-cylinder battery.
For the small one, go back on the roof. break the boxes opposite to the puzzle and you will find it. Go back down and insert it on the right. The second battery is on the lower level. Turn left from the circuit amd in the corner next to the big structure will be more boxes that you need to break. Behind that, you will find the 4-cylinder battery. Insert it on the left power supply.
After the batteries are inside the power supplies, use Nightwing’s 2nd ability to connect each one of them to the main power supply. Once it’s on, go back up and use to baton to tun on the power to the cage holding the puzzle, which will give you access to it.
Riddler Puzzle 3
Required Character: Batman
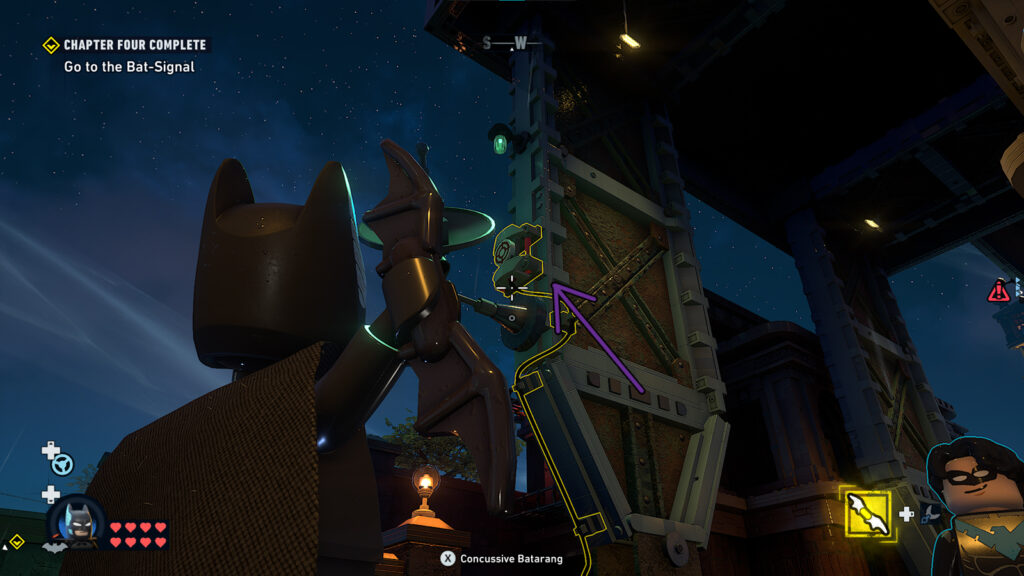
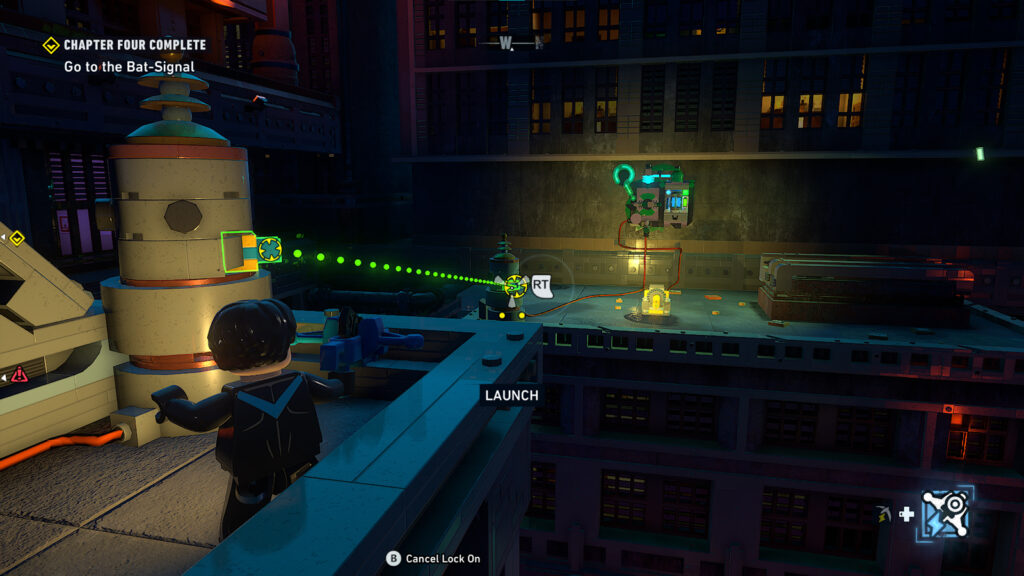
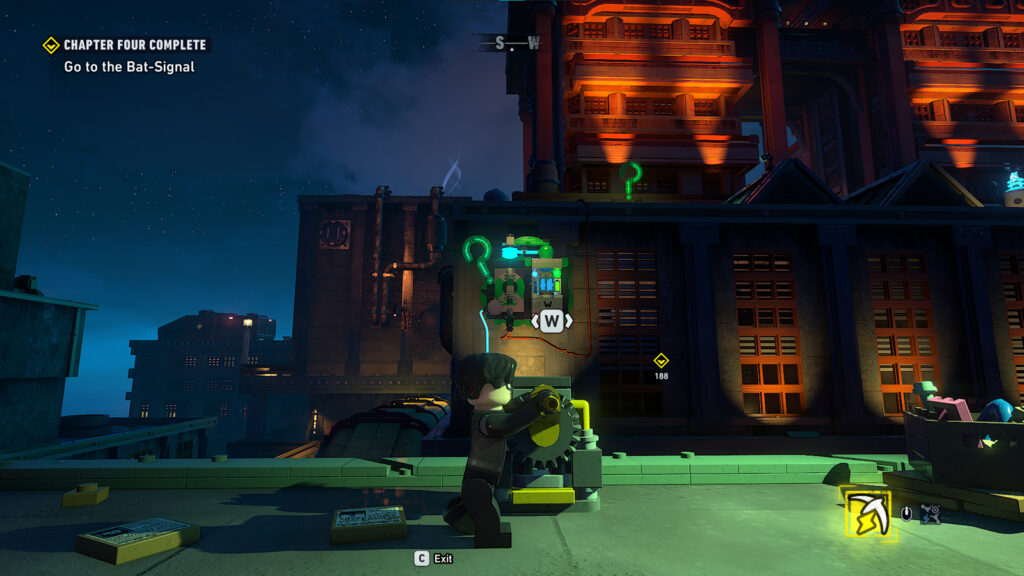
From the location of the puzzle piece, use the special vision button and follow the power cable.
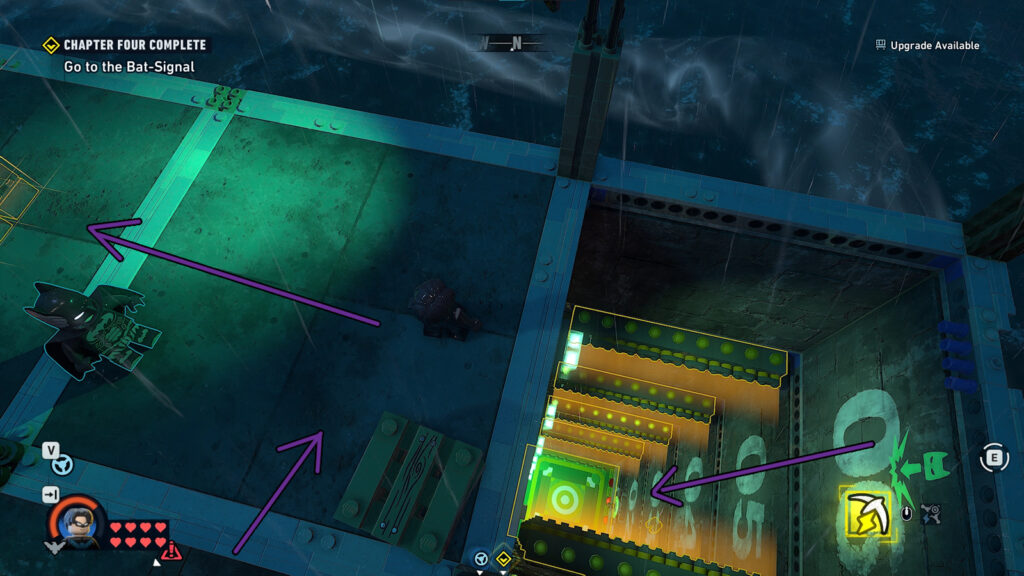
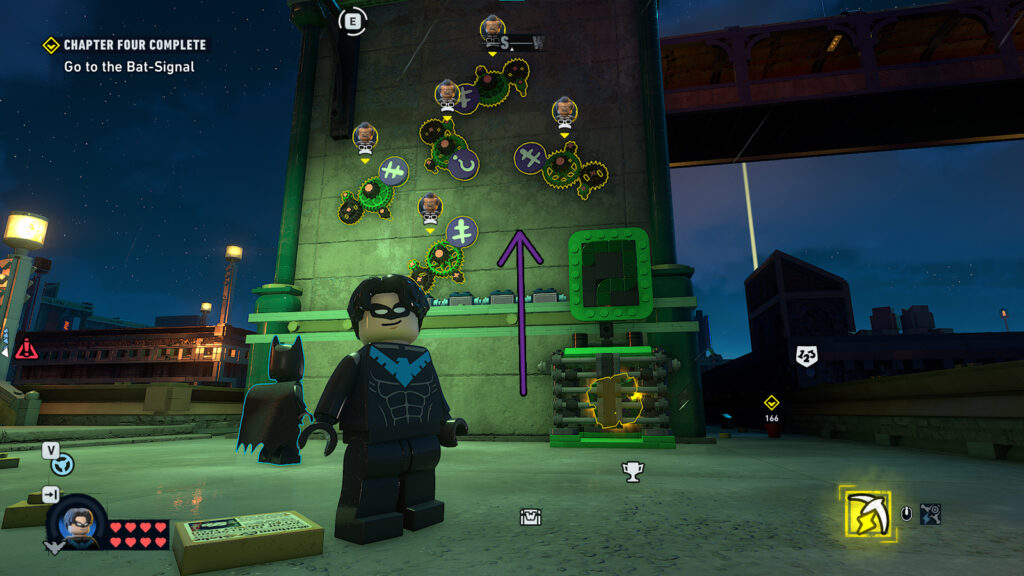
This will lead you to the actual puzzle. Turn the handle and then you’ll get signs pupping up that you will need to hit with Batarangs/other boomerangs variants. Only hit the green sigs that show you ticks. There will also be some red ones with an ‘x’ on them – ignore those. After hitting 6/6, you should be able to go back and grab the puzzle piece.
Riddler Puzzle 4
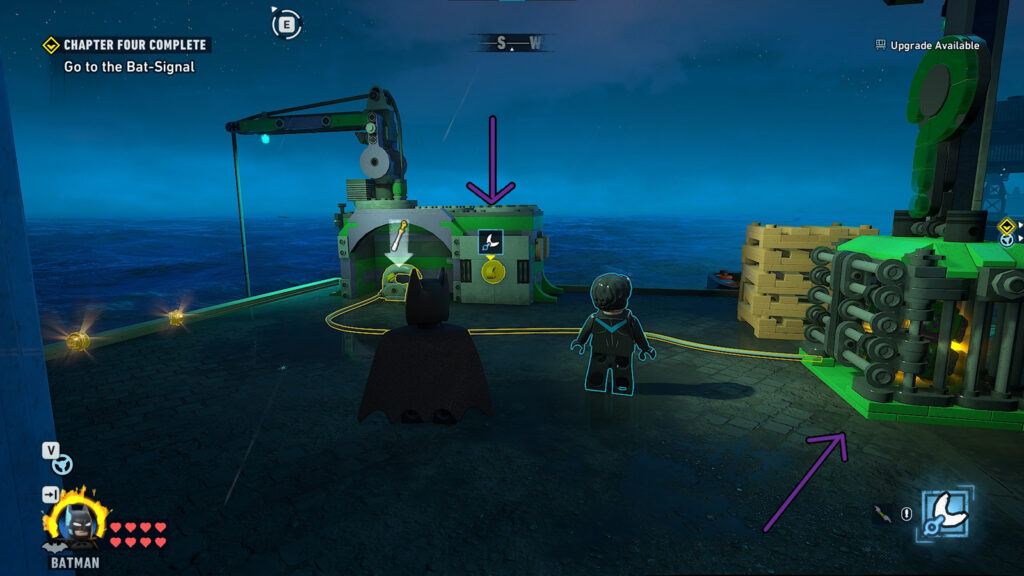
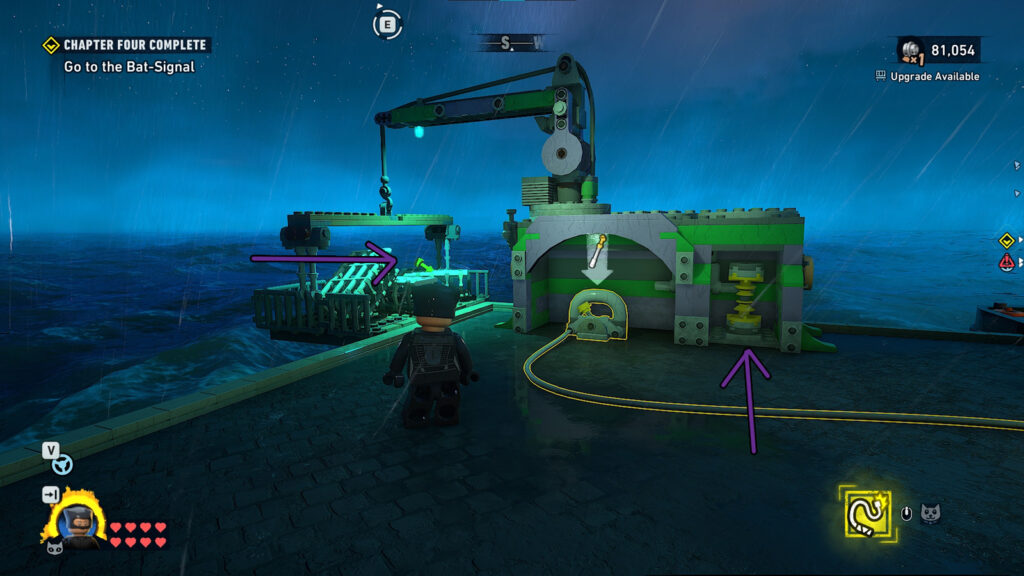
Required Character: Catwoman, Batman
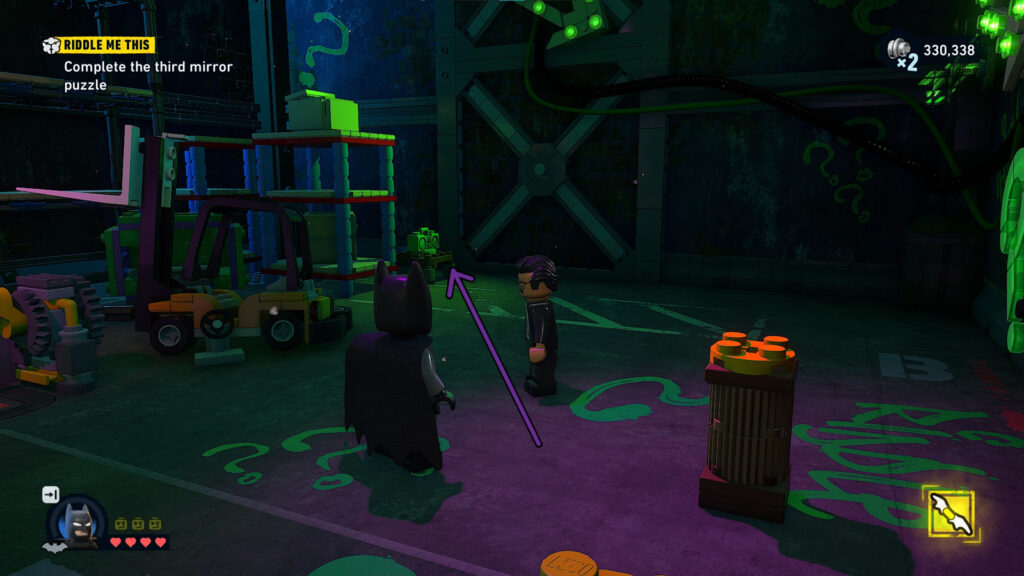
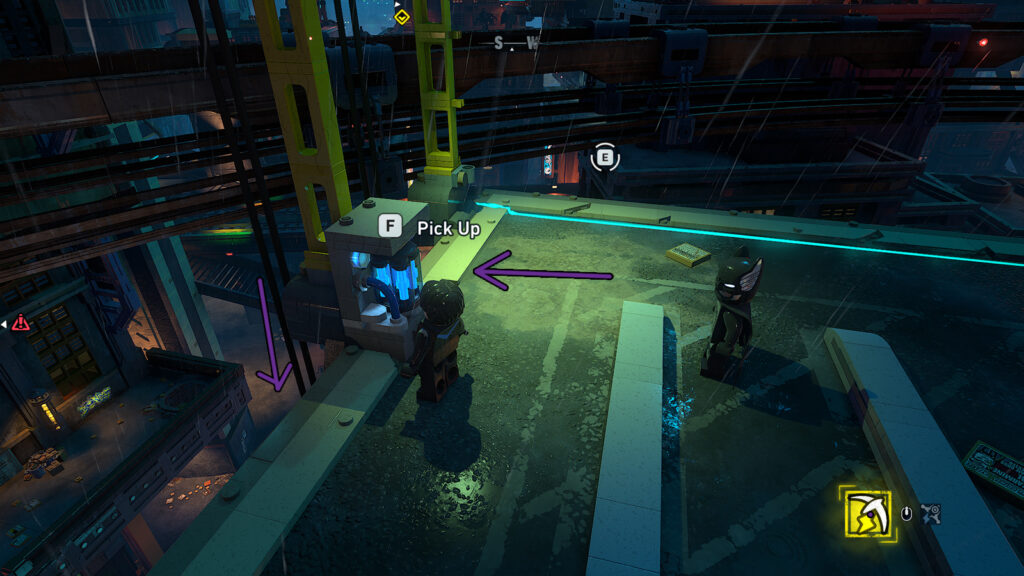
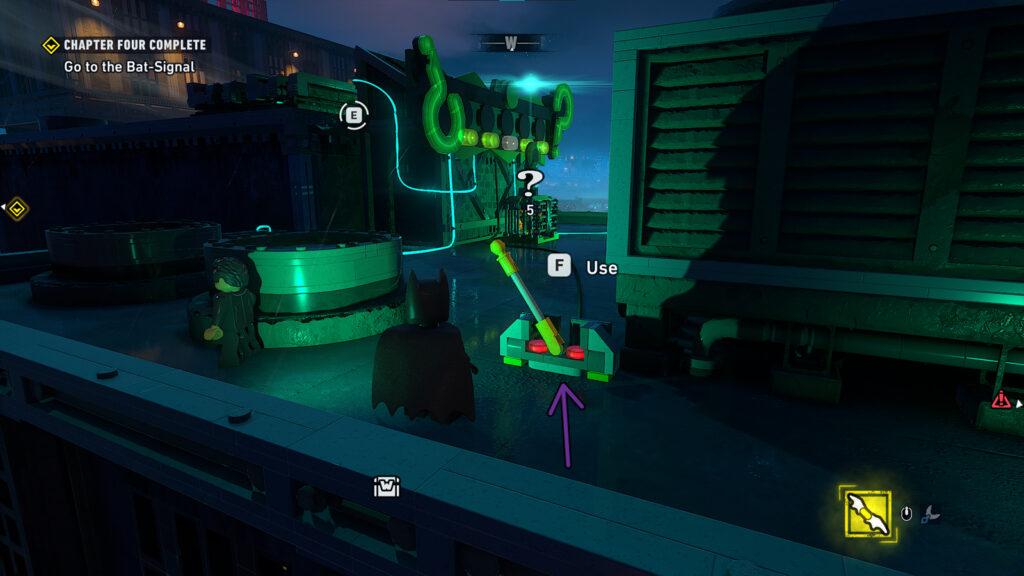
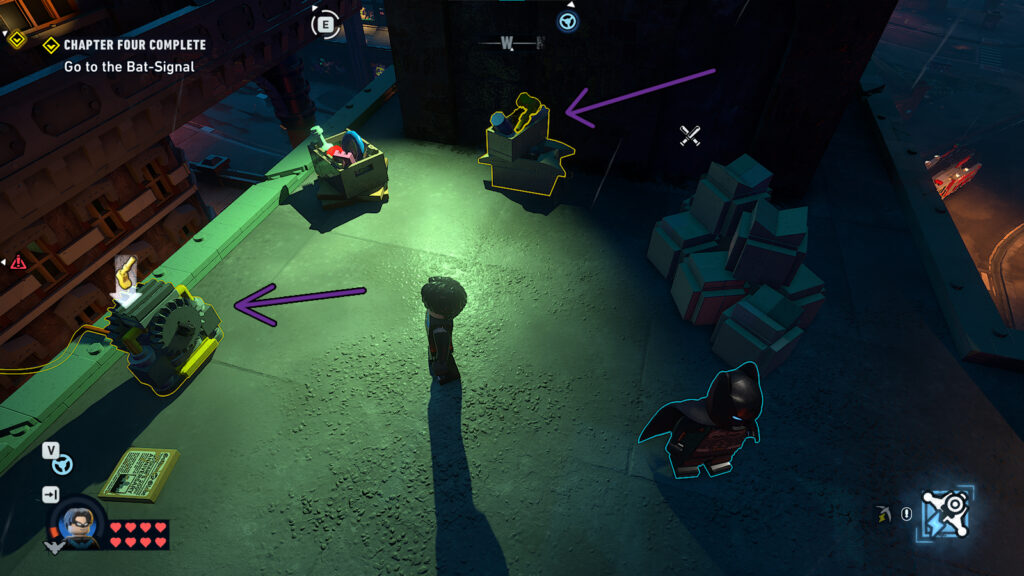
First, use the Batclaw to break open the box. You will need a handle to actually use the mechanism, which is when Catwoman needs to use her whip to get the forklift to raise a platform with loads of crates. break the crates and you’ll fidn the handle you need. Insert it in the mechanism connected to the box and then turn it to open the cage holding the puzzle piece.
Riddler Puzzle 5
Required Character: Anyone
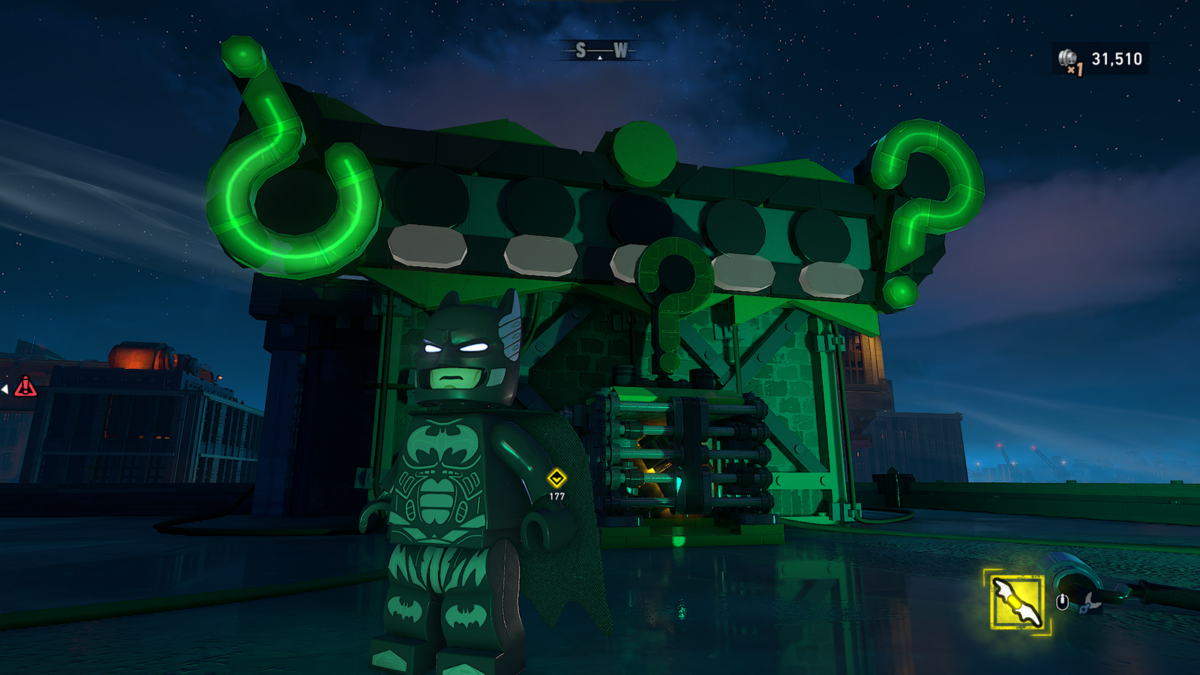
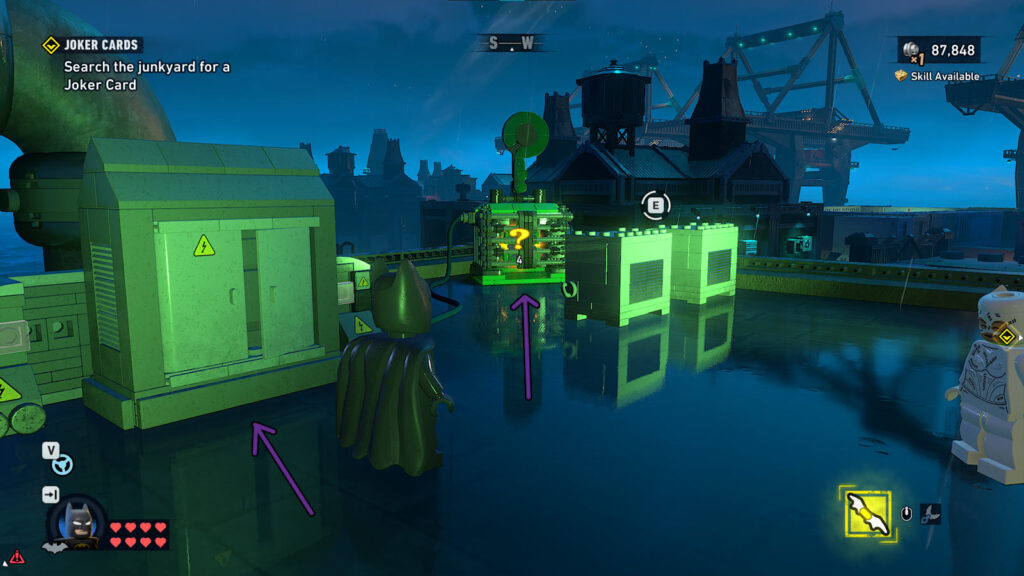
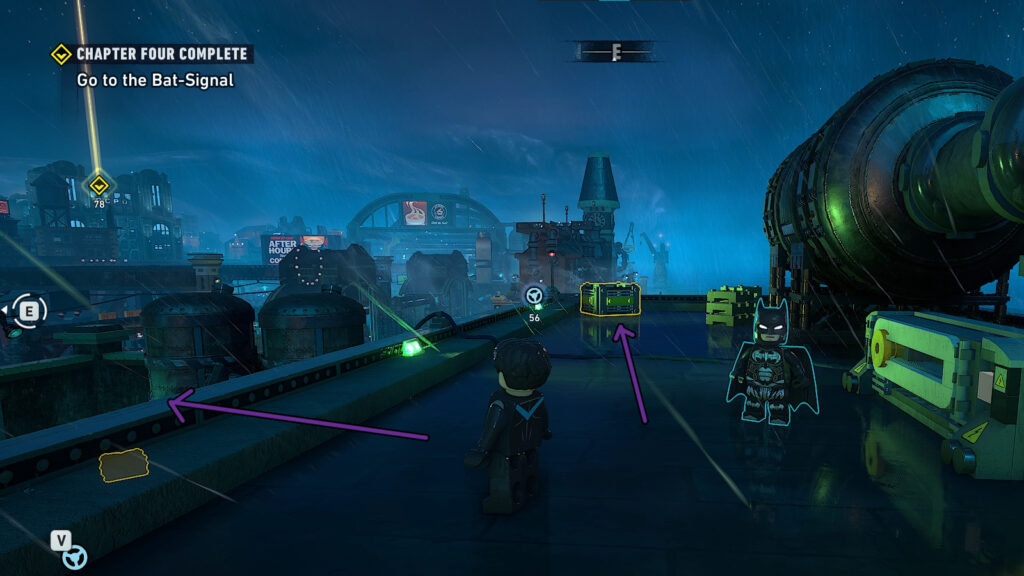
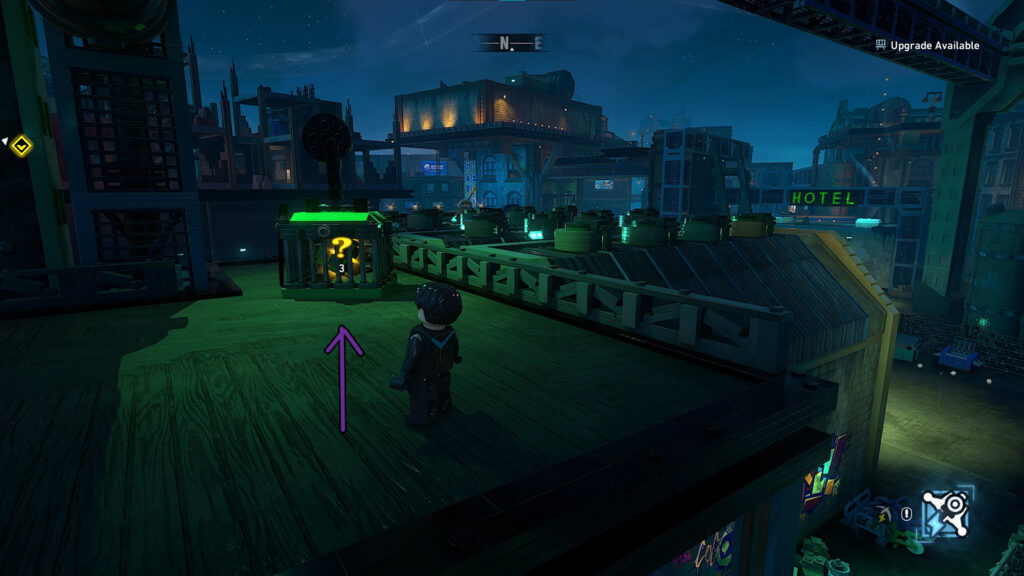
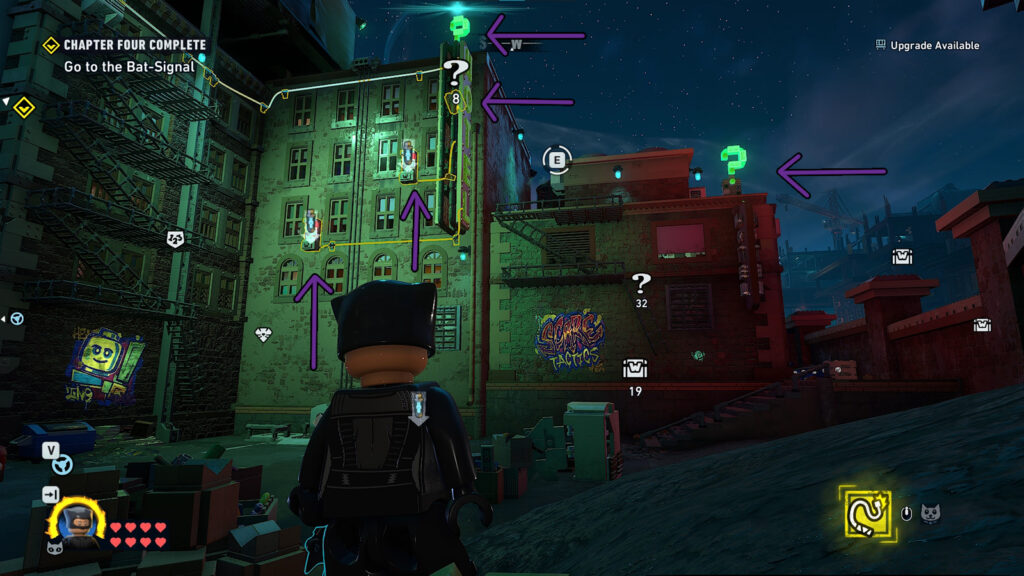
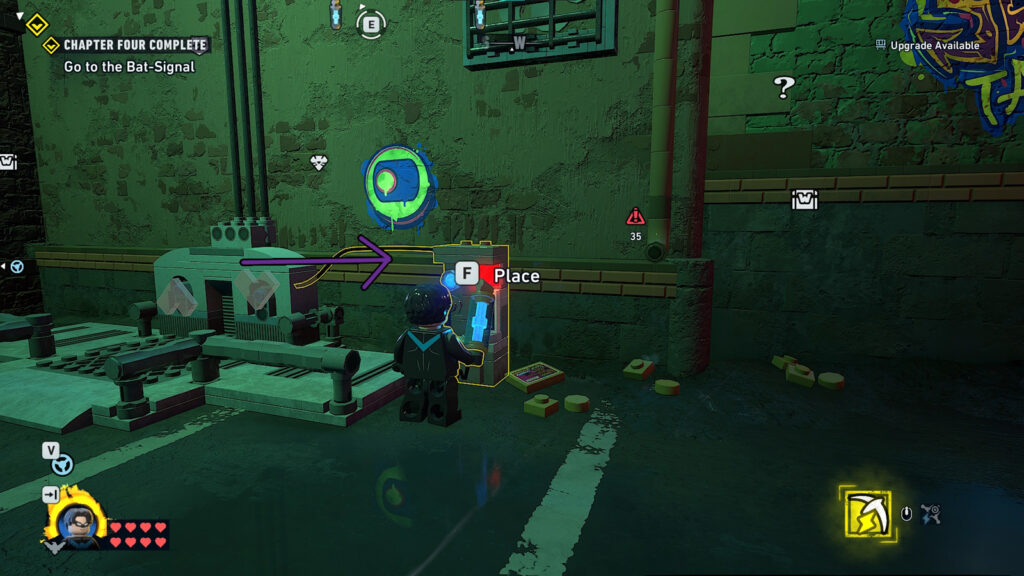
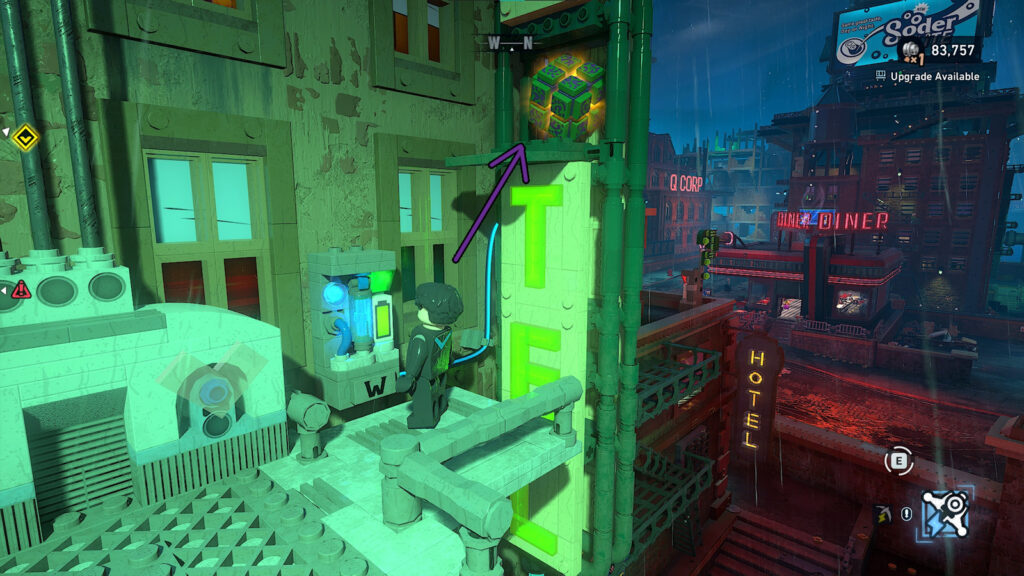
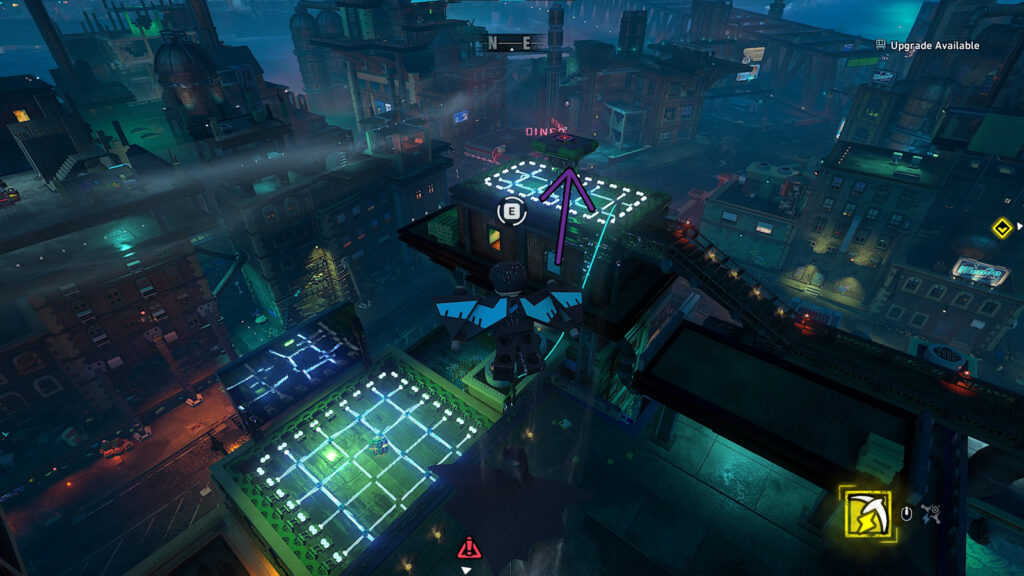
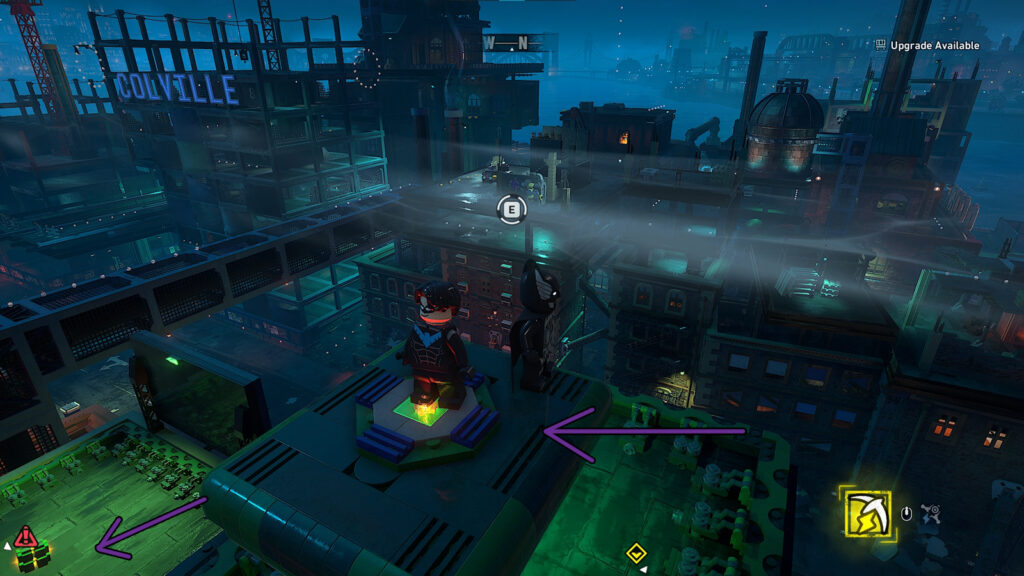
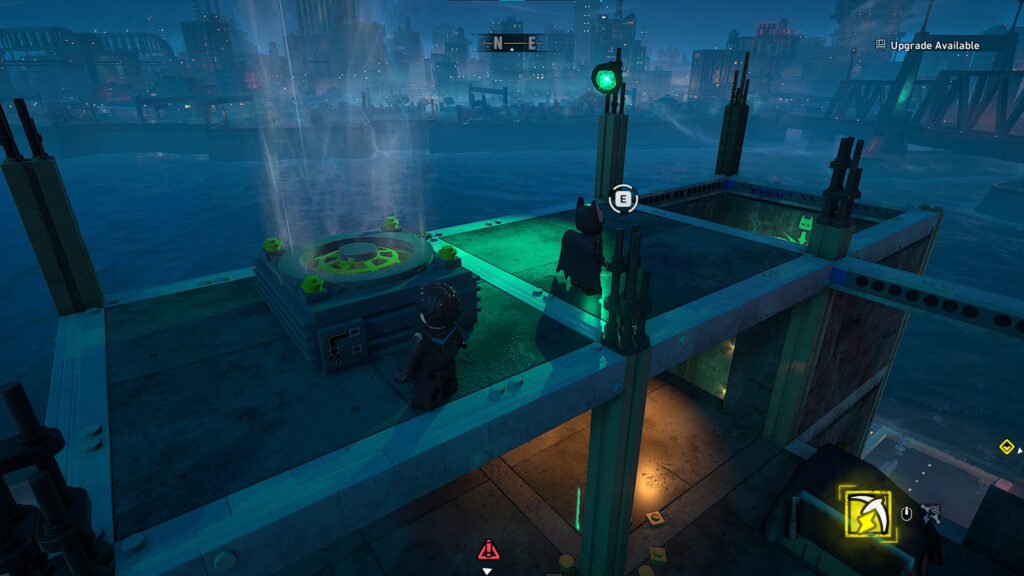
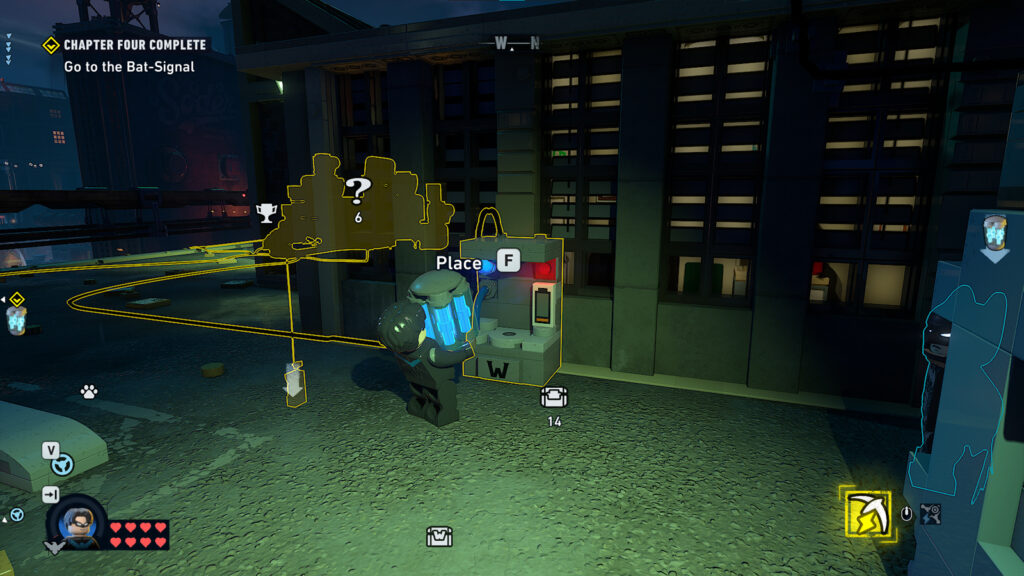
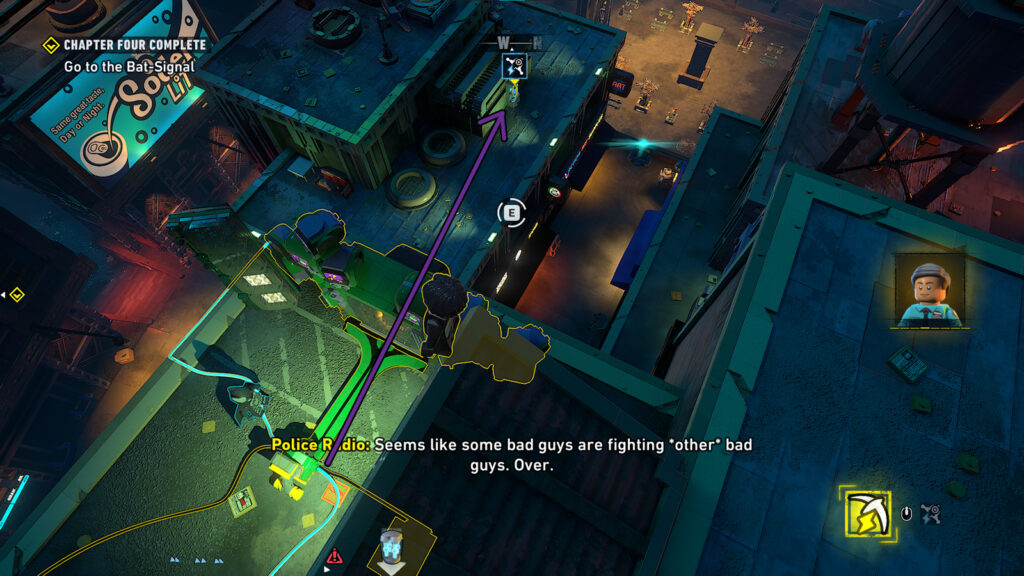
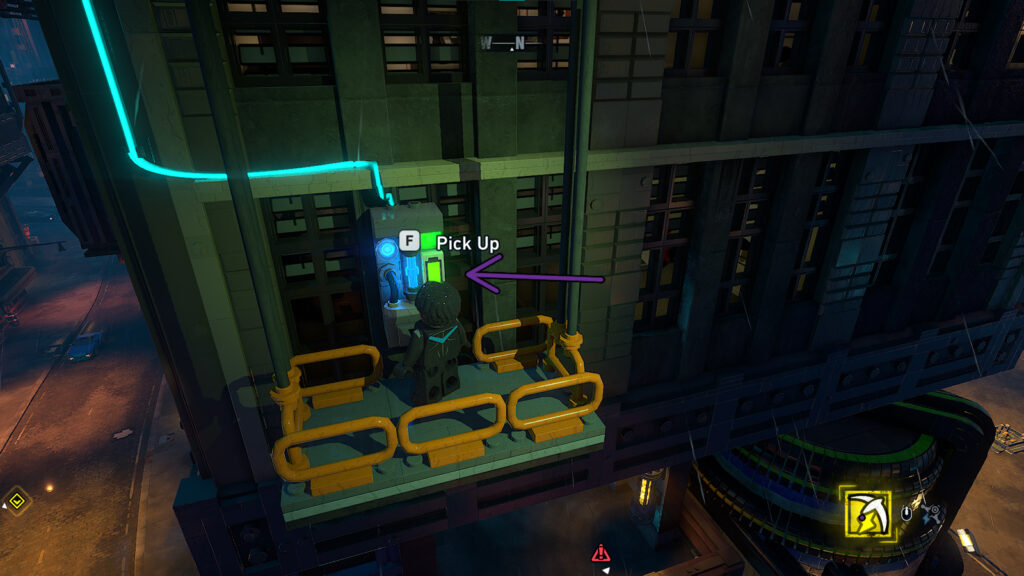
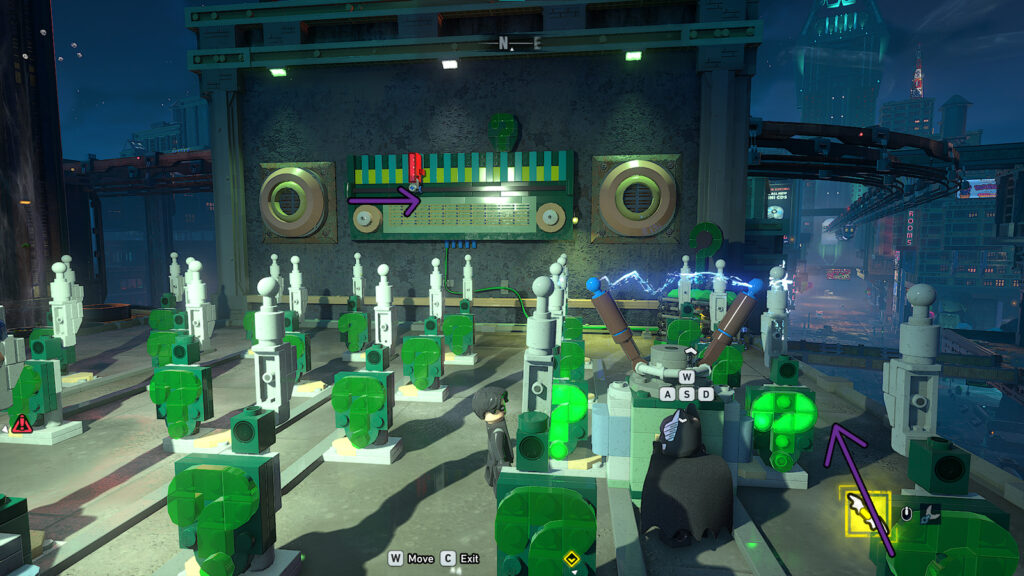
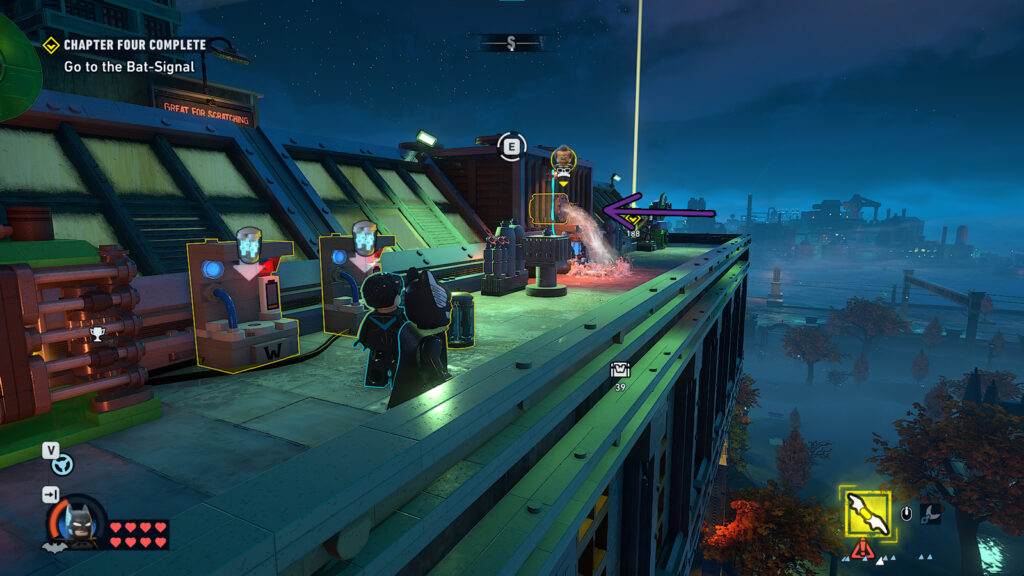
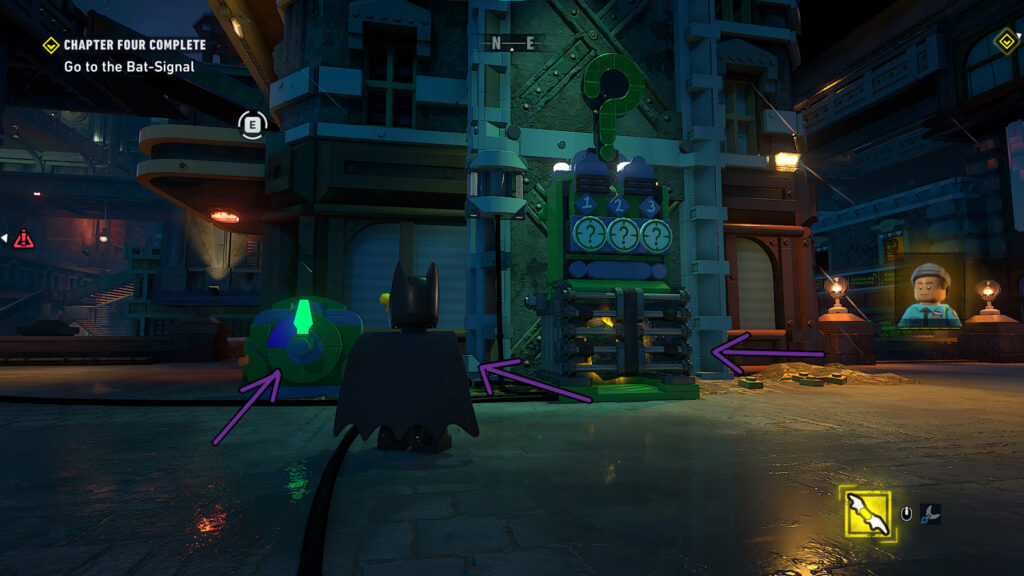
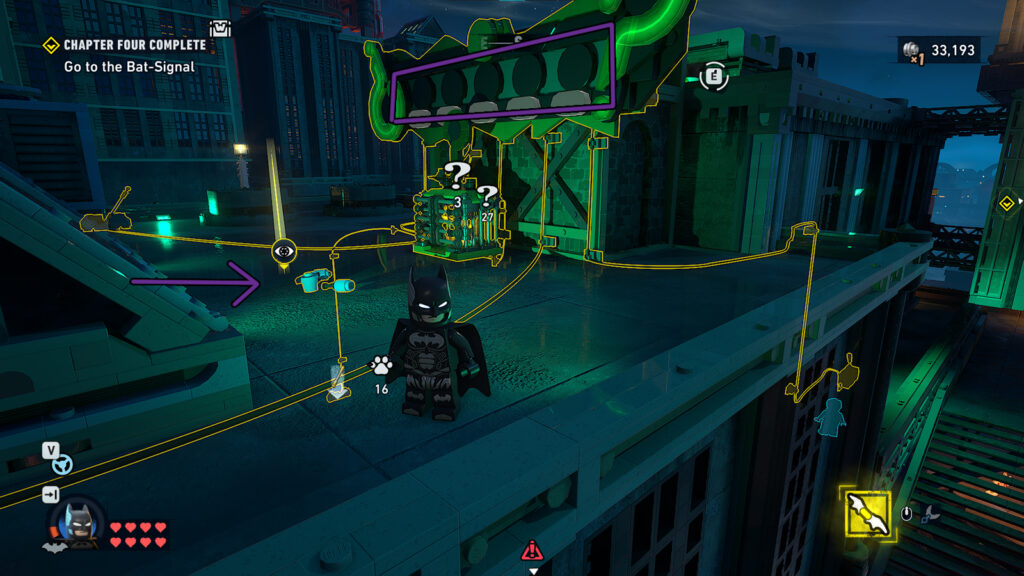
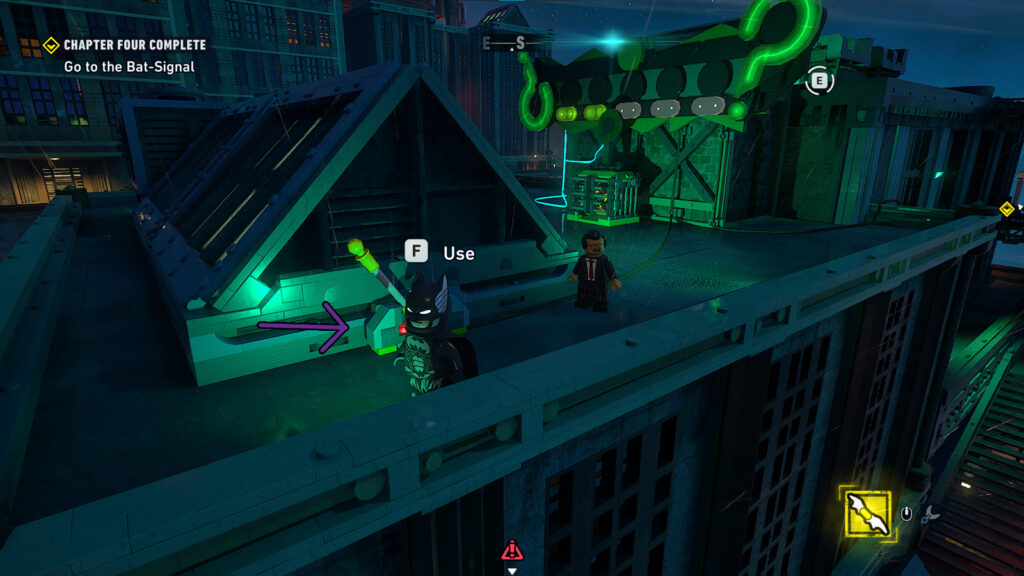
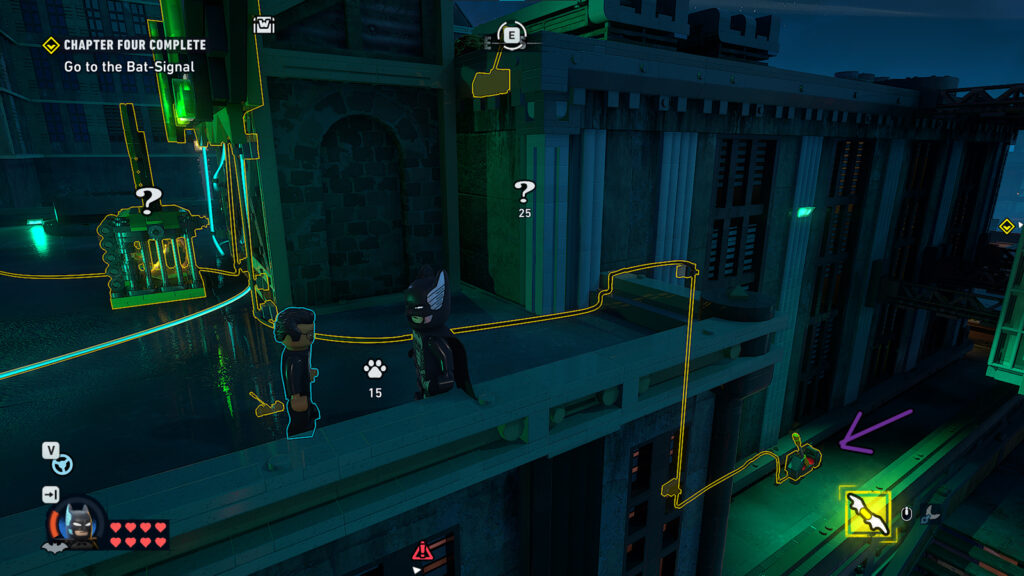
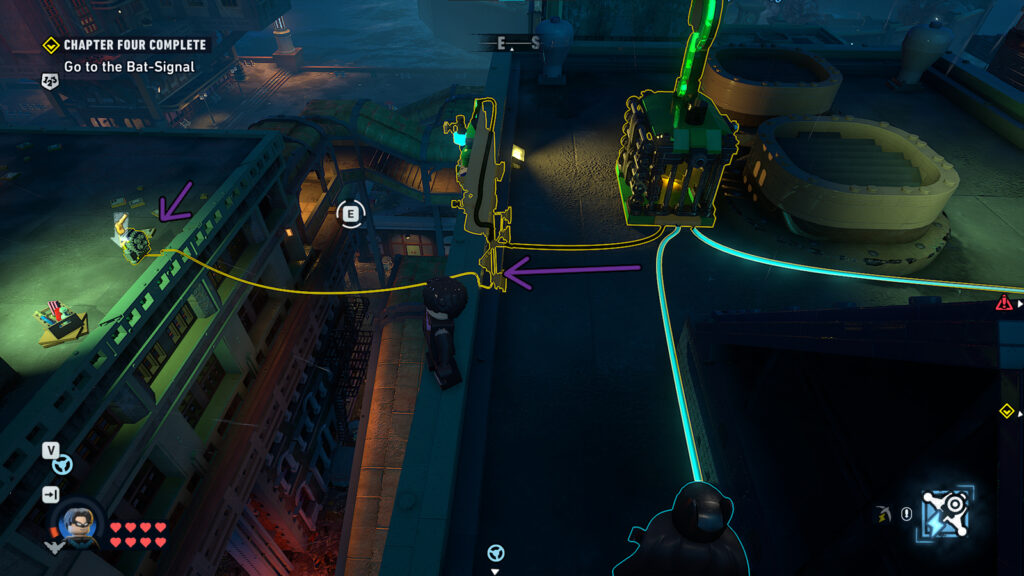
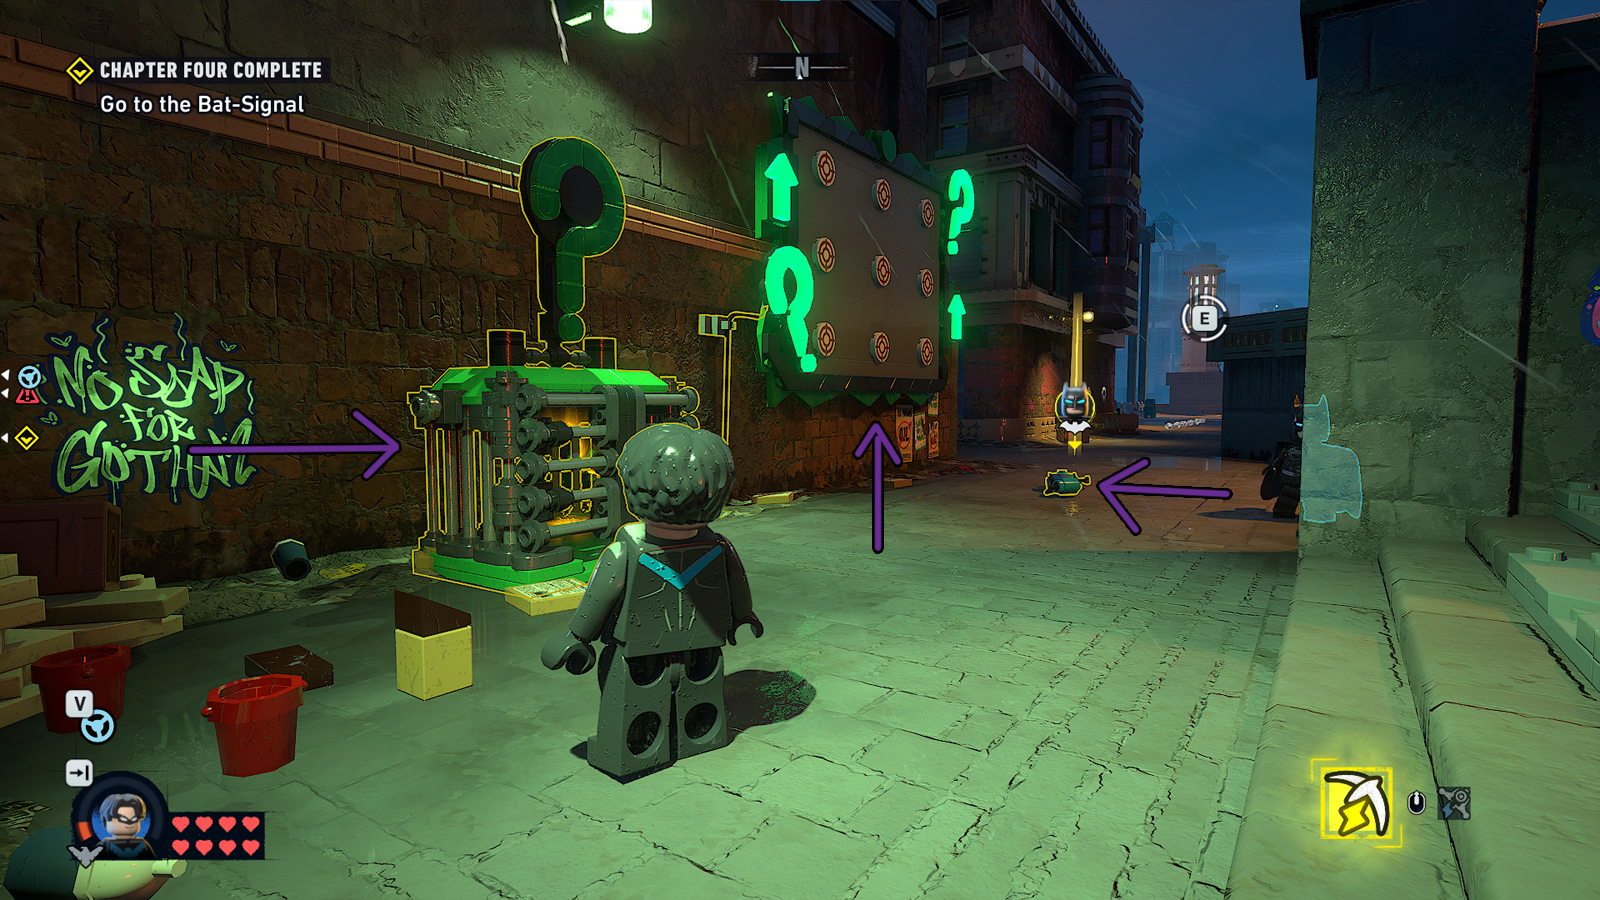
I put arrows for all the objects of interest you will need for this puzzle. If you use your special vision, you will notice that the Riddler cube is hanging around the building, higher up. You will need to use a lift, which in turn required a battery to work.

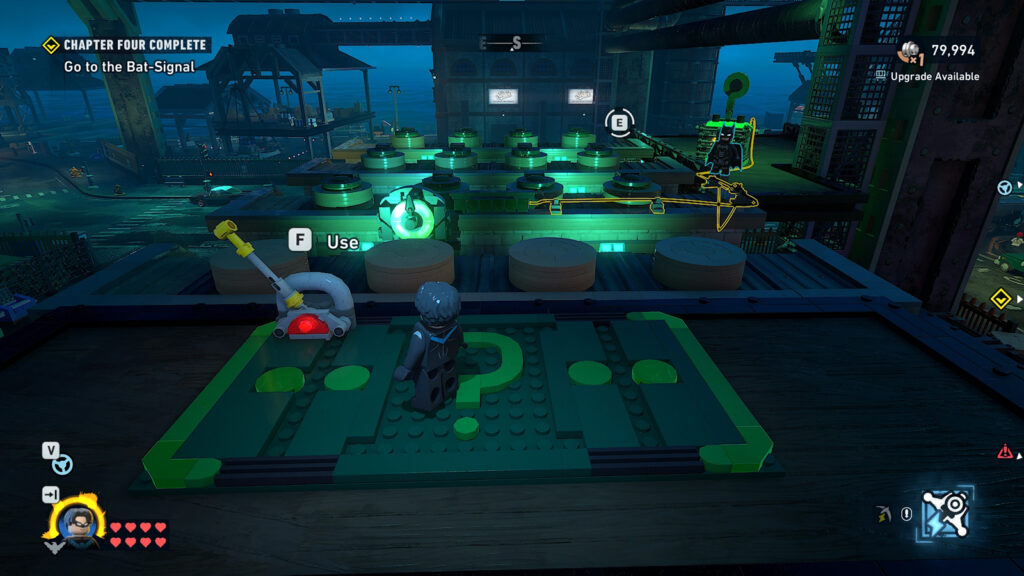
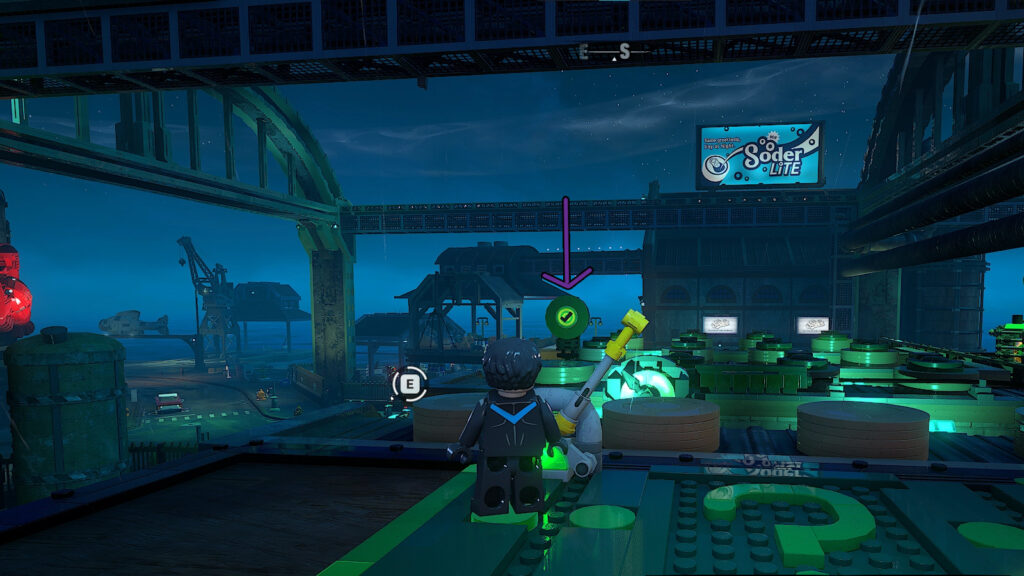
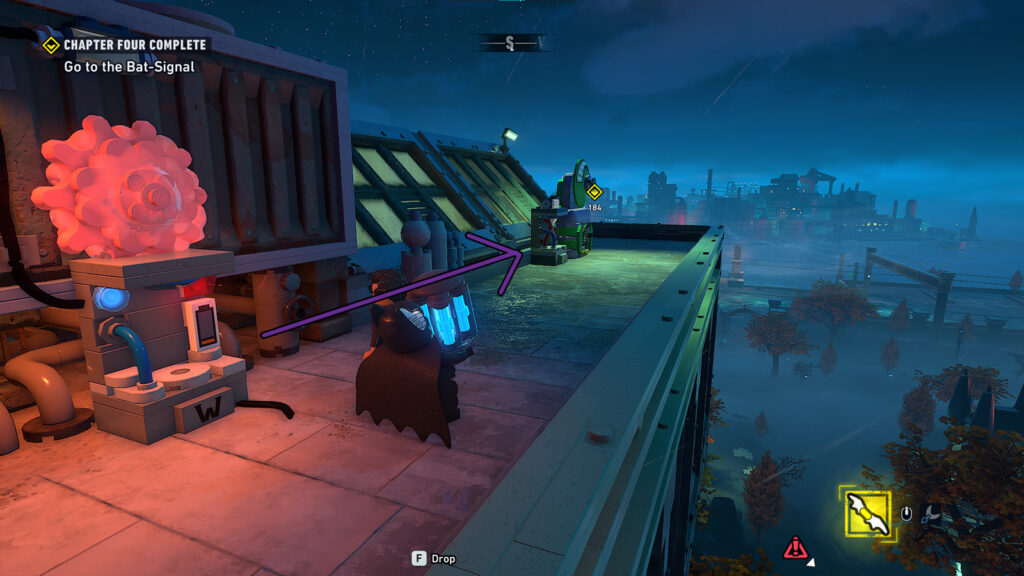
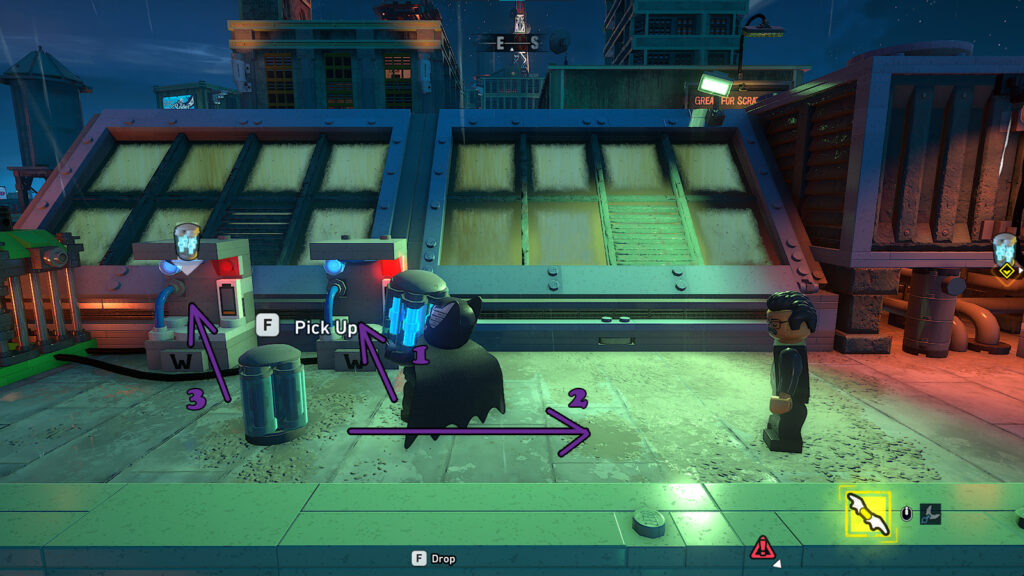
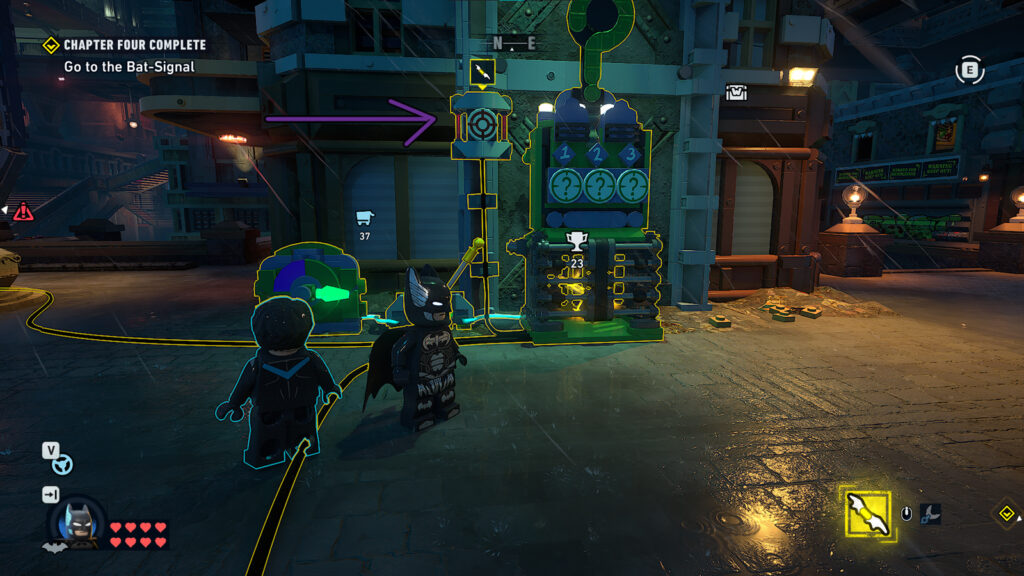
To get the first battery, climb ober to the top green question mark. The battery will be powering it. Take it and go back down to insert it into the lift’s power source. Press the up button until you see another empty power source on your left.
The 2nd battery will be powering the lower question mark. Get it and then insert it into the power source you left the lift at. Use the lift again to reach the next power source next to the locked puzzle piece. Go and take the battery powering the lift. Don’t worry about going back up, as you can use the grapple. Insert the battery into the power source and that should open the location of the cube. You can just jump there and won’t need the lift.
Riddler Puzzle 6

Required Character: Anyone
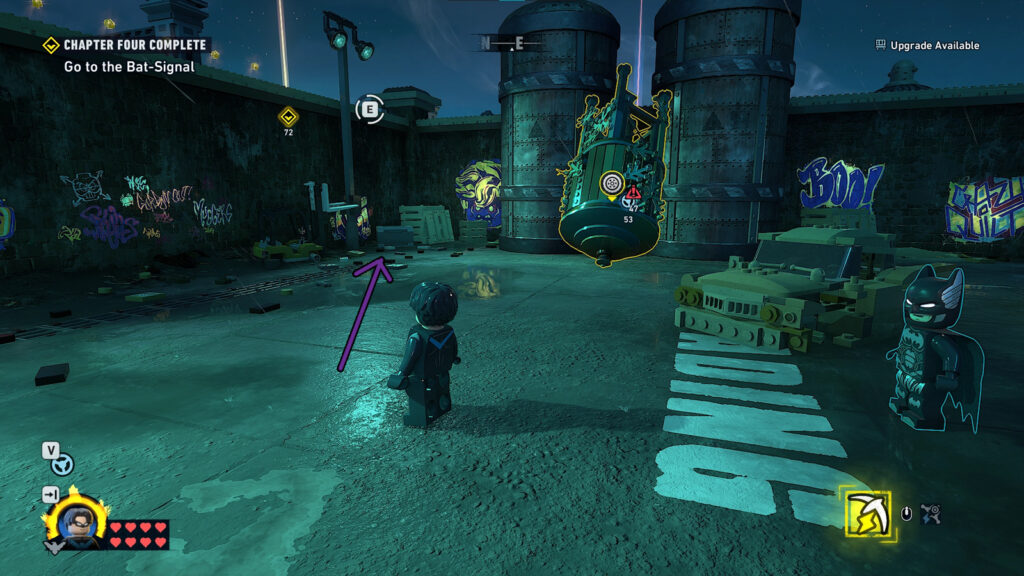
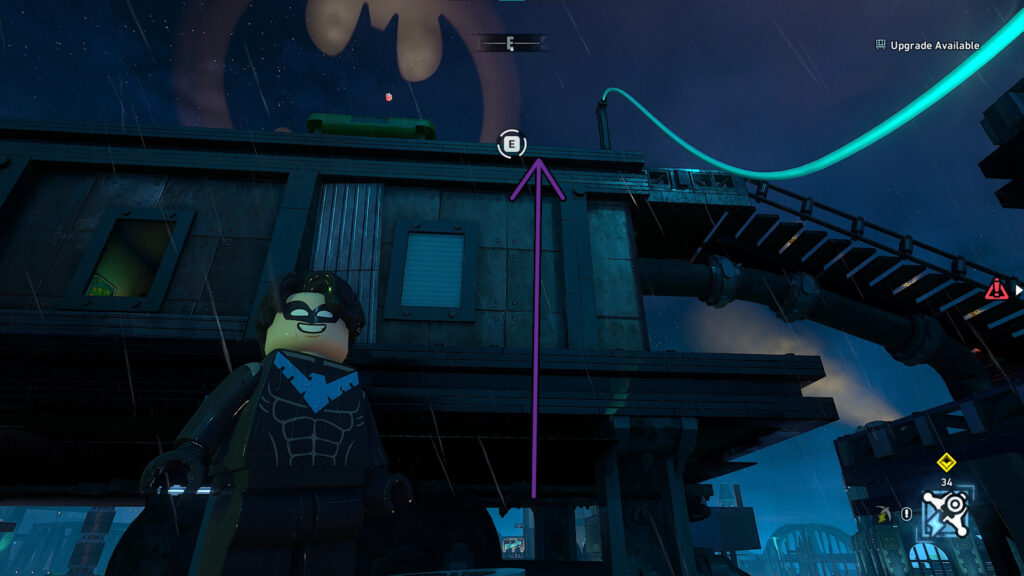
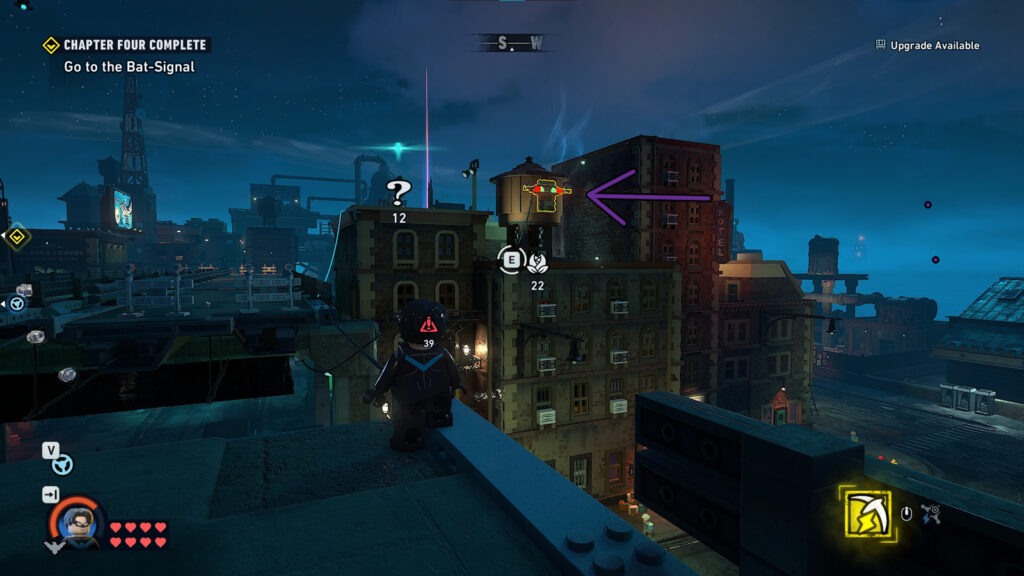
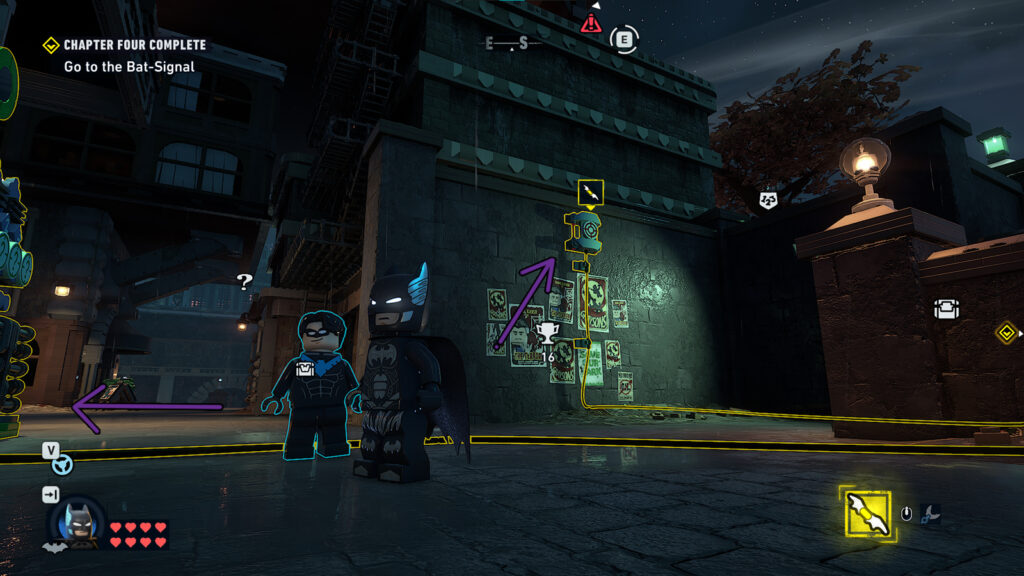
The sixth Riddler cube will be surrounded by an electric security system. In order to disable it, turn around and use the grapple to follow the blue cable.
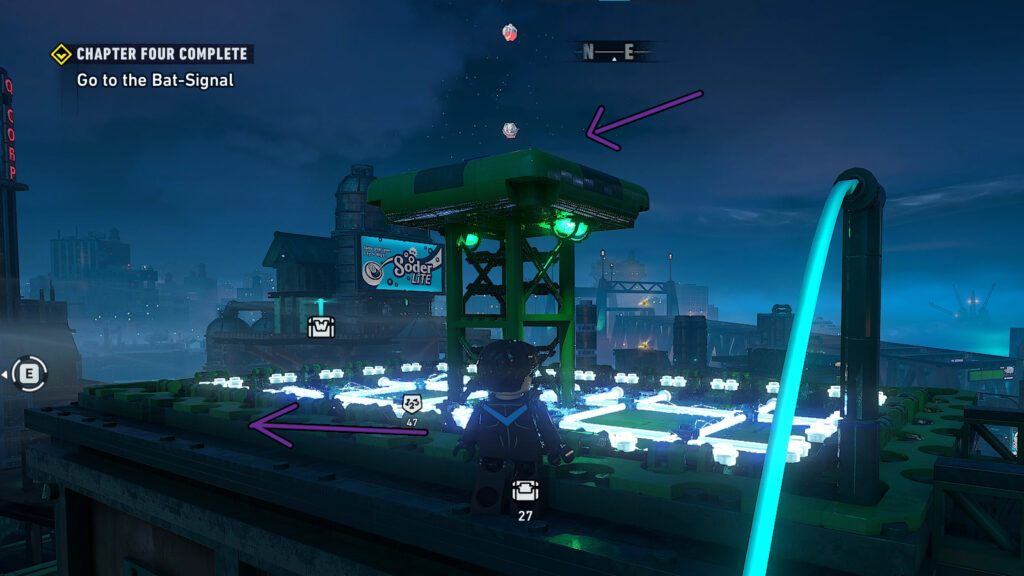
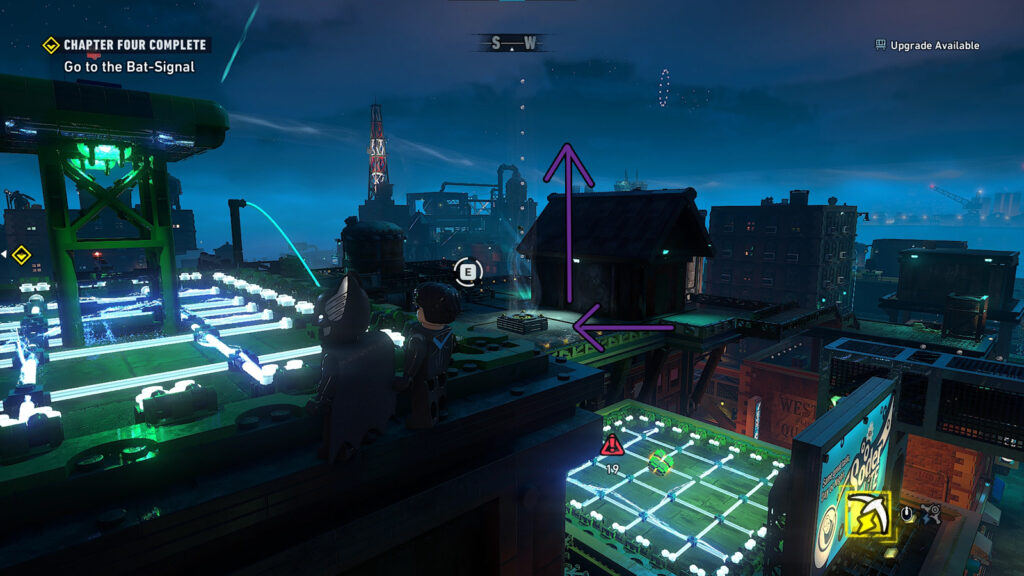
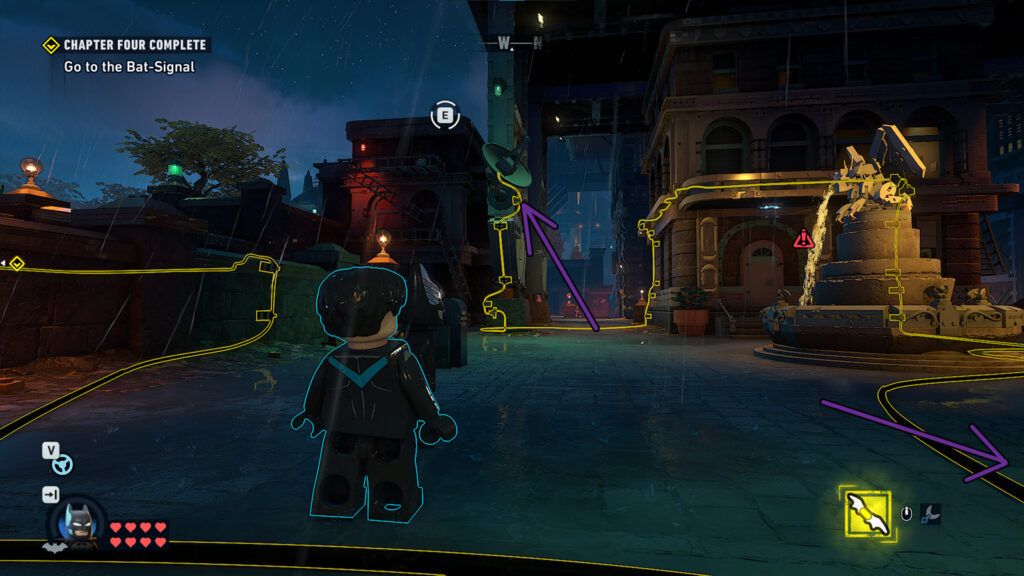
On top of that building, you’ll see a similar set up, but this ti,e with a platform in the middle. On that platfrom you will have a pressure plate that disables the electricity. In order to reach it, you can see a gust of wind further away, on the building next to the Riddler cube. Glider or grapple over.
After reaching the gust of wind, glide up and then over to the pressure plate. After you stand on it, the electricity should be disabled.
Riddler Puzzle 7

Required Character: Batman, Nightwing
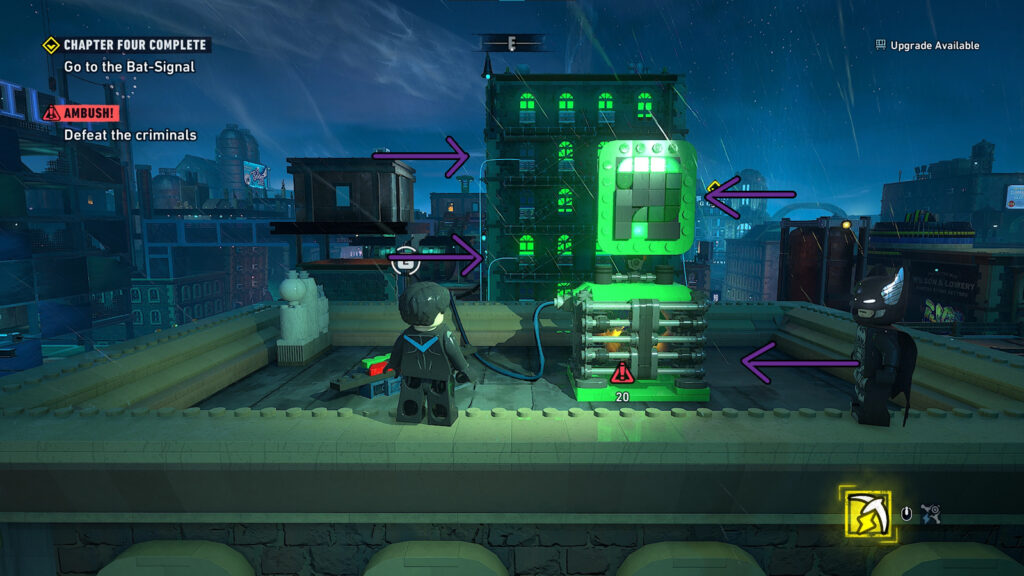
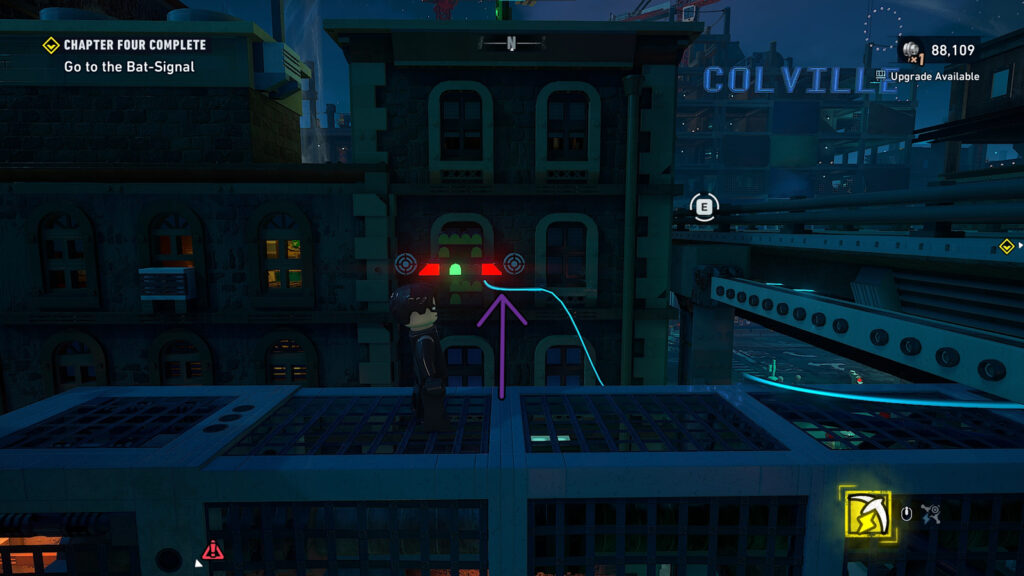
This puzzle might be a bit more confusing, but essentially there is a building behinf the Riddler cube that has green window lights. If you use the special vision detection, you’ll see cables leading from 3 levels of the building. Each one of the cables leads to some lights accompanied by targets. The pad next to the cage should give you a hint of how these should be lit by the end.
If we follow along with the wire leading from the top floor, there will be a target with 4 bulbs, in which only 2 will be lit at a time. For a better vantage point, I used the grapple to reach a broken road opposite the lights. The idea is to hit them until you hear a sound telling you that you are correct.
If we follow the wire connected to the middle floor, we will reach these lights which can have only one bulb lit at a time.
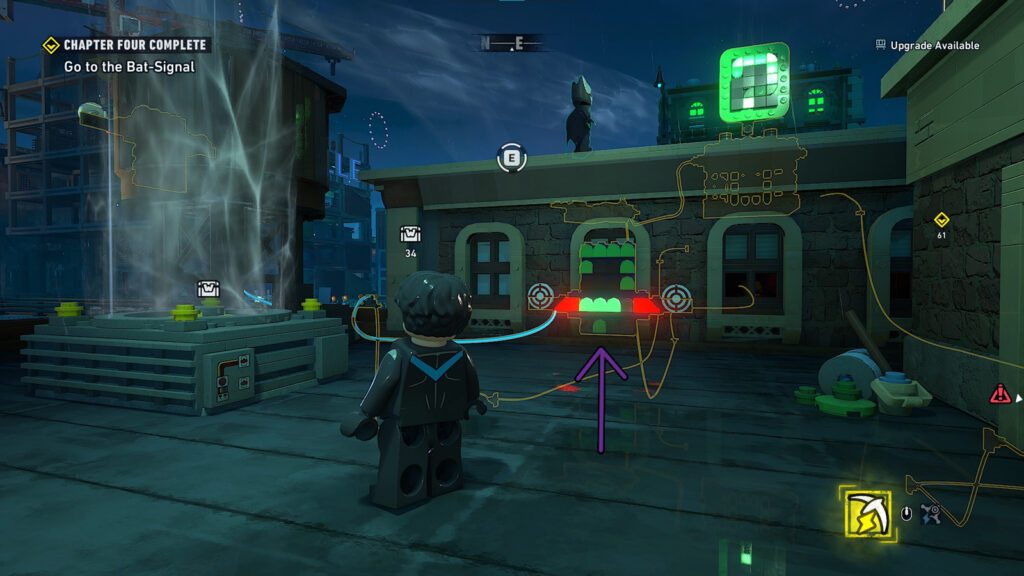
The third and lowest wire lead to a roof slightly ahead of the Riddler cube. In this case, 3 bulbs can be lit at a time.

Keep hitting the targets until the the top one has the 1st and 4th lights on, the middle one only has the 4th light on and the lowest one has the 2nd, 3rd and 4th lights on. The Riddler puzzle should then be complete.
Riddler Puzzle 8
Required Character: Robin, Gordon
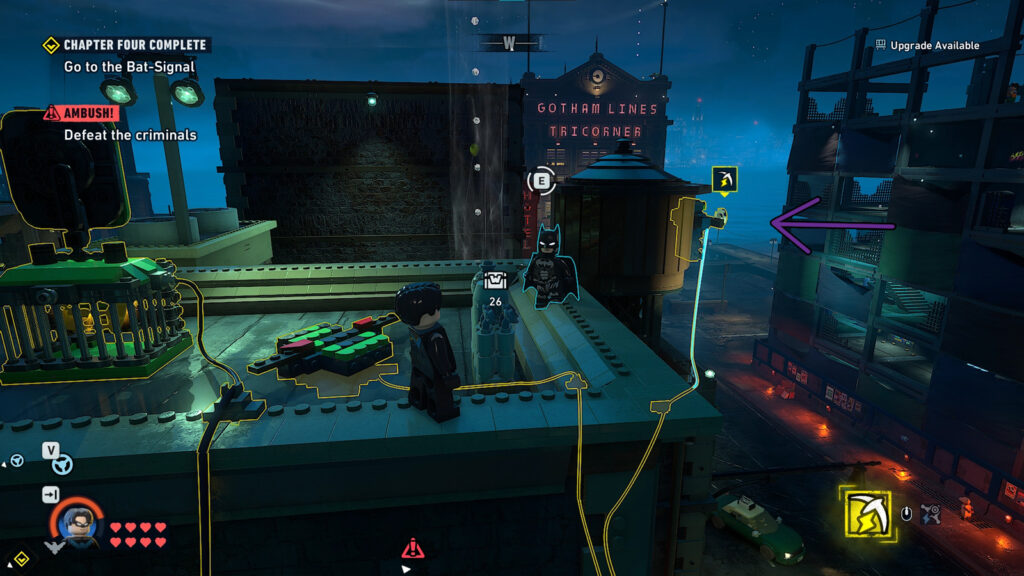
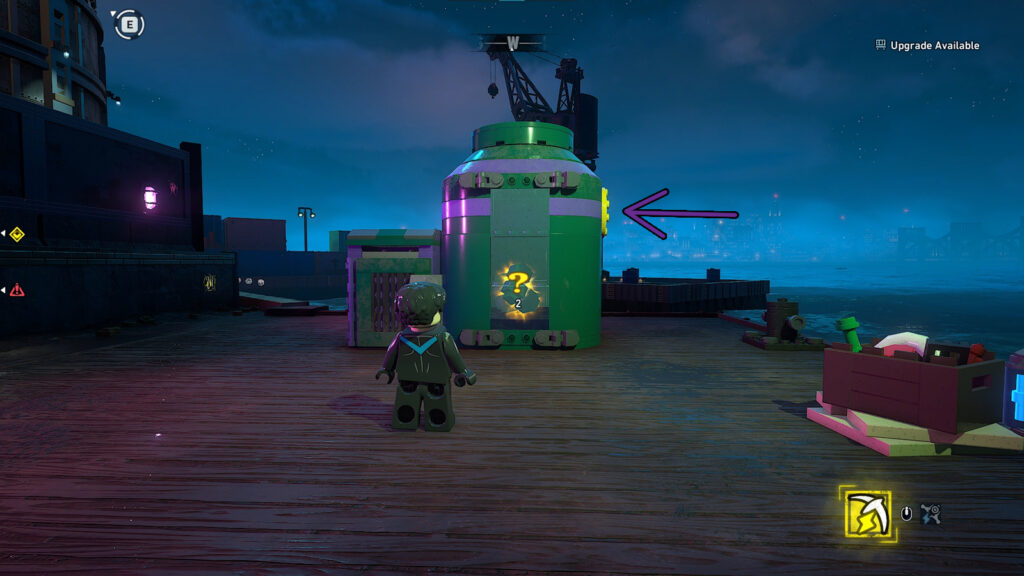
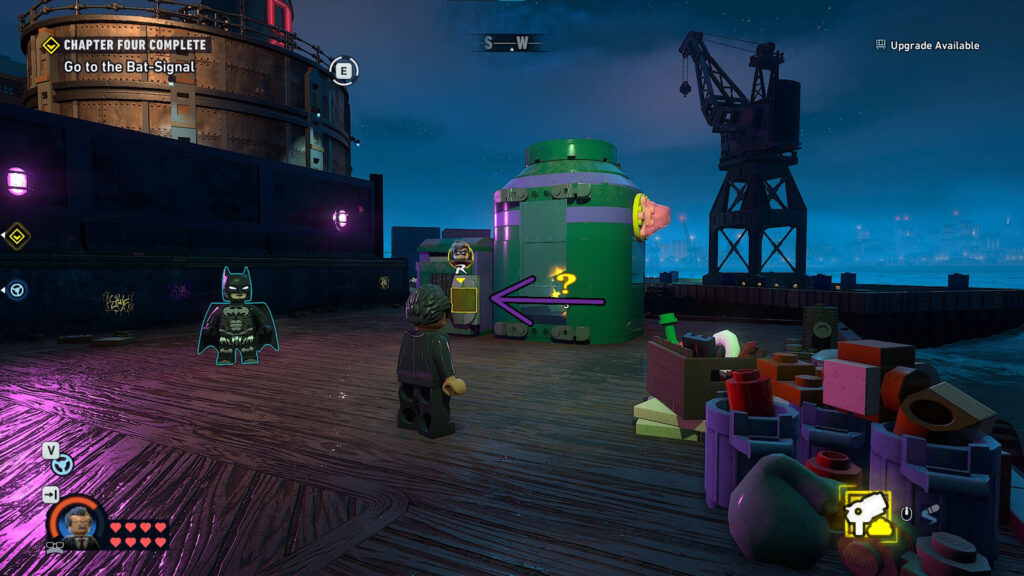
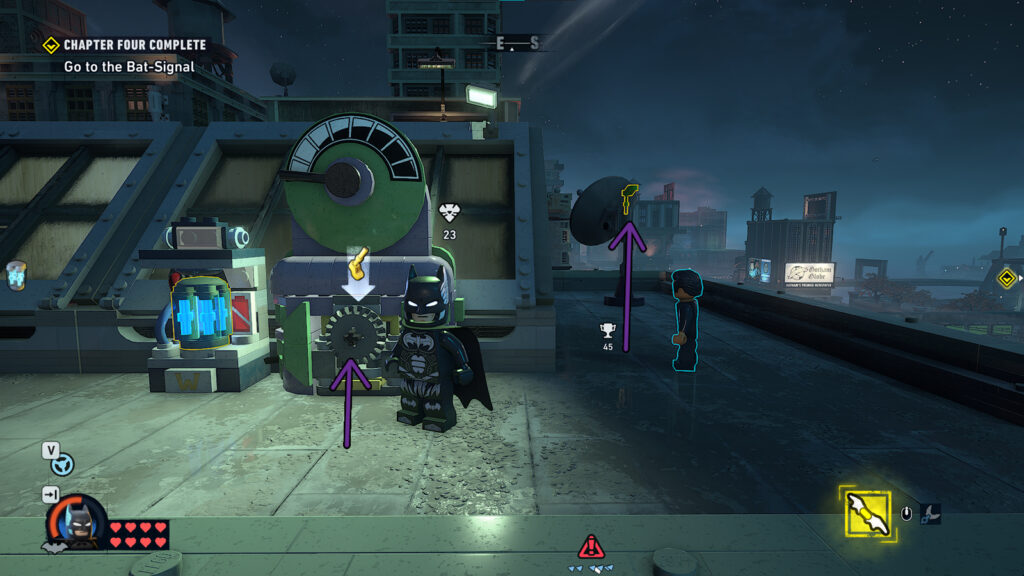
In order to open up the container holding the Riddler cube, first cover up the hole on the right side of the container with Gordon’s foam device. Then, pry open the door on the left with Robin. There are some objects in front of the container which can be broken. Do it to reveal a battery.
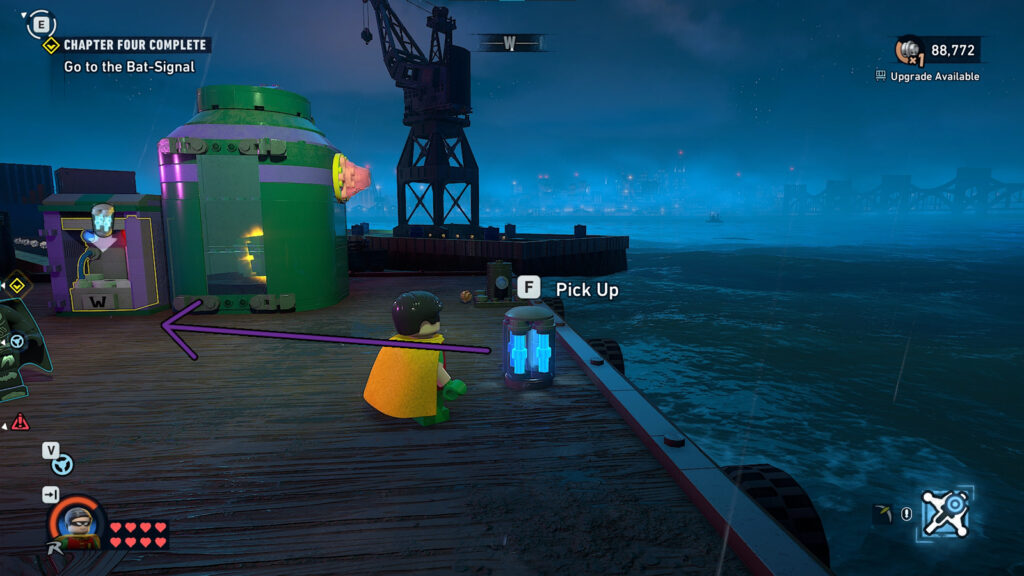
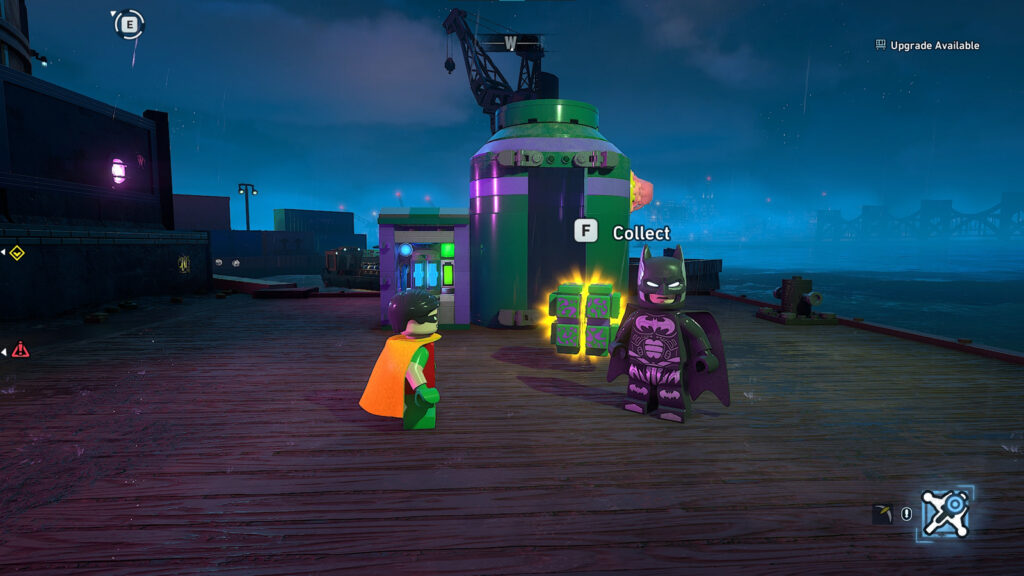
Insert the battery in the opening you got after Robin broke the door and the Puzzle pieve should jump out from the top of the container onto the floor.
Riddler Puzzle 9

Required Character: Anyone.
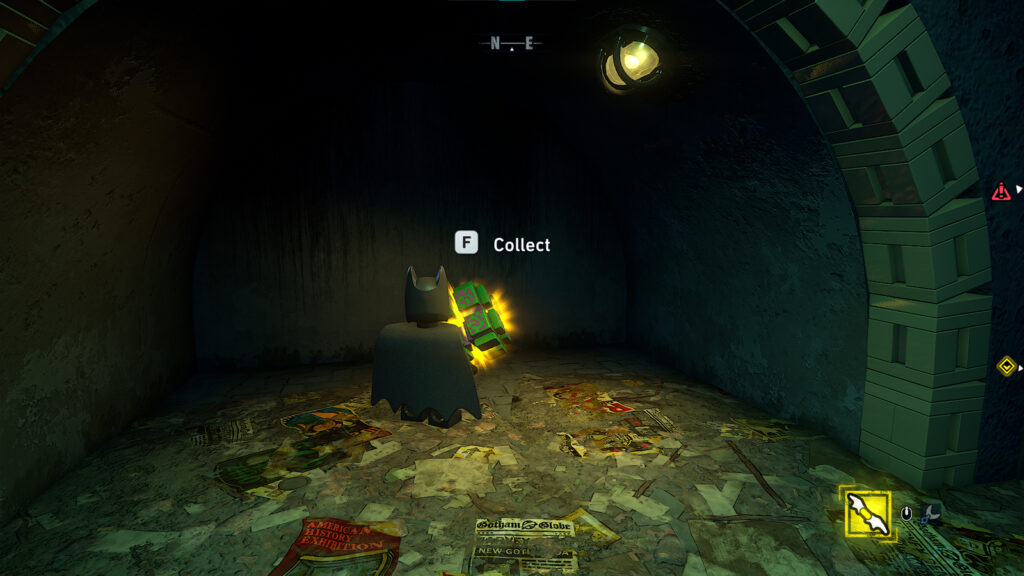
The last Riddler cube is inside a sewer. To get to it, you will have to go through the building. Inside there is a green platform. You can only go through the platform by going to the roof of the building. You will first have to break things around so you can build an air current.
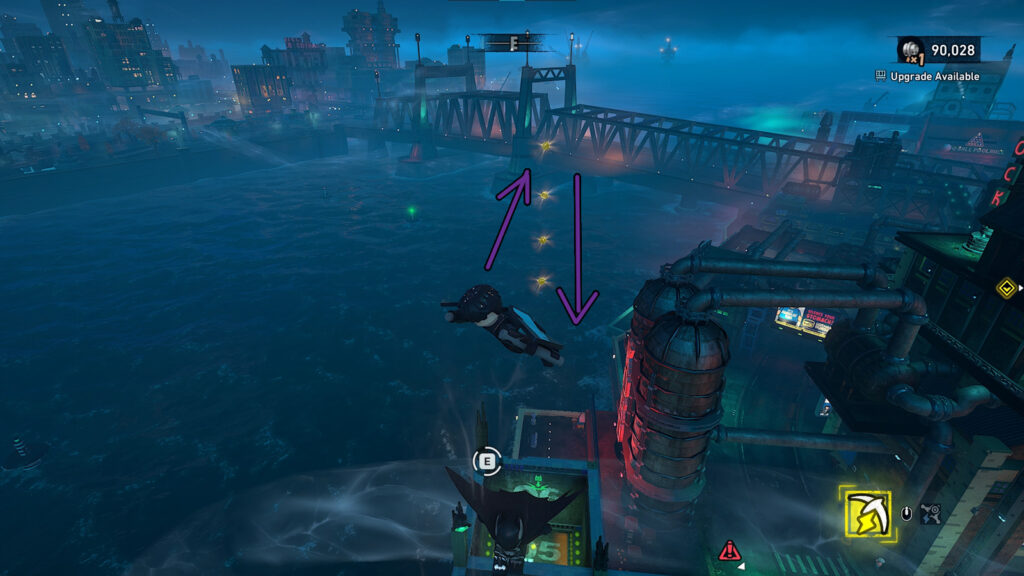
Get to the top of the current then drop off on top of the gold coins trailing down. This will cause the platform to open up and you’ll end up at the bottom of the sewer.
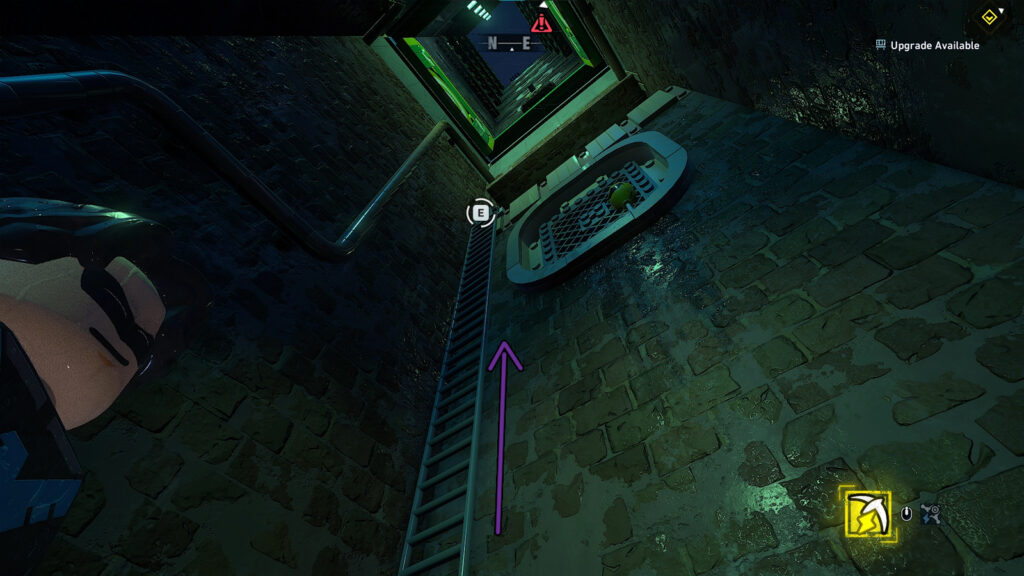
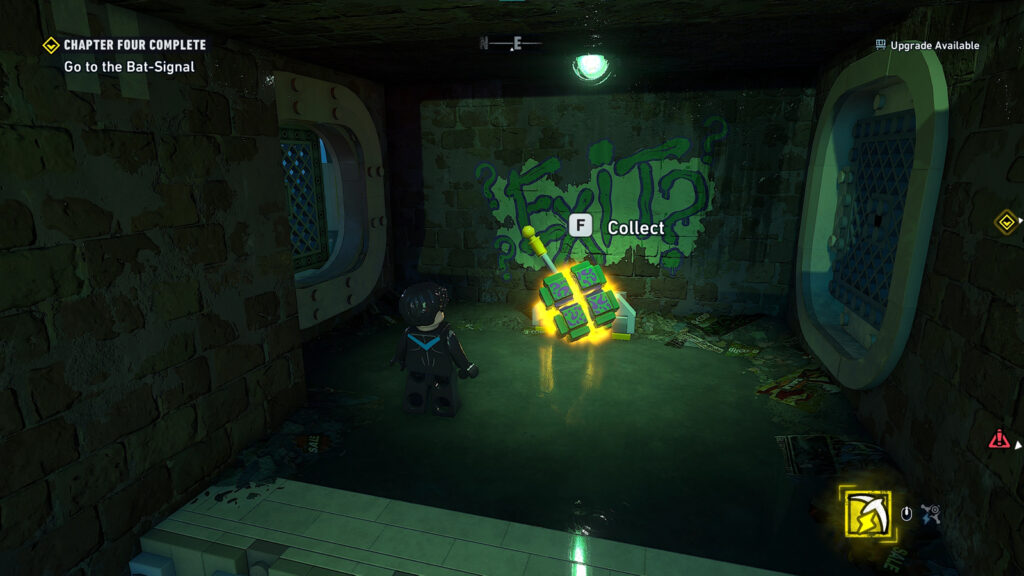
Climb the ladder and at the top you will find the Riddler cube.
Old Gotham South
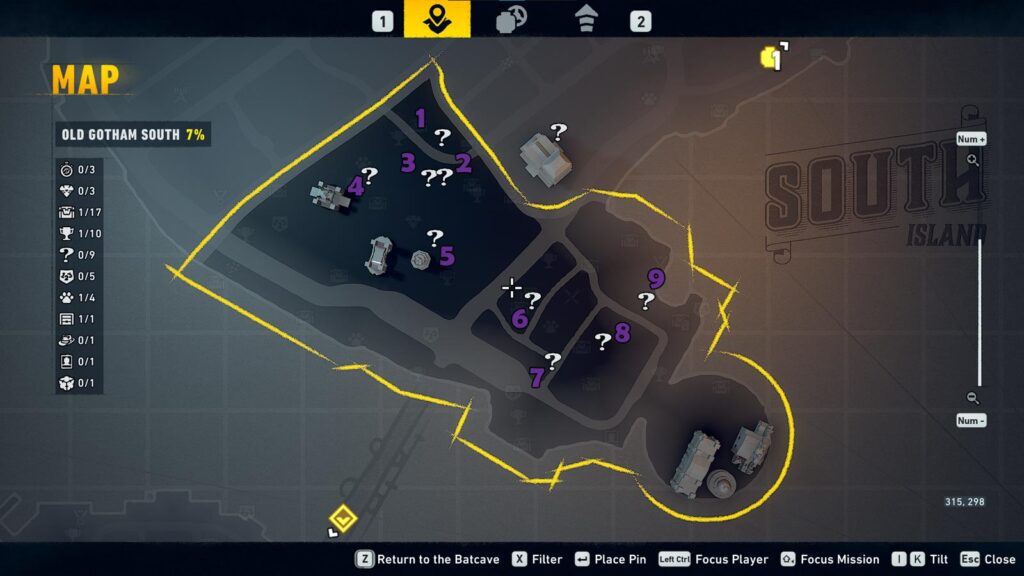
Once again, there are 9 Riddler Puzzles in this zone.
Riddler Puzzle 1
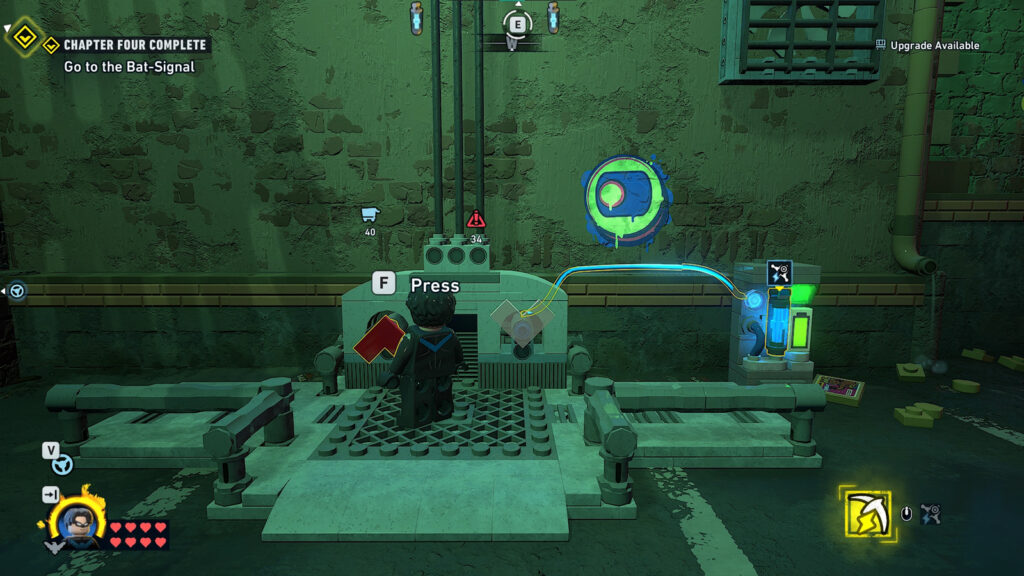
The Riddler cube will be on top of a building. To open it, you need to fill 4 energy sources by following the cables coming out of the cage.
Behind the wall on the right of the puzzle piece, you’ll find the 1st energy source that needs a battery. If you continue on that path and turn left you’ll find two of them: big and small. Take the 4-cylinder one and place it in the power source.
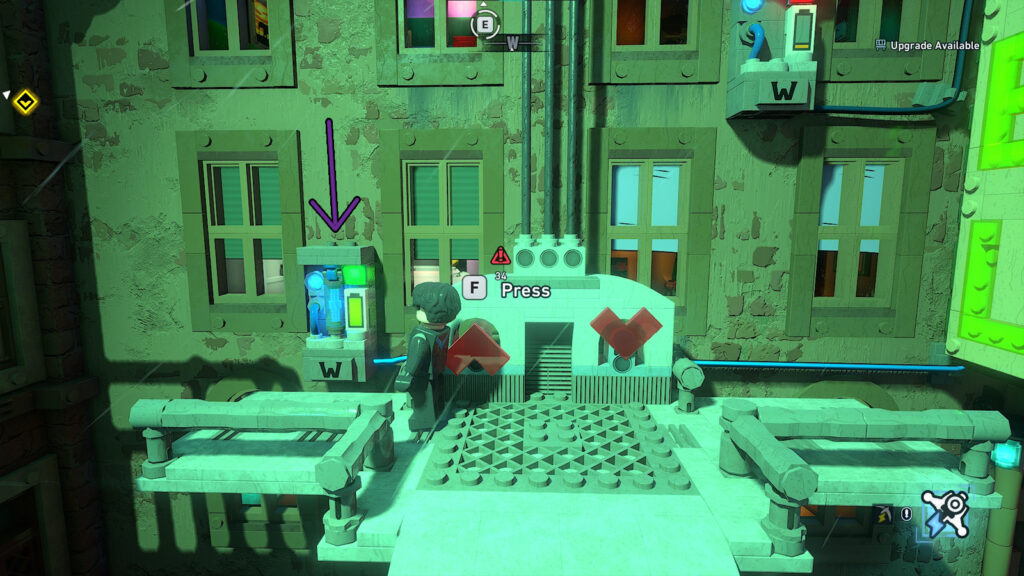
Takre the smaller battery now and follow the left wire wire which will take you to a lower roof next to the initial building. Since you won’t be able to reach and place the battery inside, you’ll need nightwing to use his string ability. Drop the battery first, then connect it to the power source with Nightwing.

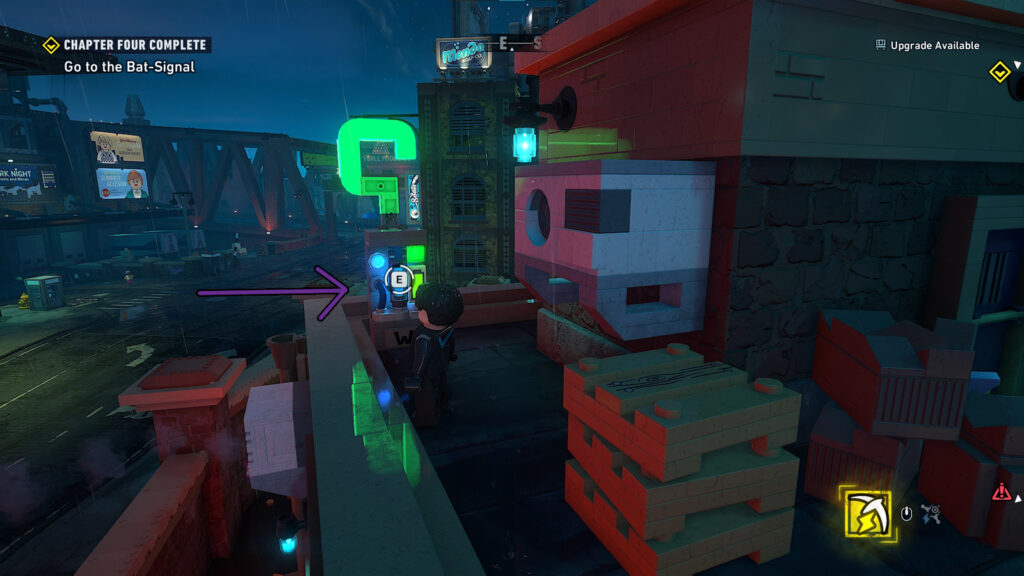
For the next step, you will need the battery that is already placed near the puzzle piece. take it, turn around and you will see a power source for a lift. Place the battery inside and go down the lift to find the next power source. Before you do that, grab the last small battery from behind the puzzle. It will be on the next building over. If you’re finding it hard to see, go to a higher vantage point.
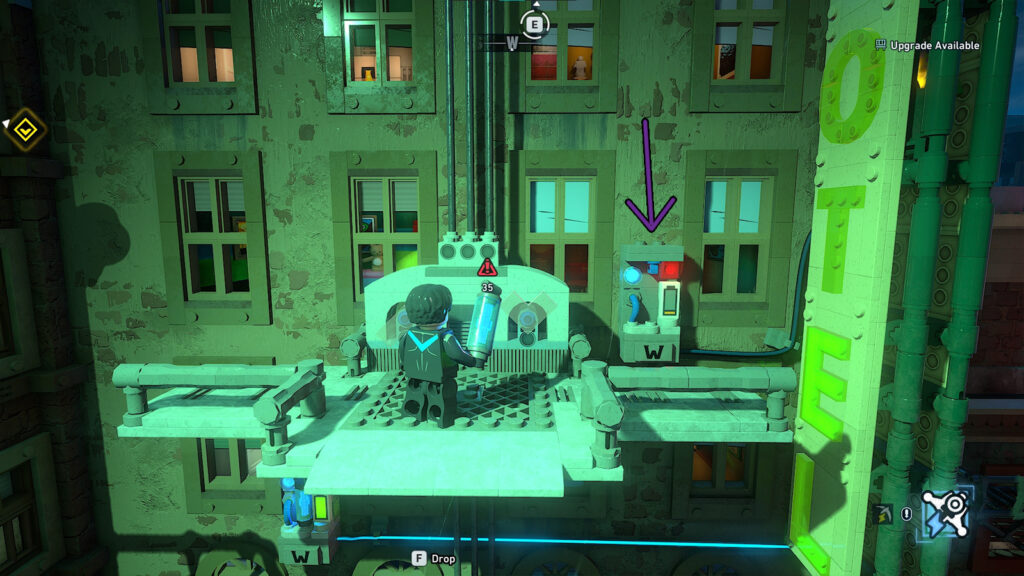
Take it, go down the lift and place it in the power source. Return, take the battery powering the lift and return it to its original position near the puzzle piece, which will open it up.
Riddler Puzzle 2
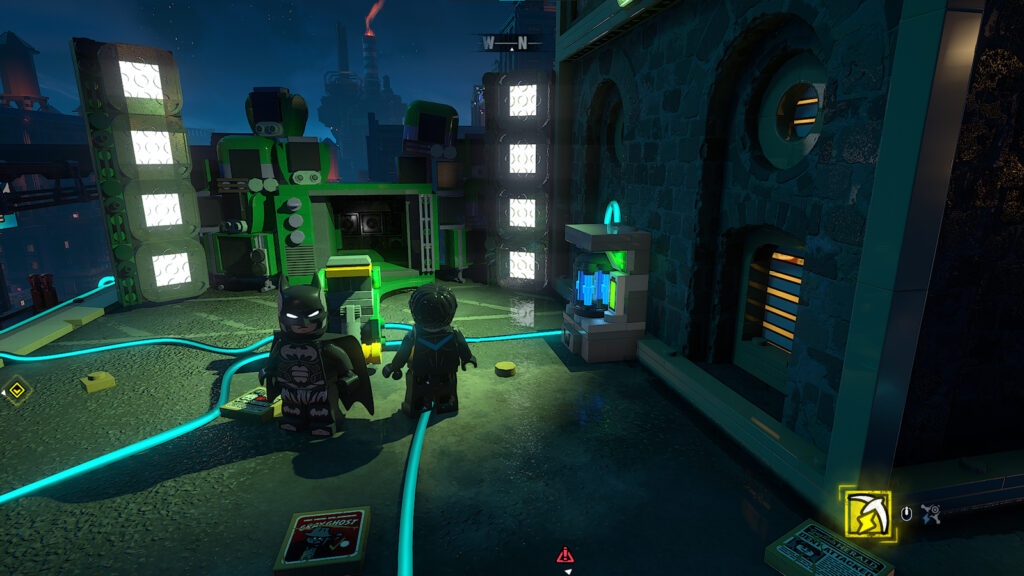
This puzzle piece will be blocked by some flames. With Batman, use the UV vision. Follow along the yellow pipe and it will take you near a wall.

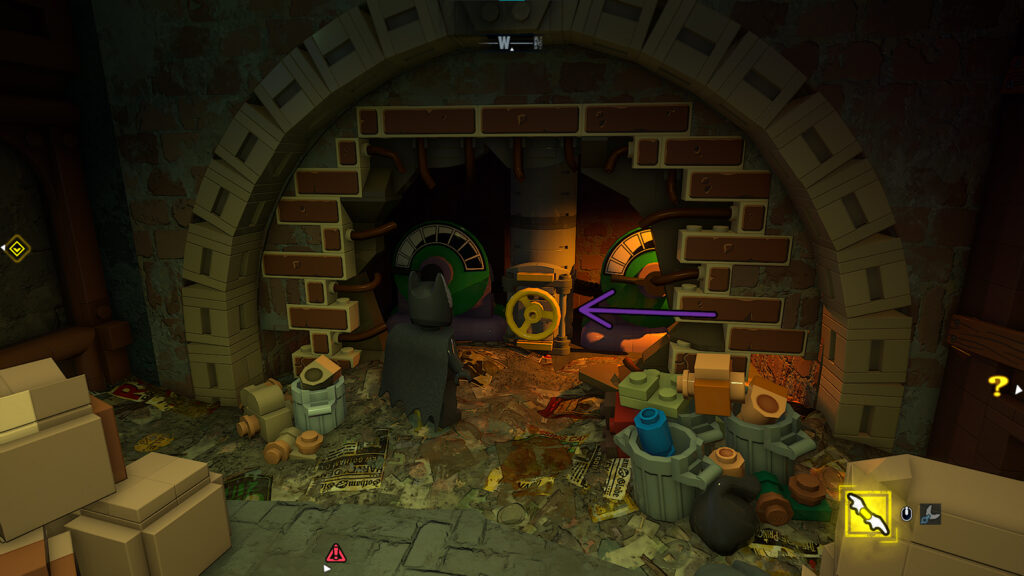
Use the Spray Explosive to break the wall, and behind it there will be a wheel that will let you turn off the heat.
Go back to the original position to grab the Riddler cube.
Riddler Puzzle 3
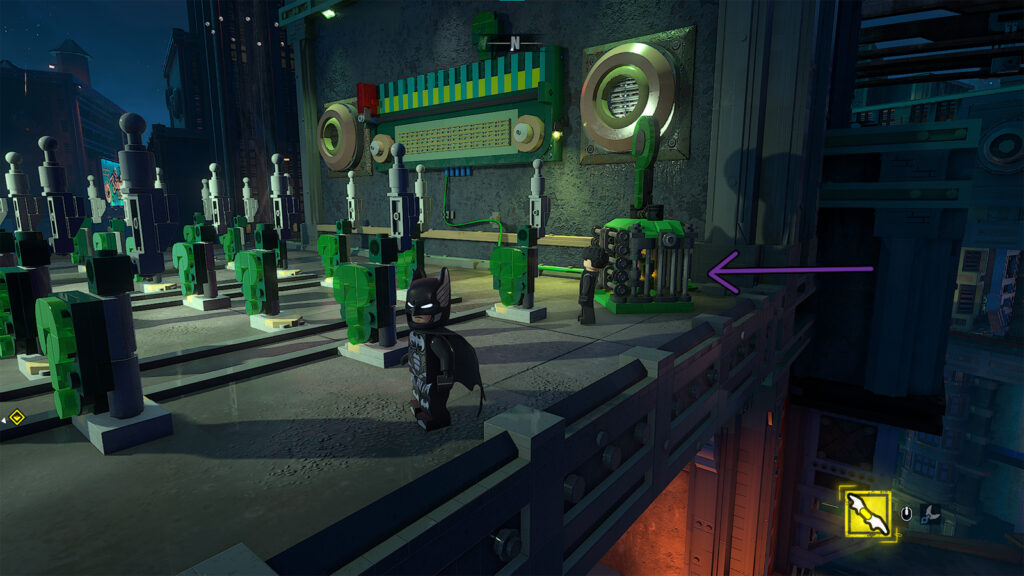
The next Riddle puzzle is on a roof where the cage is near rows of question marks. If you mov away from the cube, you will see that there are 3 containers you can push along 3 lines.
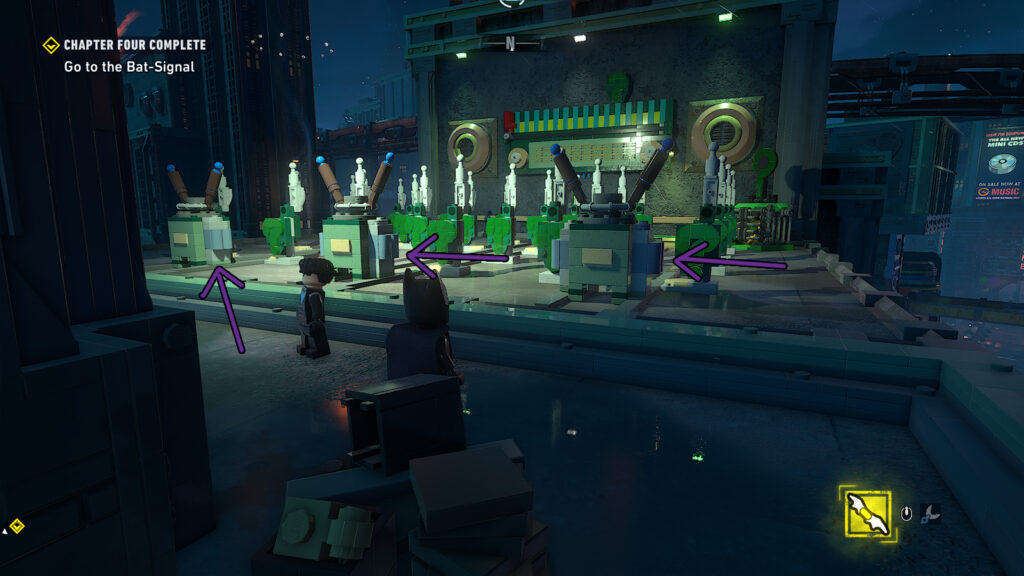
Depending on how far you push them, the red line on the wall moves more to the right or left.
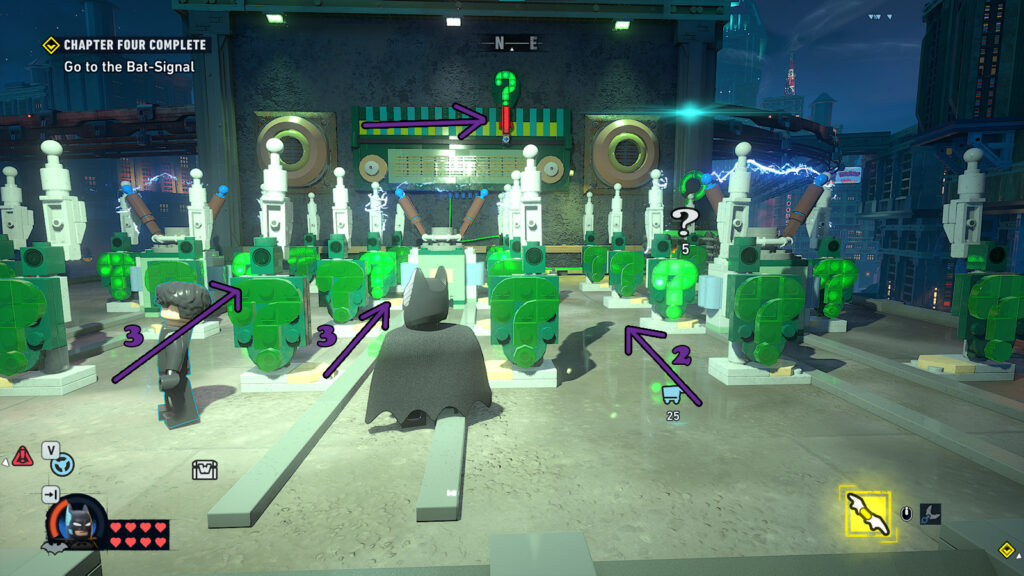
The idea is to move all the containers until the red line reaches the green question mark, and not beyond it. Move the container on the right until the 2nd set of question marks, the middle one until the 3rd, and the left one until the 3rd.
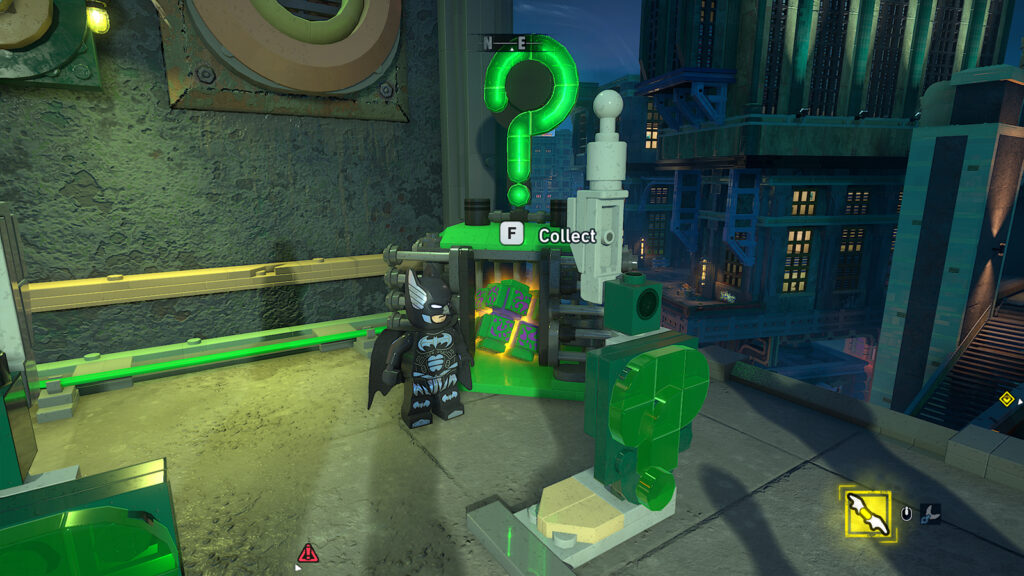
Go back to the wall and collect the Riddler cube.
Riddler Puzzle 4
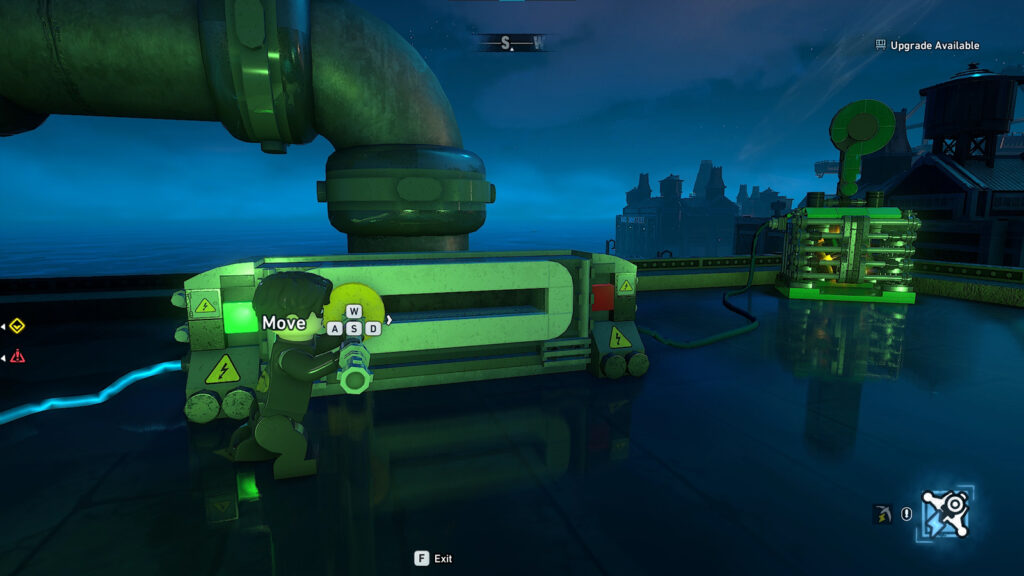
The next Riddler puzzle will be on another building roof. As you can see, it needs to be powered by 2 energy sources, however even if you have the batteries, the current won’t flow through. So, the first thing to do is to make the current flow. Cover up the water flow with Gordon’s foam device.
Take the battery from below where the water was and bring it to the power source further along. You will need a handle to turn on the power though, which will be on the antenna behind the corner. Break the antenna, take the handle, insert it and pull it until the indicator reaches the other end. The device will charge the battery which you can then take to the cube cage.
Insert the battery in one of the power sources. Take the other battery back to the charger first, then insert it in the second opening. That should open the puzzle.
Riddler Puzzle 5
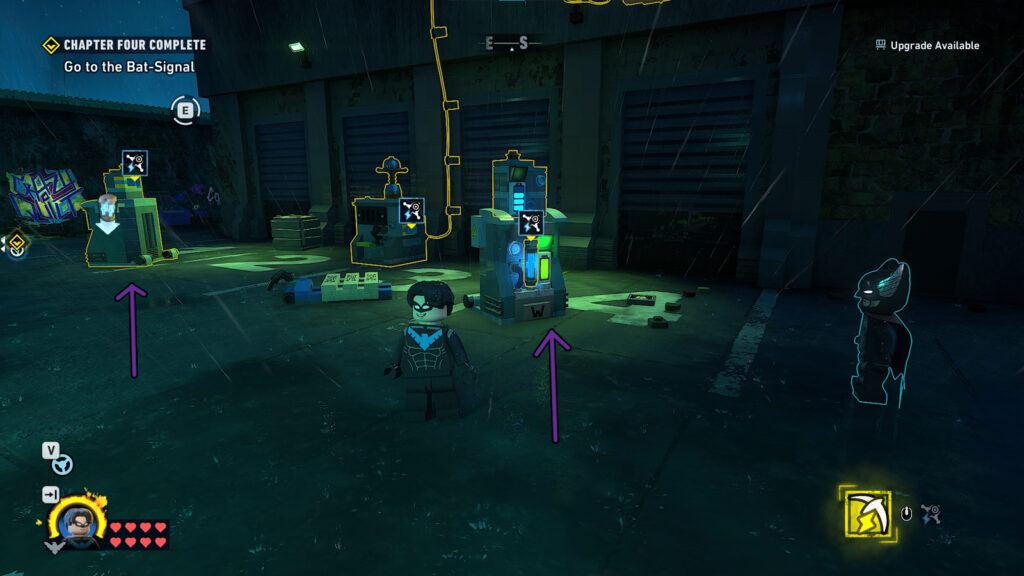
For the 5th Riddler Puzzle, you will be on ground level. There will a timer on the left, a lever, and the Riddler cube on the right. You will have to turn the lever to start the puzzle.
There will be 3 targets you will need to hit with the Batarang before the timer runs out. It doesn’t matter which order you hit them in (I tried). The first one is right above the lever. The 2nd one is on the wall on the right side of the mechanism. I’ve also marked where it is in relation to the puzzle piece, just in case.
The third one is left of the mechanism, behind a radio antenna. Hit it in time and the cage with the Riddler cube will open.
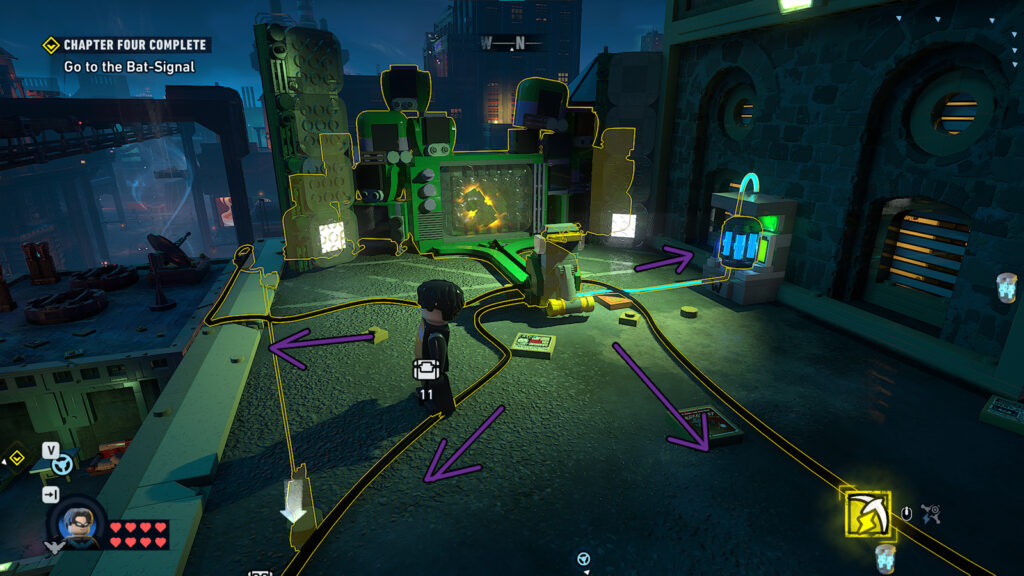
Riddler Puzzle 6
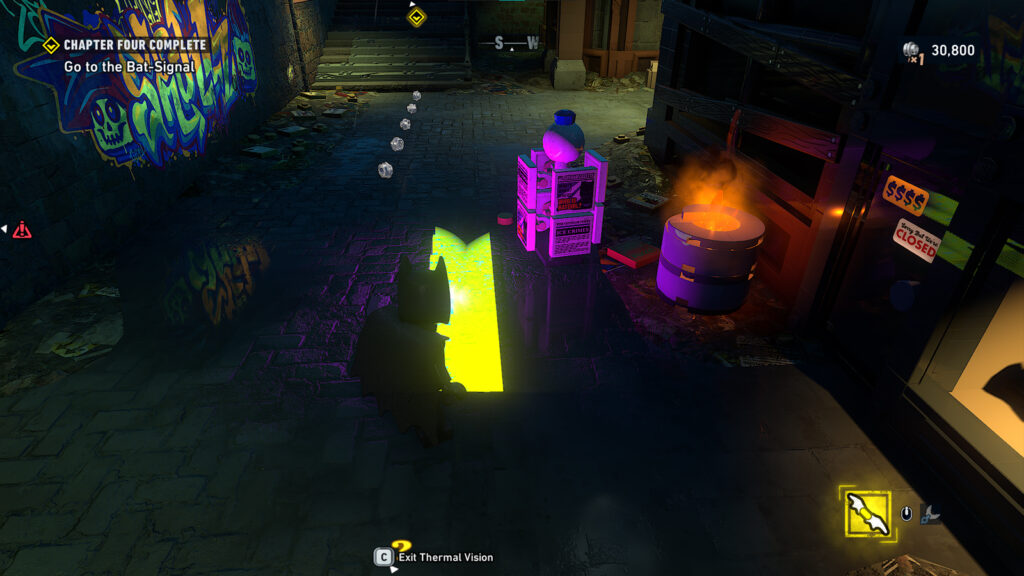
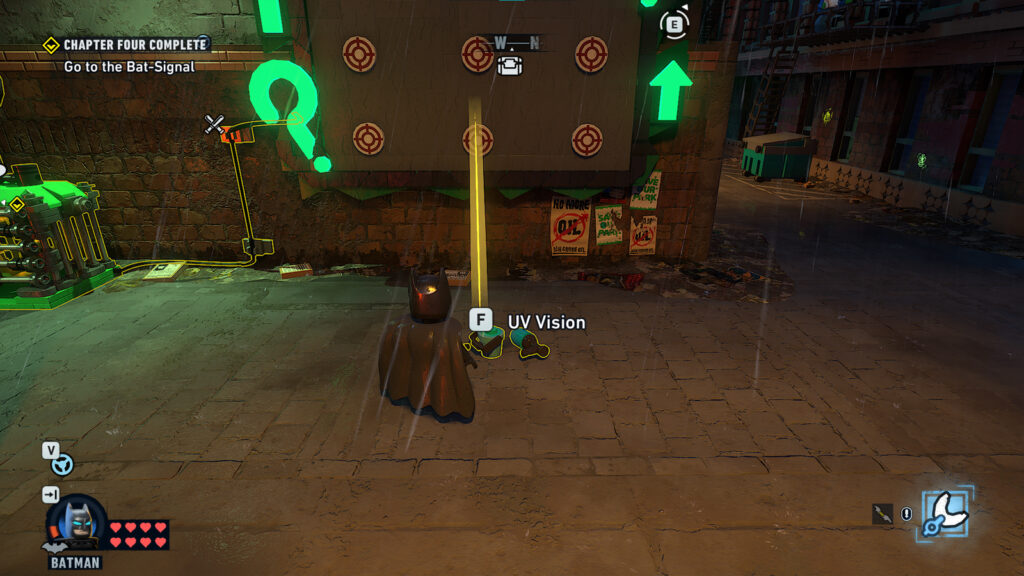
This puzzle isn’t as complicated as it seems once you understand what you need to do so I’ll try to simplify it. Essentially, you have to use the UV vision with Bruce, which will take you to the wall next to the Riddler Cube. If you look up at the black circles, you will see numbers on each one.
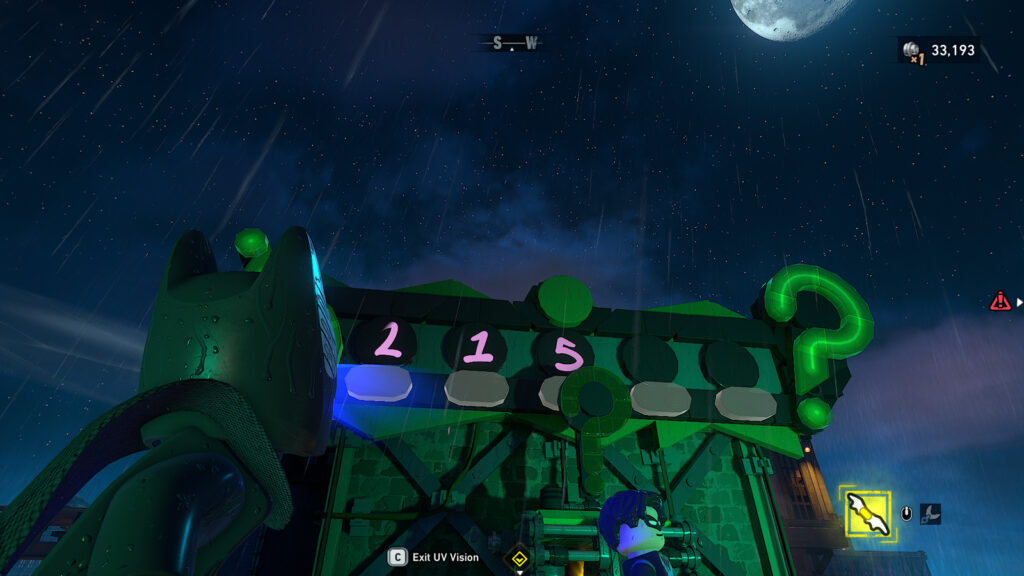
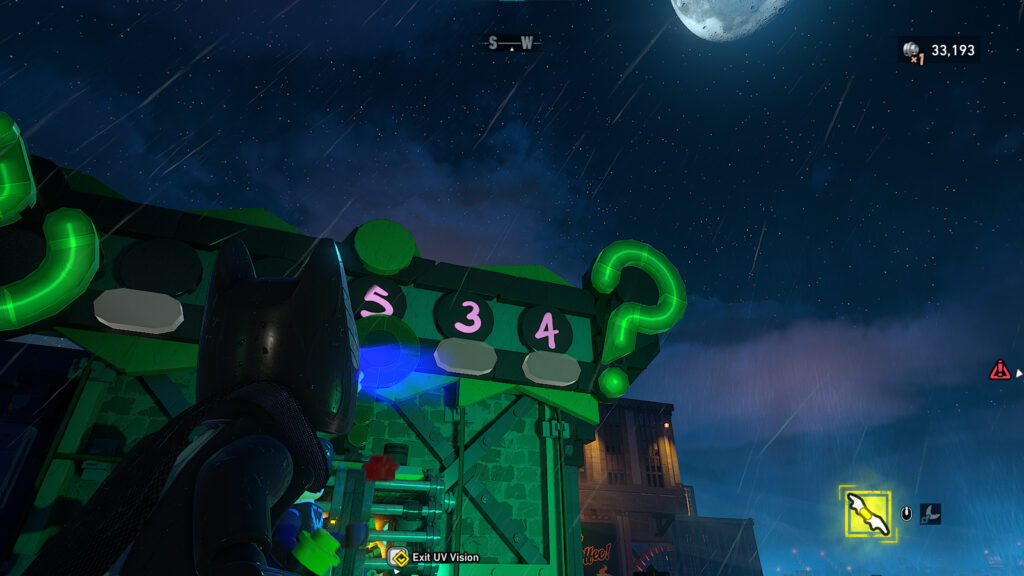
The order of the numbers is as follows: 2, 1, 5, 3, 4.
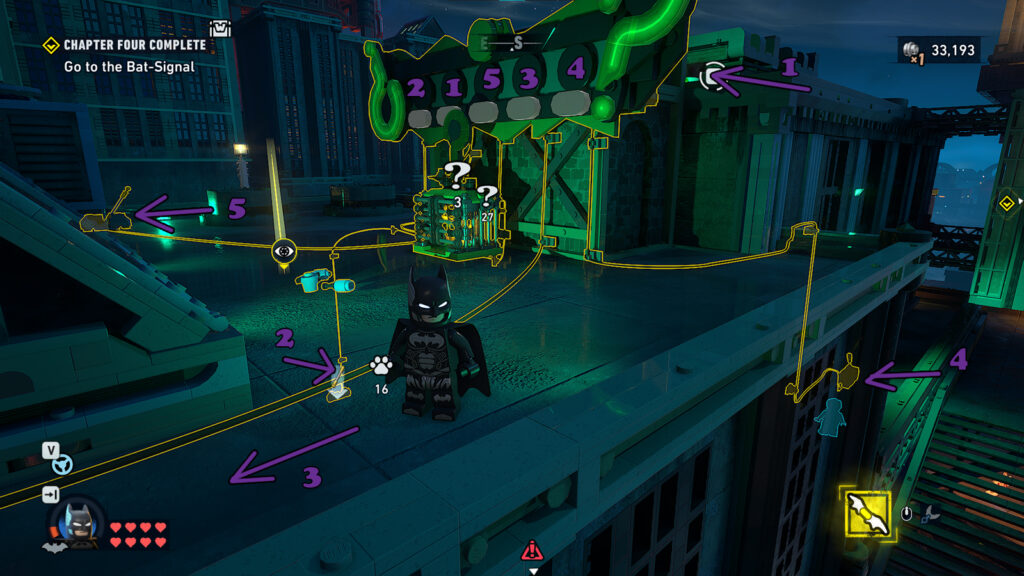
What you need to do is turn 5 levers in the order revealed by the numbers in UV light. I put arrows indicating which ones you should turn in which order and where they are, but I’ll also go through them one by one.
The first one is right behind the big question sign with the numbers. Climb up there and foam up the fire with Gordon. Then, simply turn the lever.
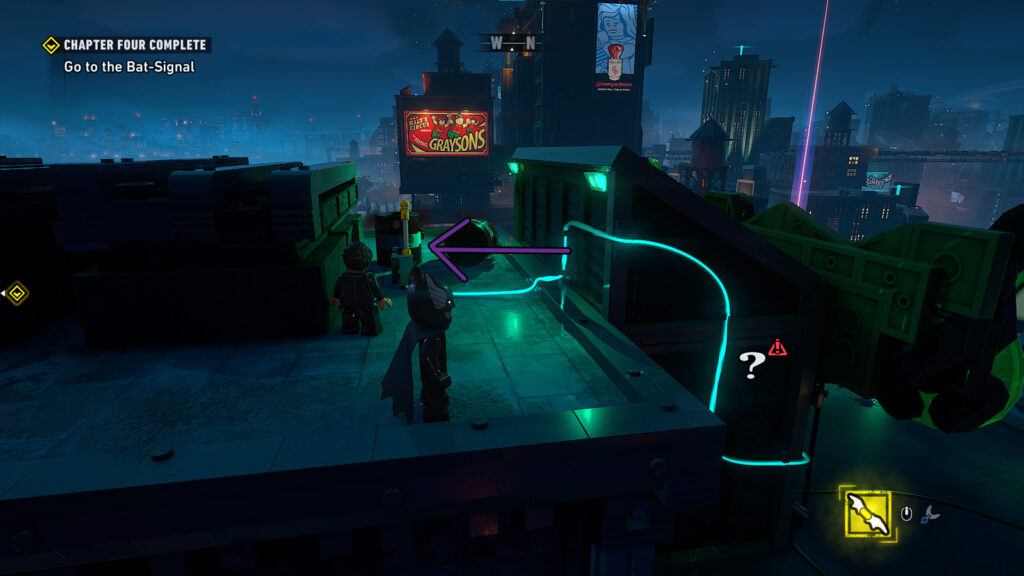
For the 2nd lever, turn left from the original position in fron of the sign, then down. The lever will be tied to a spider web, which you can break with any aiming gadget. Pick it up, insert it in the required space, turn the lever, then go back up to the sign.
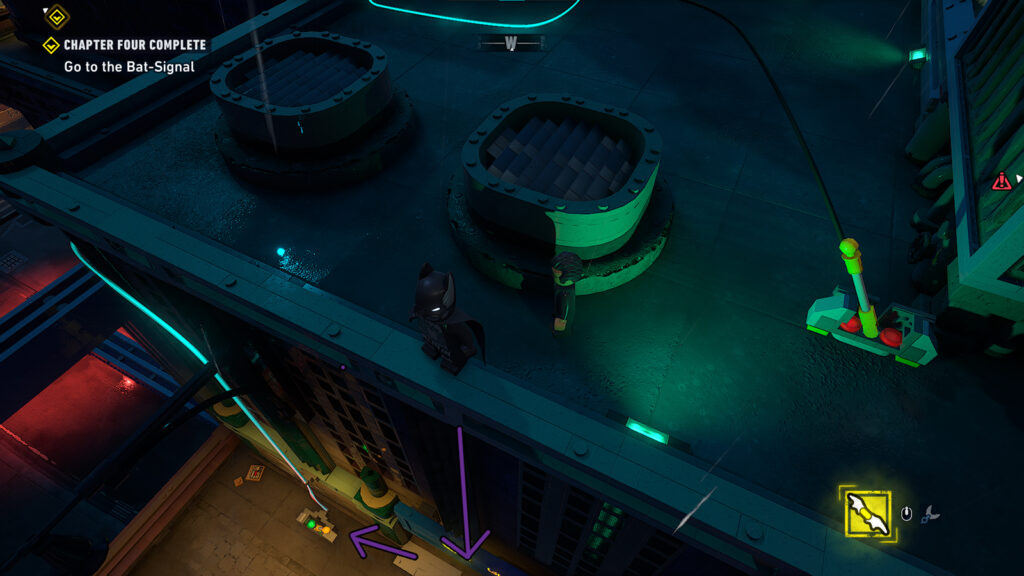
The third lever is next to the triangle roof opposite the question mark sign, on the right side.
4th lever you can find by following the rightmost cable to the right. Go down and just turn it and it should turn on.
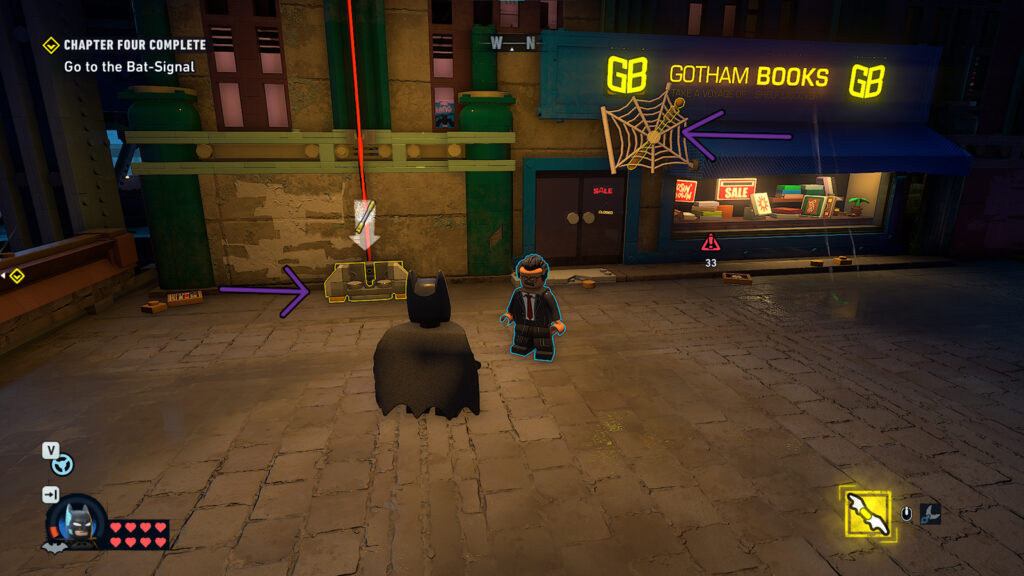
The last lever is in the direction of 2nd lever, just dont go fown. It will be left of the sign, next to the grated wall. Turn it and then the puzzle will be done, with the Riddler Cube now free.
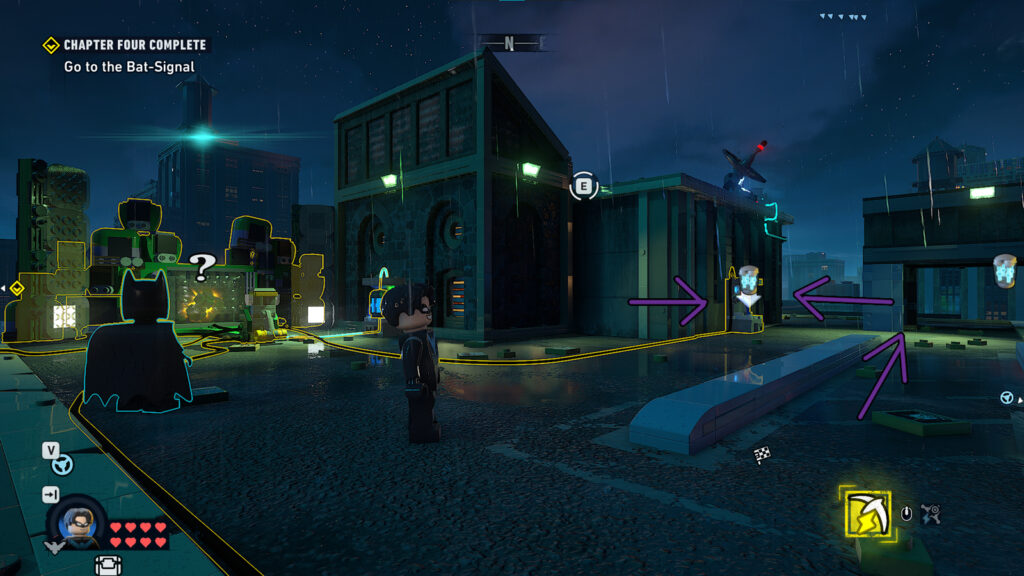
Riddler Puzzle 7
Required Character: Gordon
The puzzle will be right next to the Riddler cube, on the wall on top of the roof of a building.

If you turn left, you will see a symbol on the wall next to a burger ad. You have to stop the rotating pieces with Gordon to replicate the symbol. You’ll know you’ve got it when they turn green. If you happen to get it wrong, just break the foam with the Batarang.
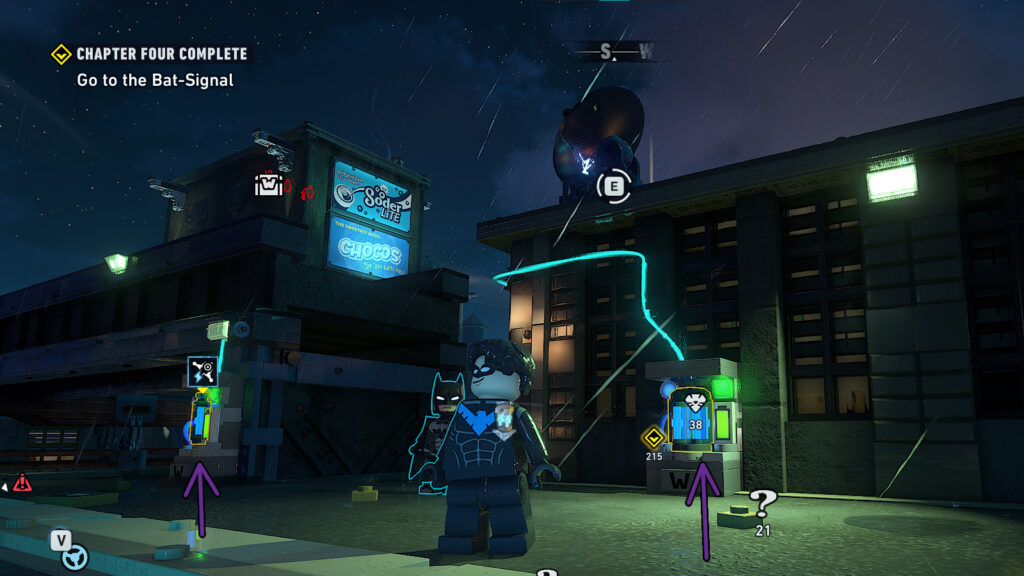
Riddler Puzzle 8
Required Characters: Nightwing
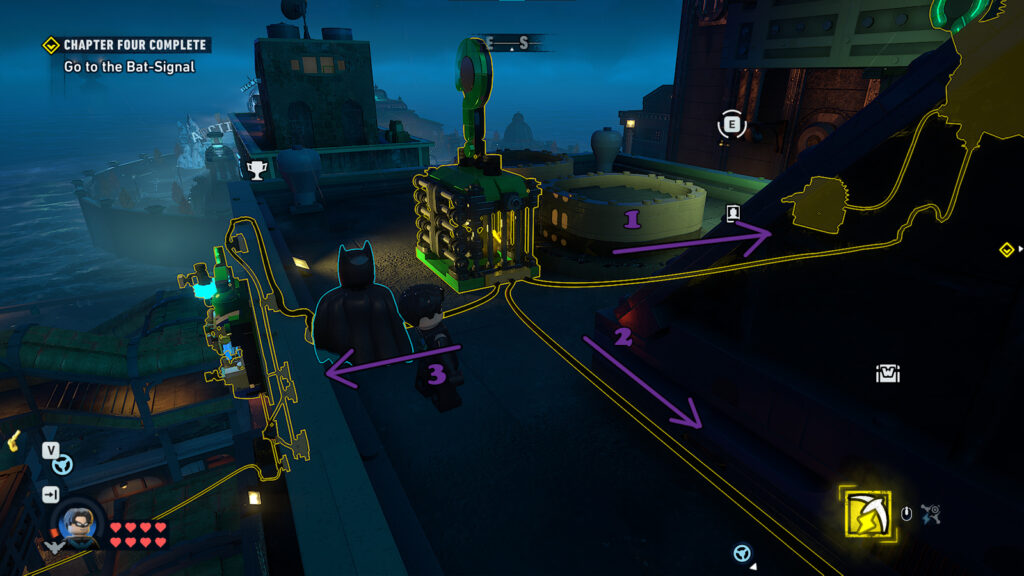
For this puzzle, similar to ones before, you will have to follow along 3 power cords. I numbered them in the order I turned the power on, so you know as you follow along.
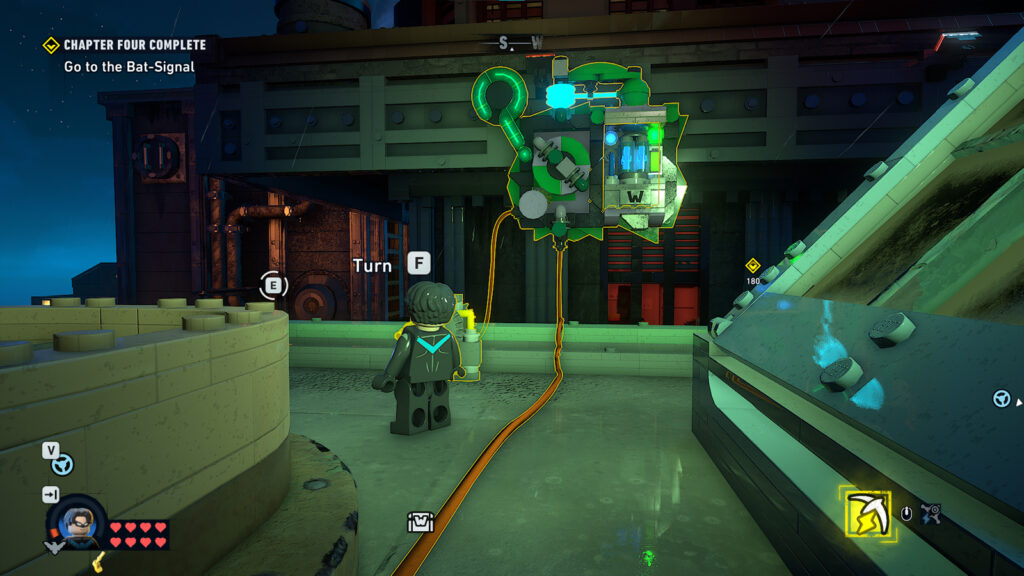
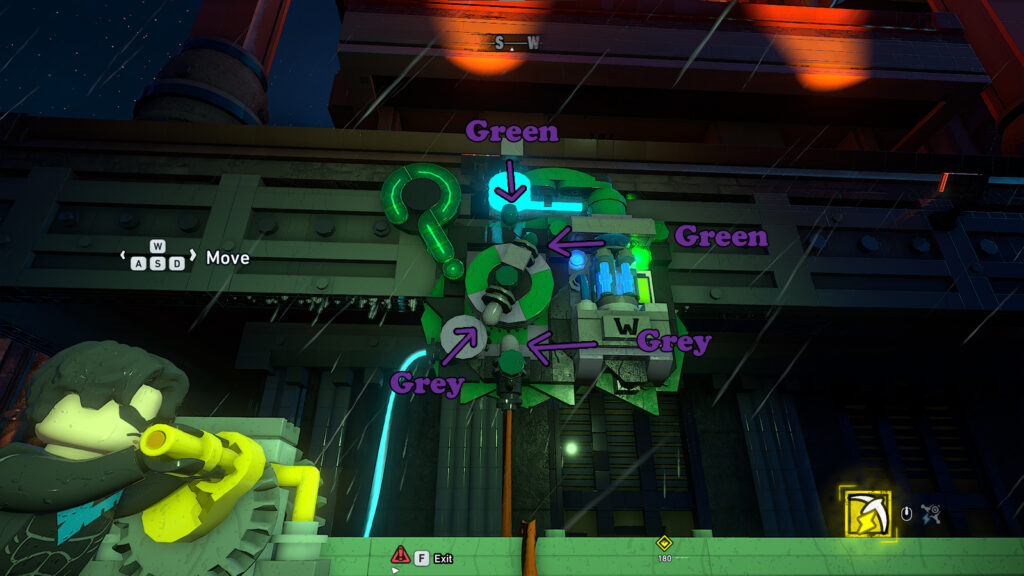
For the first power source, you simply have to turn the handle next to the panel. Make sure the green end of the indicator that moves meets the green point at the top, whereas the grey end should be pointing towards the grey point on the panel. I added markers on the pictures in case it’s not clear. When the end are directly in place, let go of the handle, and the power source will activate.

Follow the cable originally marked with the number 2 (middle cable).
You will have to connect the ends of the two devices on both buildings. That will help connect the power source to the cable leading to the Riddler Cube. Repeat what you did in the first step and connect the green ends andf the grey ends with each other. Let go and the electricity should start.
For the last power source, turn left and follow the 3rd power cable. Glide or use the grapple to reach the other side of the building.
First, break the boxes right of where you need to insert the handle. There you will find the stick you need for the mechanism. Repeat step 1 and 2 and match the greens and the greys and the puzzle should open.
Riddler Puzzle 9
Required Character: Batman
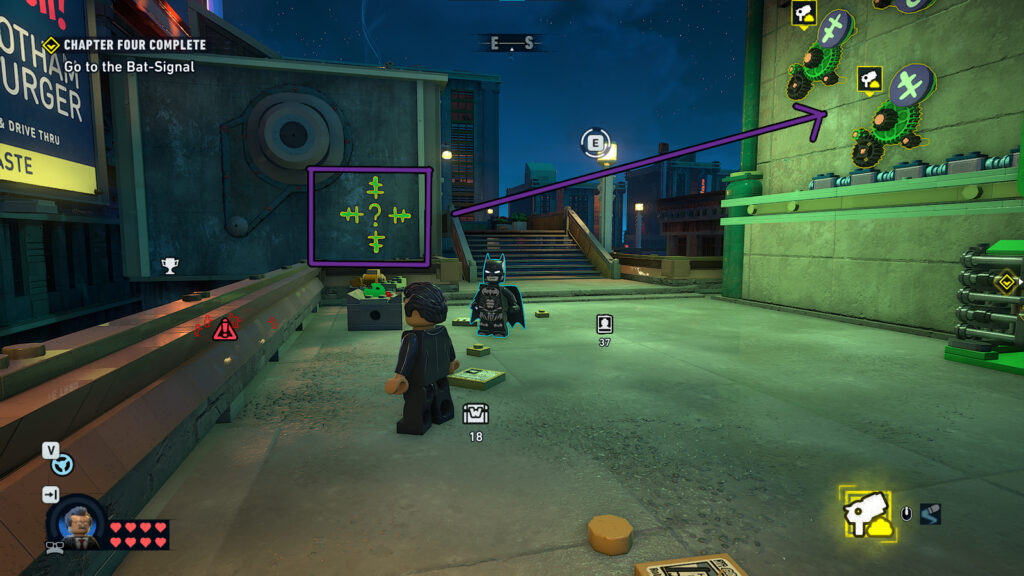
For the last puzzle on this map, you will need to hit the targets in a specific order to open up the cage.
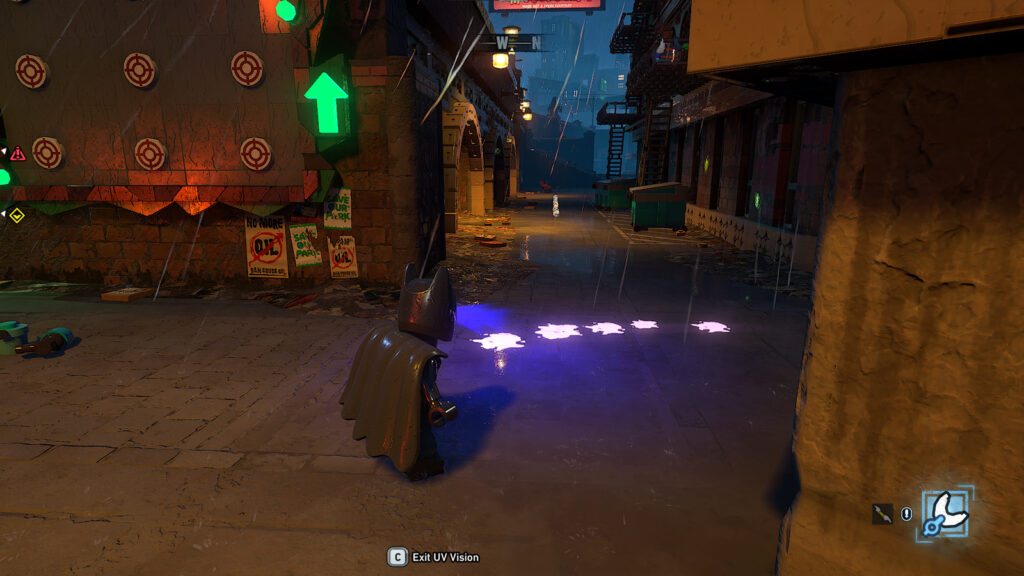
In order to find which targets you need to hit, yo will need Bruce to use the UV vision. Follow the marks and you will eventually get to a wall with the hint you need for the targets.
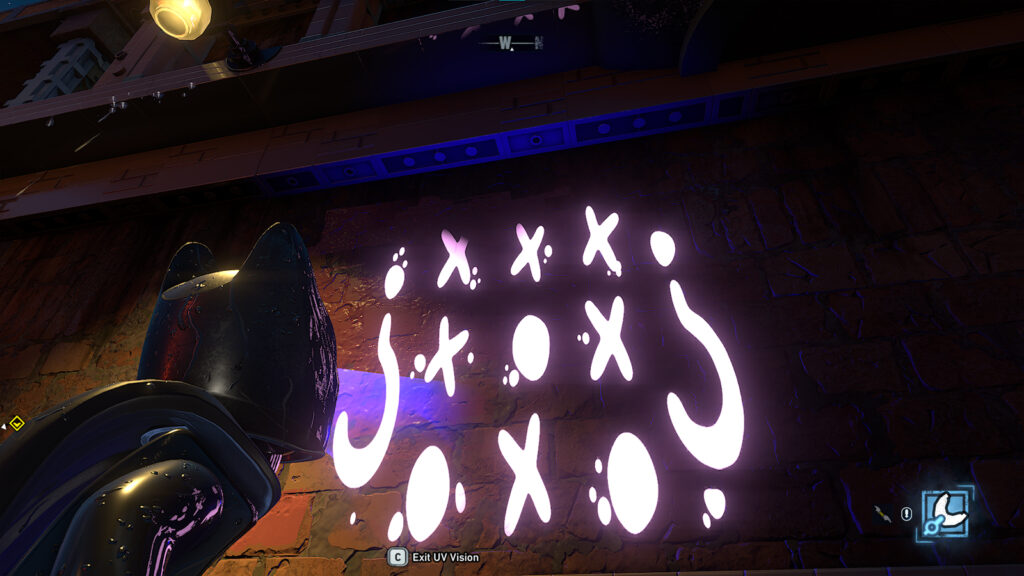

The hint will be upside down. I turned it around so you can get an idea of what you actually need. Only hit the targets that are marked with the circles, not the Xs.
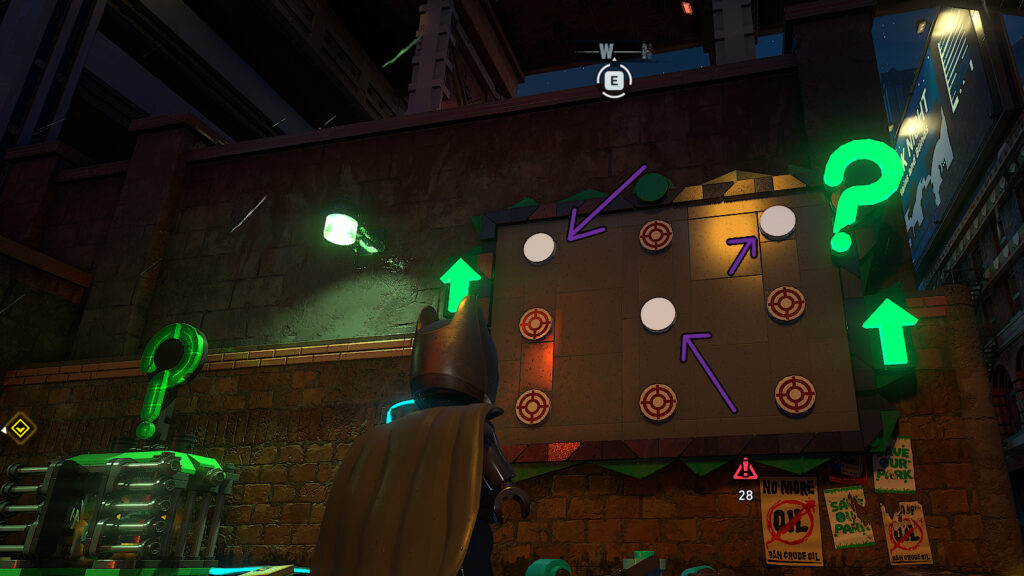
If the targets are hit in this order (1st and 3rd one on the first row, 2nd one on the 2nd row), the cage with the Riddler Cube will open.


