Want to see Raider King content first? Add us as a preferred source.
The Abyss is probably the weirdest part of Crimson Desert but also one of the more interesting ones. Why? Because it has a gigantic source of skill points for you to upgrade your character by just solving a few puzzles here and there. There are 40 Abyss Restoration Challenges, which means there are 40 Abyss Artifacts just waiting for you to take them. What do you give in exchange? A lot of time and probably a bit of mental sanity as you fall of a platform the 4th time in a row and have to start all over again.
In this guide I’ve listed all of the Abyss regions in Crimson Desert, alongside with the Spires you will have to climb to unlock them, and also how to complete their puzzles to get that sweet, sweet Artifact.
Path of Providence
Axiom Archive

This is part of the tutorial/main quest part of the Abyss. Simple puzzle here, just rotate the slabs on the ground using the new skill once to the right.
The next puzzle will require you to hit a pedestal with Axiom Force and turn it around until it starts emanating blue sparks. Once it does, just wait for a few seconds for a platforming part to appear. Then just jump forward and follow the path until you teleport to a new location.
Ethereal Pathway
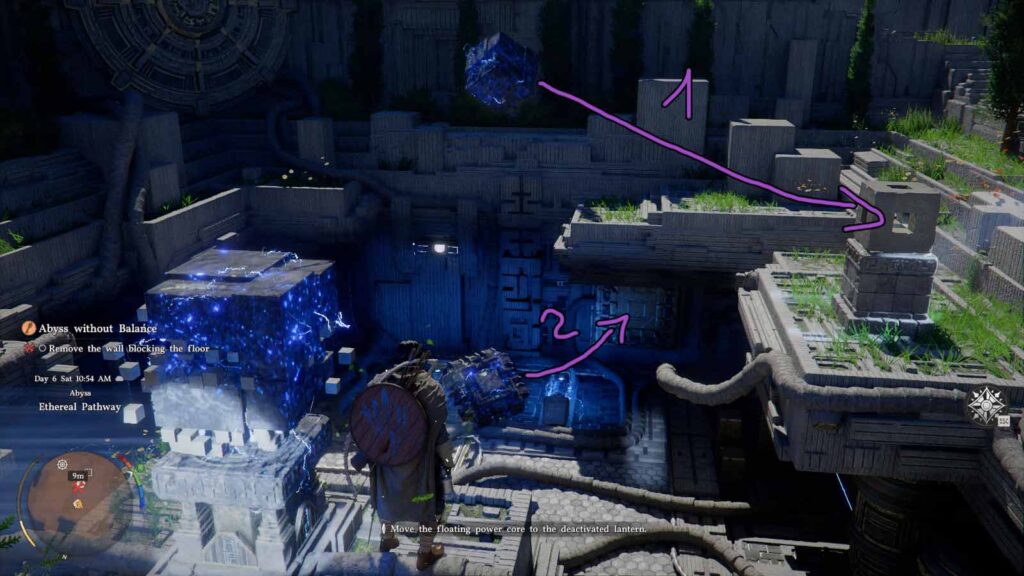
Continuing during the main quest, after a platforming sequence you’ll get to the sequence that most people will probably search online for help in the Abyss without Balance quest. First, you’ll need to hit the floating cube with your Axiom Force whip and drag it to the little stone cube. The electrical one will “replace” the stone one and will continue to the 2nd part of the puzzle.
Then jump down and you’ll see a ghost punching the wall. Approach it and press the Observe button, keeping it held until you learn a new skill. Following that, pull the 2nd floating thing next to the slot in the wall that the ghost was punching. When it stops sparkling and it has leaves dropping around it, leave it there.
You will need to punch it with the new ability you learned to stick it in the wall.
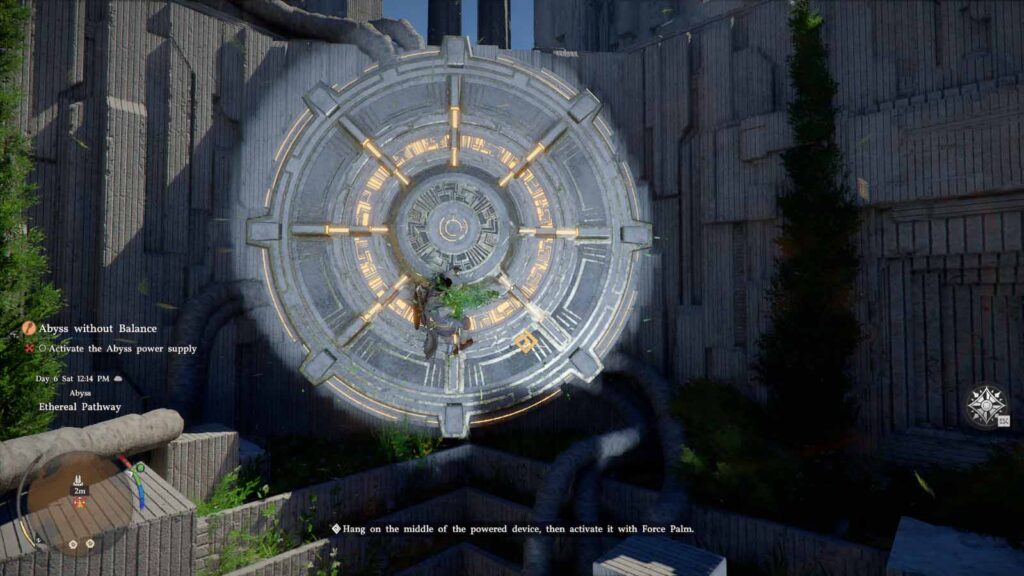
A big circle on the wall will power up. You probably won’t understand from the instruction given by the game, but what you have to do now is climb out, climb on the circle, and punch it with the new ability, Force Palm, to finish this puzzle.
Root’s End
Though the game makes you jump off into the sunset to show off your new glide skill, you can instantly go back up into the Abyss (open map, go to the all category, open the Abyss map, and double click the Nexus on the Etherial Pathway) and continue on the way down The Path of Providence, as it says widely on the map.
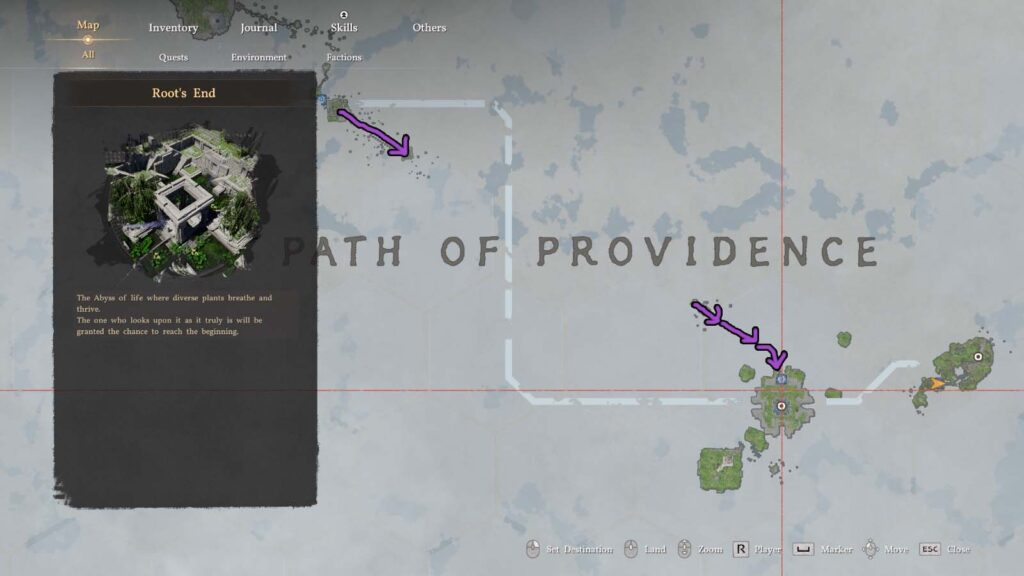
Go up and past the Restored Abyss through the Skybridge Gate. Platform your way until you reach a part where the platforms move from left to right, meeting in the middle. You don’t actually have to wait for them to meet, you can sprint jump or spam the jump button to glide to the ones close to you to get to the end faster.
Go through the portal and you’ll reach Root’s End. Here, you’ll reach a part where it will seem like you can’t do anything if you move too slow. Well, you just need to wait until a platform comes and takes you to the next island. On the second island, walk down the platforms that will break if you stand on them more than a few seconds and then glide to the large island.
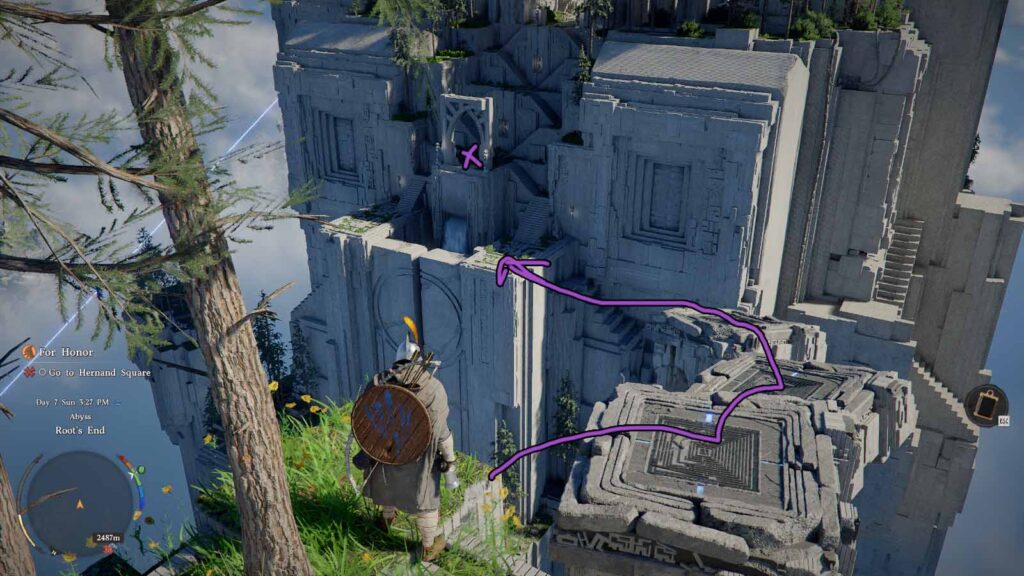
If you’ve gotten some Stamina upgrades by now, you will easily reach a higher part of the island. If not, you can climb your way to the top from a lower floor. The Nexus is on the northern side of the island, up a set of stairs.
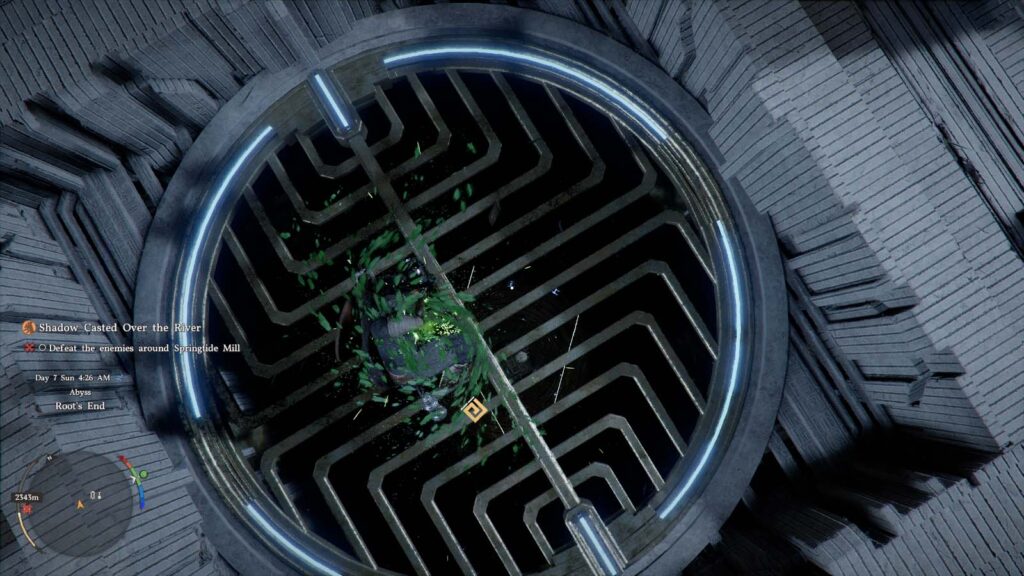
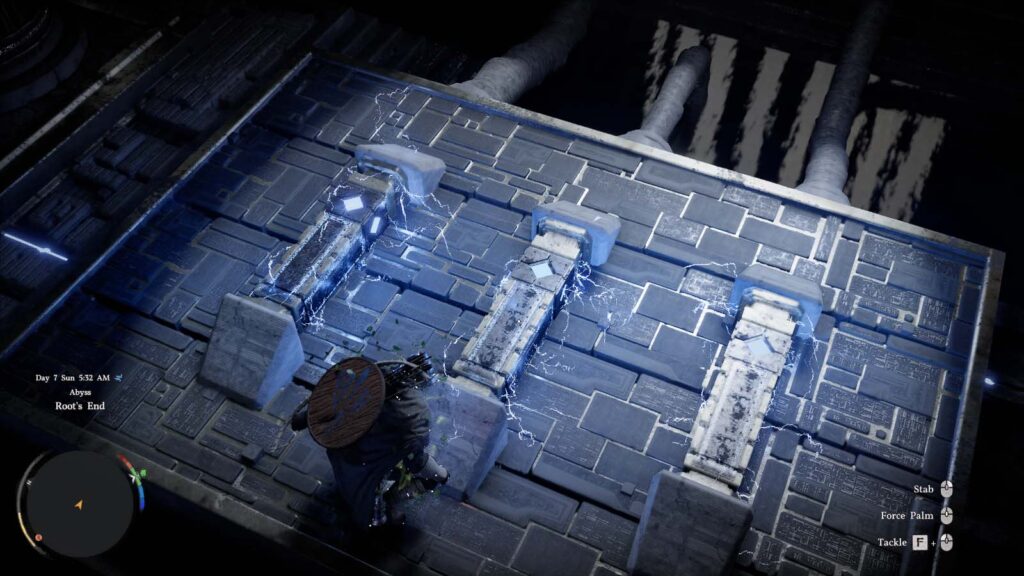
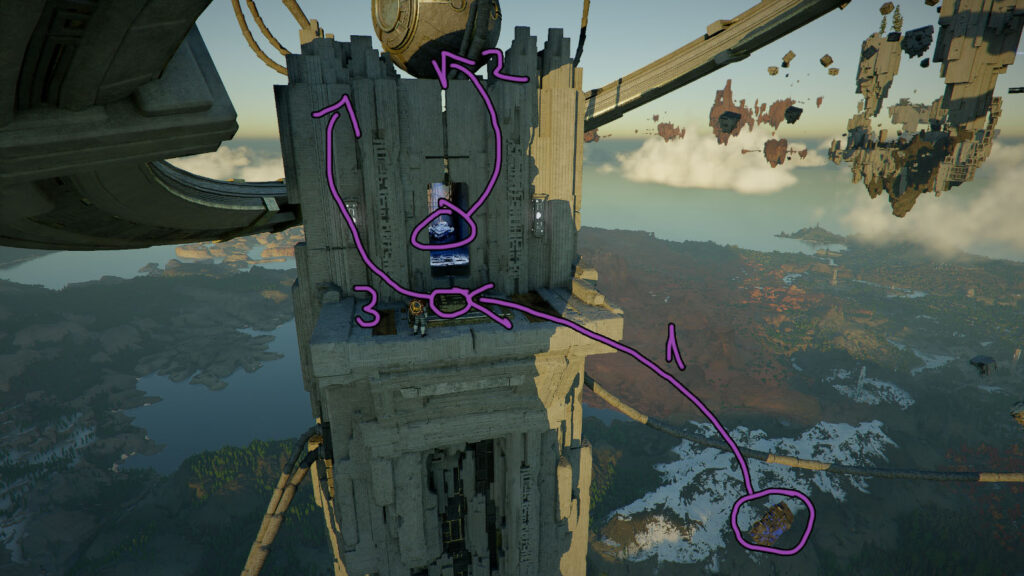
Get up and you’ll reach the puzzle area for Root’s End. Here, you need to walk in the center, crouch, and hit the grate with Force Palm.
You’ll start falling through a Mission Impossible sequence where you’ll try to avoid lasers while falling. Just tap the jump button from time to time to glide and adjust your position. You can take a few hits, as they only take around 75 HP. It’s pretty easy and you can fall without gliding most of the sequence. Once you get relatively close to the end and past the lasers, make sure to glide to get the lay of the land.
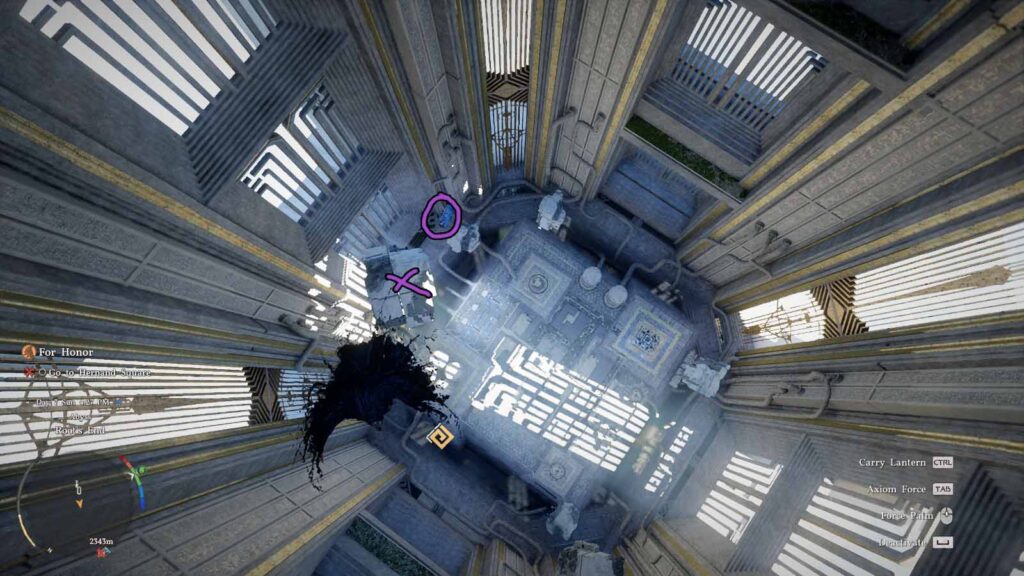
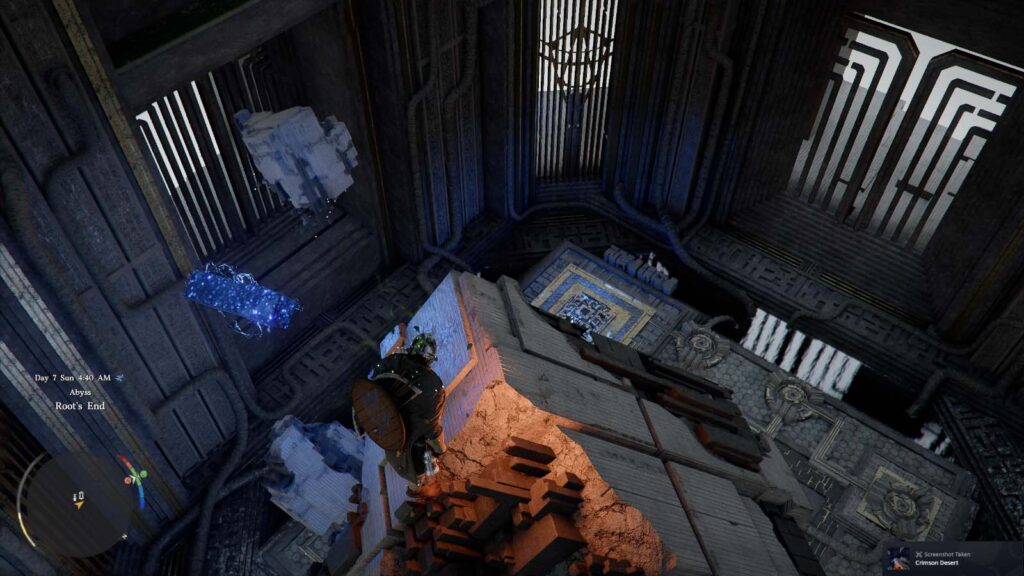
There’s a boulder floating next to a blue crystal. That’s where you should land, since you need to grab the crystal with Axiom Force and bring it down with you. If you’ve fallen all the way down, use the lower of the large boulders to get closer to the power crystal and get you in range to use Axiom Force. You can easily climb it by jumping and using Force Palm two or three times to get above the boulder.
Insert the blue item into the slot below, between the two other batteries. You’ll need to put it directly on top with Axiom Force and then crouch hit it with Force Palm to stick it in. For me it was kinda buggy and I had to stand on the little gray platform to hit it properly. If I stood on the circuit I got electrocuted and couldn’t perform the attack.
Now go stand on the little blue circle on the right and you’ll teleport outside.
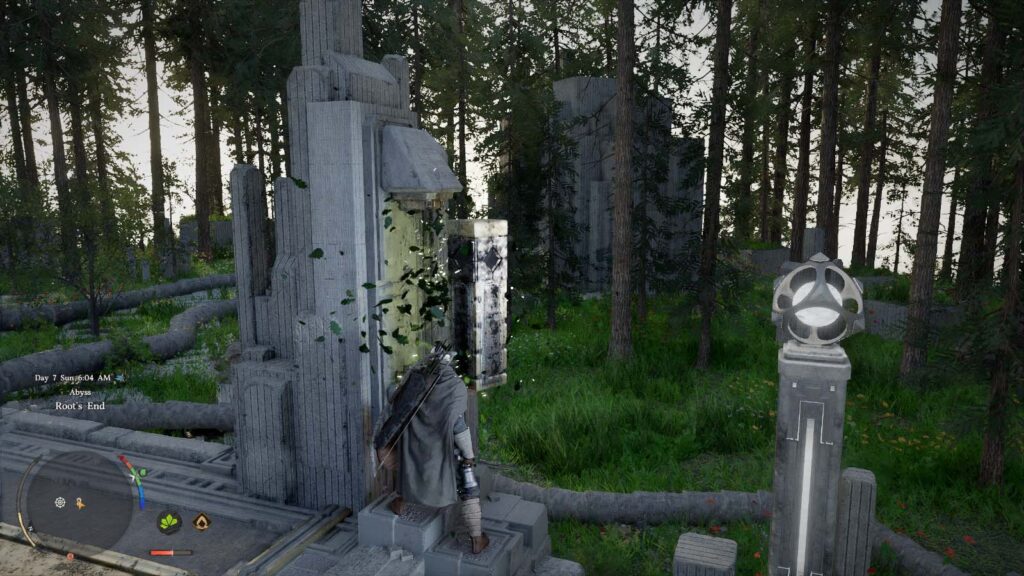
There’s another floating battery in this new location that you’ll need to push into the the slot. You’ll see it on the right, floating and throwing lightning all over the place. Move it with Axiom Force around a bit until it shows leaves floating instead of lightning. Move to the front part and try to push it in with Force Push. It’s a bit weird since you can’t really stand at the same height as it in front of it, but it floats up and down. Hit when it’s down.
Crouch Force Push the circular platform that popped up and you’re done with this area! Walk past the Abyss that just activated, pass through the gate, and use the portal at the end of the platforming/gliding bit to get going to the next puzzle.
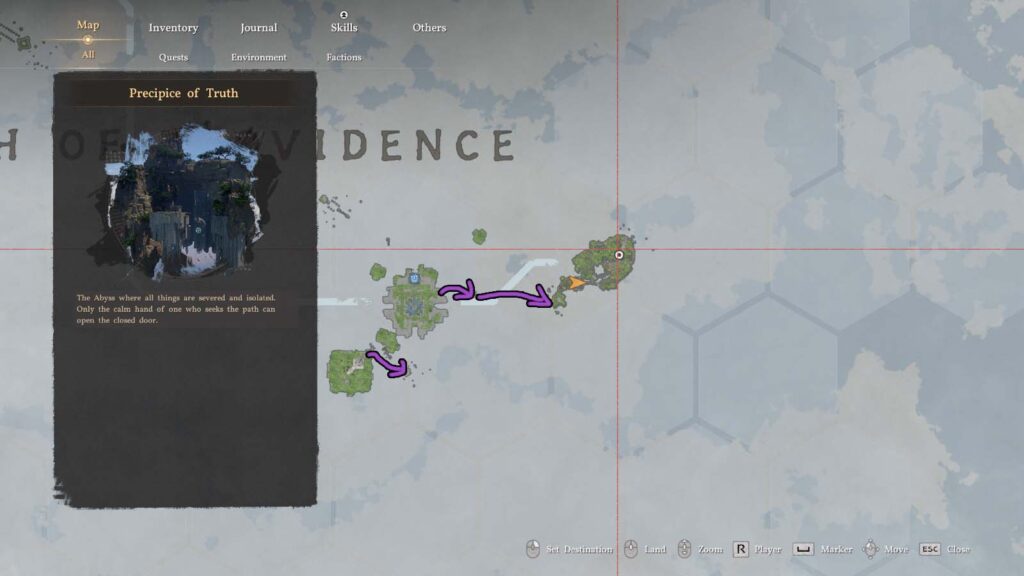
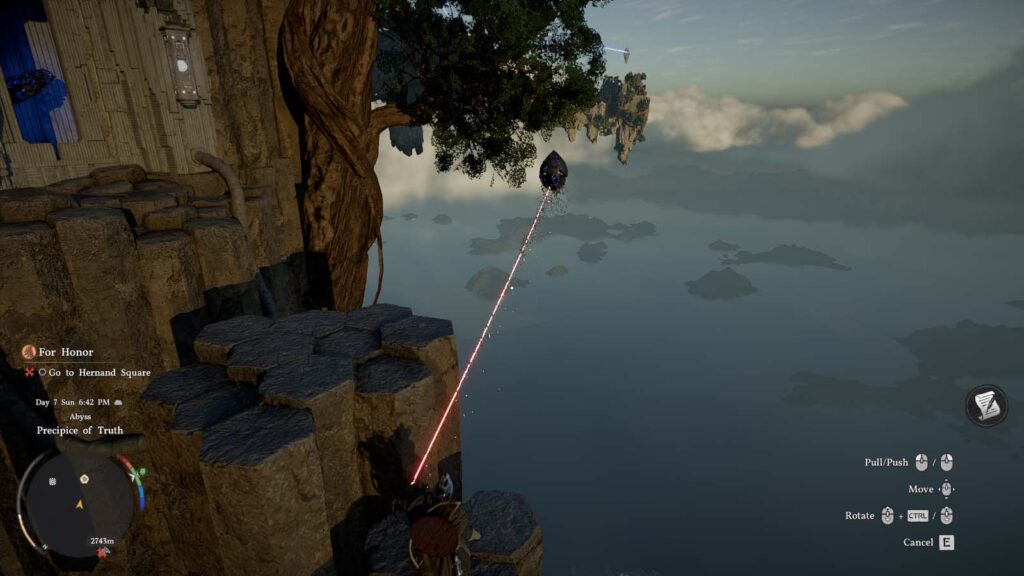
The Precipice of Truth
You can reach this island either by using the portal at the end of the road. after finishing Root’s End, or you can just glide to the little island to the east and then glide all the way to the Precipice of Truth island if you have at least one or two Stamina upgrades.
Pass the little platforming part (if not, try to quickly glide below the island you were on and land on the tree roots. You can climb them almost all the way to the top without grappling) and then you’ll find a little ball that will shoot fireballs your way. Hit it with Axiom Force and it will explode and turn into an power box.
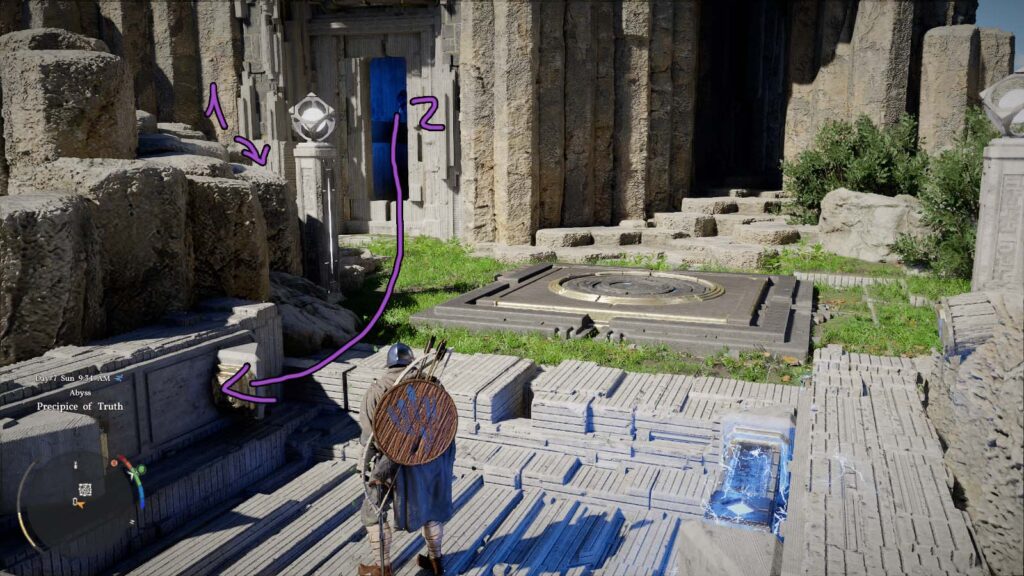
Grab the cube with Axiom Force and carry it with you to the Nexus in the next “room.” You’ll see a slot for it to the right where you can insert it. Then, pick up the slimmer blue pillar and push it into the slot with Force Push.
Now, if you’re weird like me and have come to the island, destroyed the ball to spawn the cube, found the Nexus, and teleported somewhere else, the cube will disappear forever and you won’t be able to solve this puzzle until you unlock the Kuku Pot.
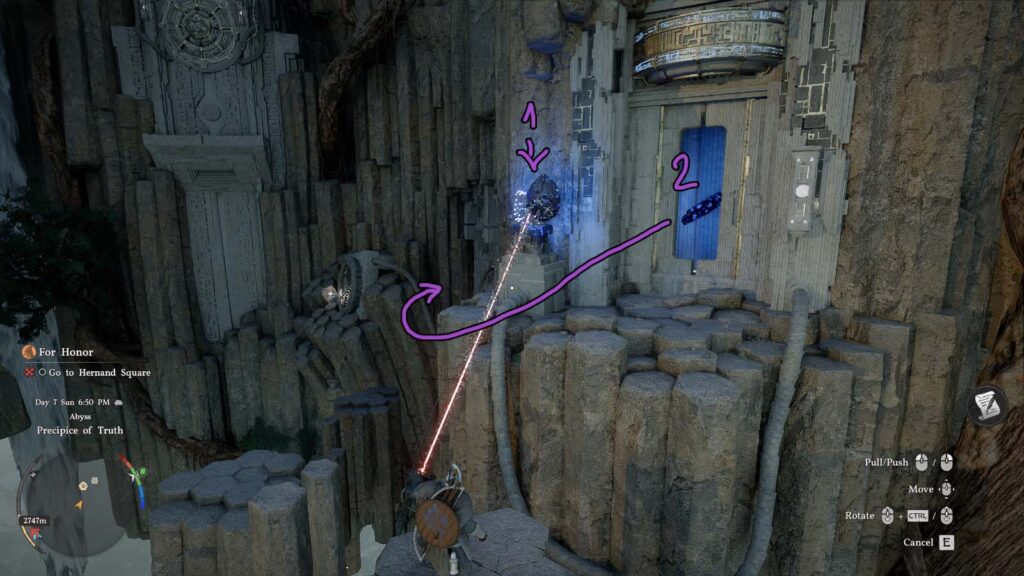
Glide to the turbine that got activated and get to the next higher part. Again, first of all, destroy the round thing that attacks you to find another power box. Wait for the platform to come from above, get on it, and grab the egg (it kinda looks like one) and don’t let go. Get off at the top, put it in its slot, and get the power square out.
Pull and then push it to the left close to the wall. Cancel it and leave it floating.

Before advancing to the platforming part, pull out the power egg and place it further down to the left. For the next part you’re supposed to continue down the path, climb up, find another one of the enemy spheres, and get another power egg, but you can just use the same one.
Back to the power square you got, you’ll see the illuminated slot on the right where you need to fit the it. Put it there and punch it with Force Palm (you can stand up on the little edges next to it).
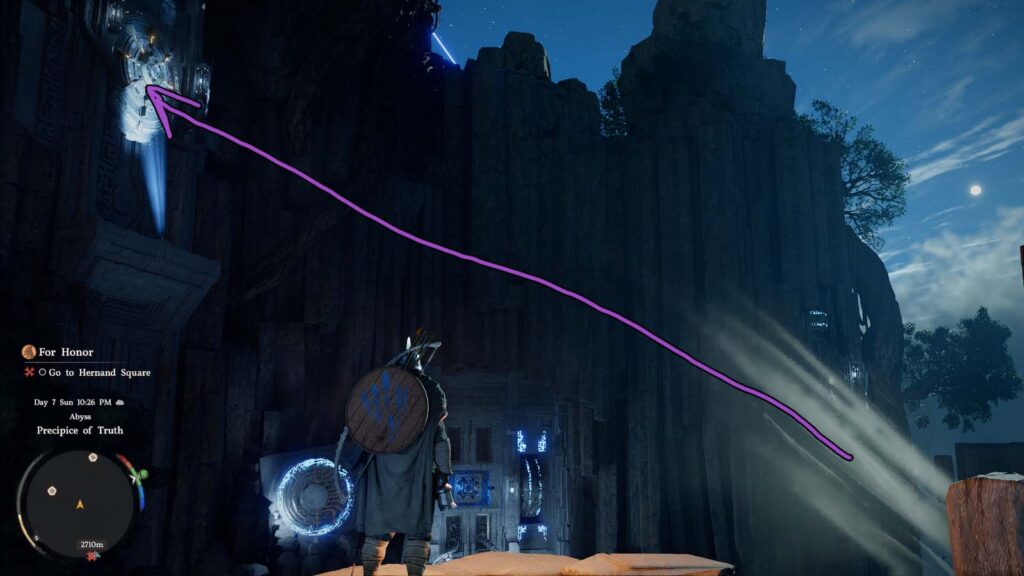
Once the last one is activated the turbine behind will start and you can get to one of those circular mechanism you need to punch to finish the island challenge.
Climb up, get the Abyss Artifact, and then be disappointed after climbing the platforms on the right when you notice you can’t use the skybridge at the top. Why? Because you’ll need to complete two other Abyss sections first to make it work. Enter the Spire of Insight and enter the Abyss through there to continue.
Spire of Insight
To gain access to the next Abyss Challenges, you’ll first need to complete the optional Spire of Insight puzzles.
How to Reach the Top of the Spire of Insight
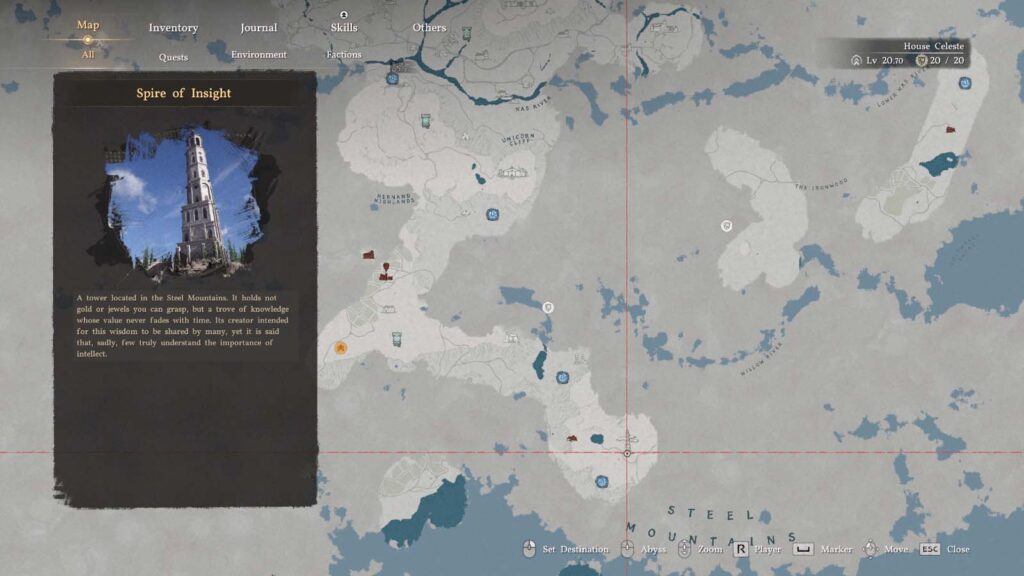
You can find the Spire of Insight in the western part of the Steel Mountains.
The first puzzle you’ll face will be the brambles in front of the entrance. Just use concentrated Blinding Flash on them to burn them up and gain access to the door.
Riddle #1
Now to actually get inside, you’ll need to solve the riddle at the door, which says: “When the bones of the earth awaken from their long silence and find their place, time begins to flow once more.”
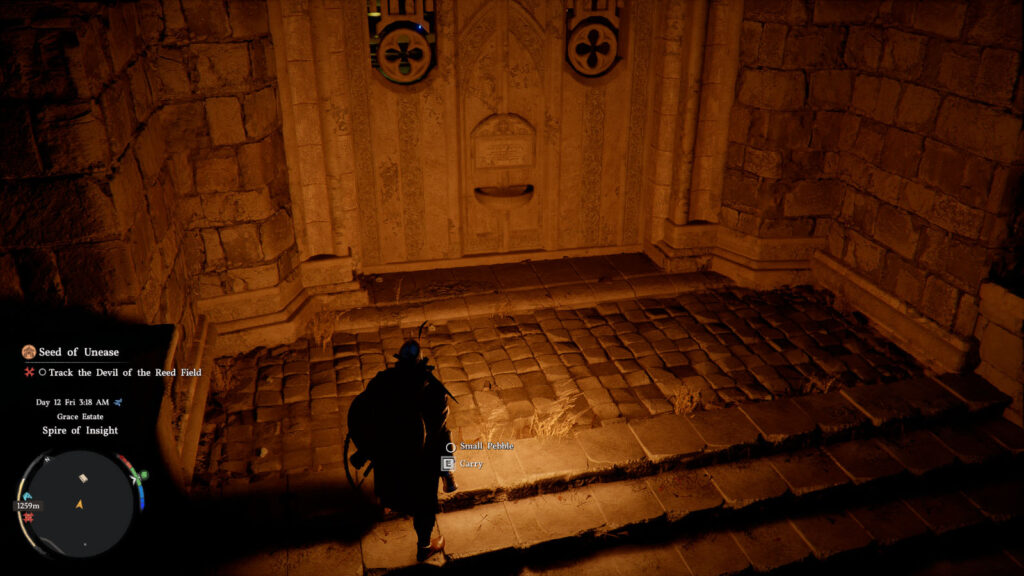
That means that you’ve got to pick up a pebble from the ground and place it in the basin.
Riddle #2
Now inside, interact with the giant book at the end of the room and discover the next riddle: “Even after many years have passed, the traces left behind revive forgotten tales.”
Pick up the gravestone from the right side of the room, next to the book, and place it into the chalice. Then press the button in front of them and walk back next to the chalice.
By the way, if you miss the elevator, just press the button again when it reaches the top.
Riddle #3
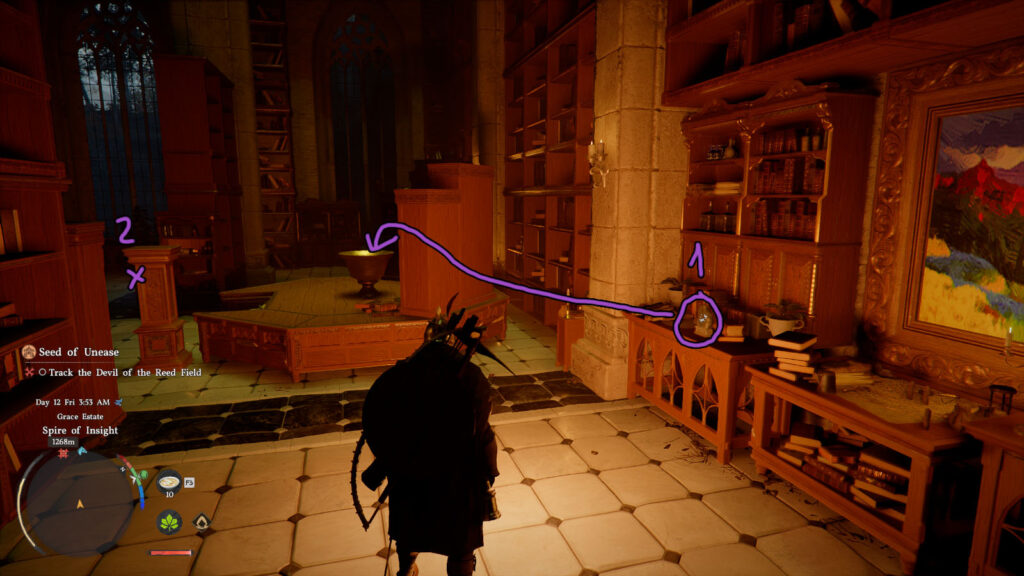
Now on the 2nd floor, we’ve got another riddle to solve: “Records filled with wisdom guide us to the past, while tools that look to distant places illuminate the future.”
For this one you’ve got to pick two items. turn and look at the room behind you. There’s a telescope to the right that you’ll have to place in the chalice. After that go to the left, around the corner, and you’ll reach an office of sorts. Pick the Pen Tip sitting on the right side of the table and place it in the chalice as well.
Take the elevator to the next floor.
Riddle #4
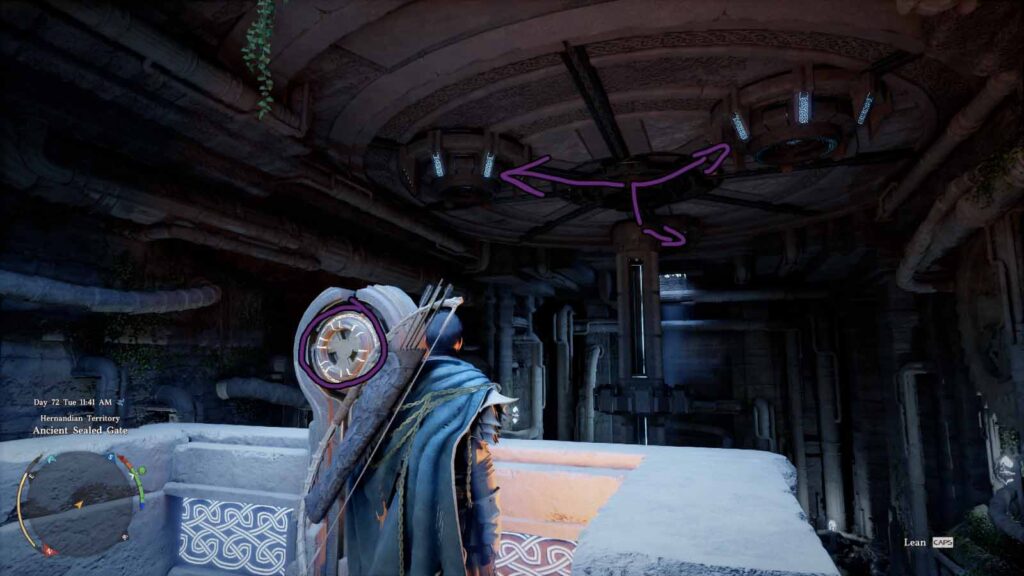
This one doesn’t have a written riddle, it’s got drawings. Look at the book and you’ll see three items you need to gather and place in the chalice.
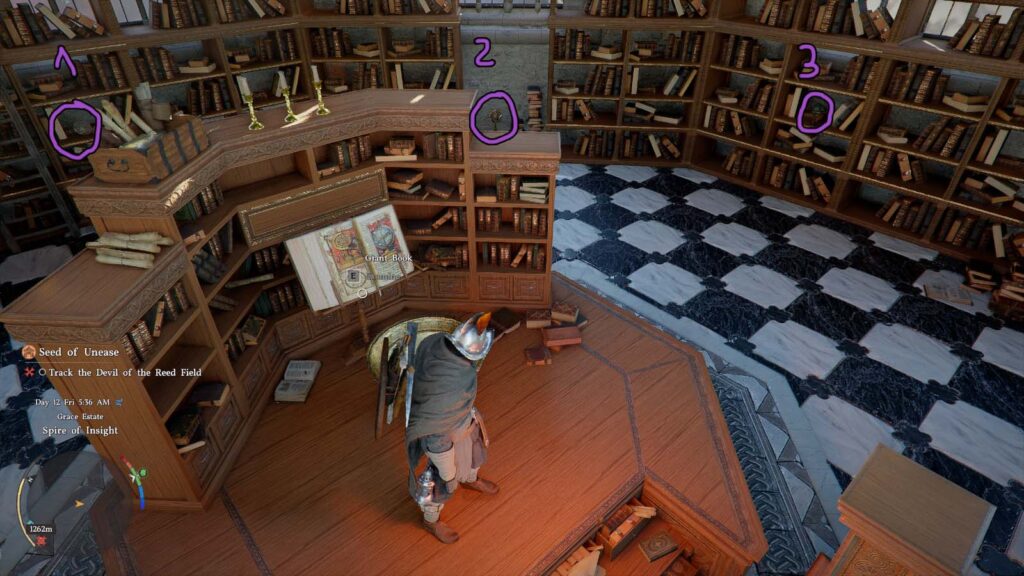
You can see the Sundial, Celestial, and Small Map Rotator locations in the image above.
An Abyss Gate to the Chaos Forest awaits at the top.
Chaos Forest
Use Nature’s Grasp to get past the gate and you’ll notice a bunch of brambles everywhere. I suggest burning them using concentrated Blinding Flash to make your life easier.
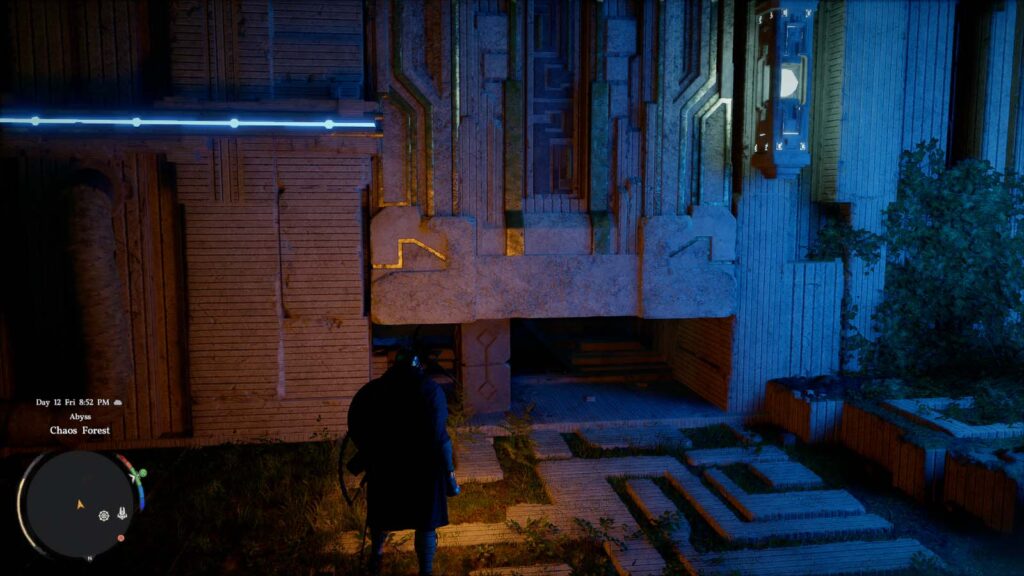
Get the power slot from across the chasm and put it in the empty slot close to the entrance of the area. If, for some reason, the power slot is burning and you can’t stand on it, put it in the pool of water where a bunch of brambles are blocking your way (burn them first) and it will allow you to stand on it again.
Now glide across to the final sphere. There’s a false wall you can lift next to it, to the left. You got a simple slot insertion puzzle plus Force Palm solution. Now pick up one of the Abyss Fragments (the gray cuboids), leave it next to the closed door, use Nature’s Grasp to get out again, but quickly place the Abyss Fragment to keep the door open. If the door fully closes, the power doesn’t get to the sphere.
Now hit the sphere with Force Palm and you’re done. Climb, get the Artifact, and glide to the right to get to the gate to the next region.
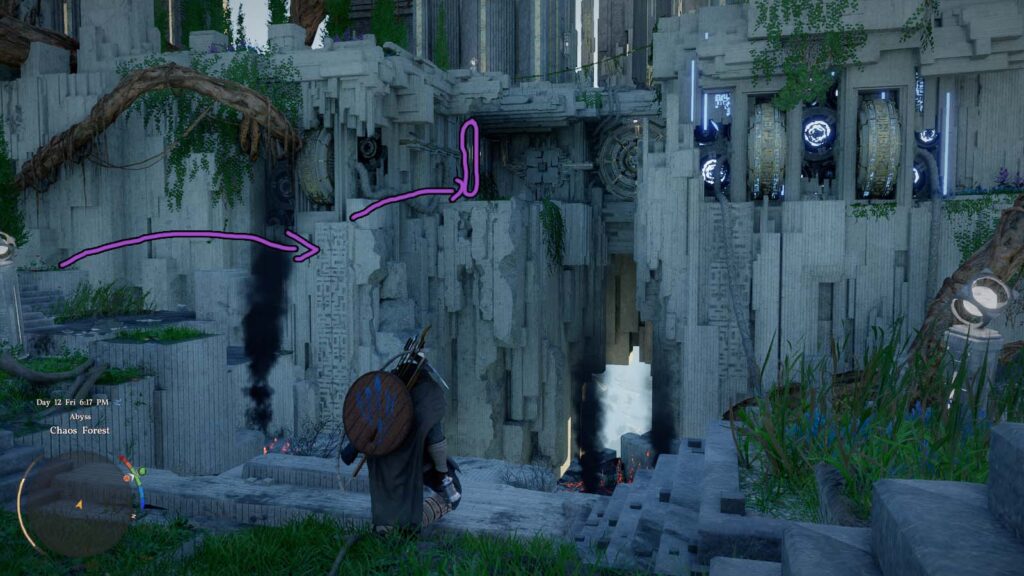
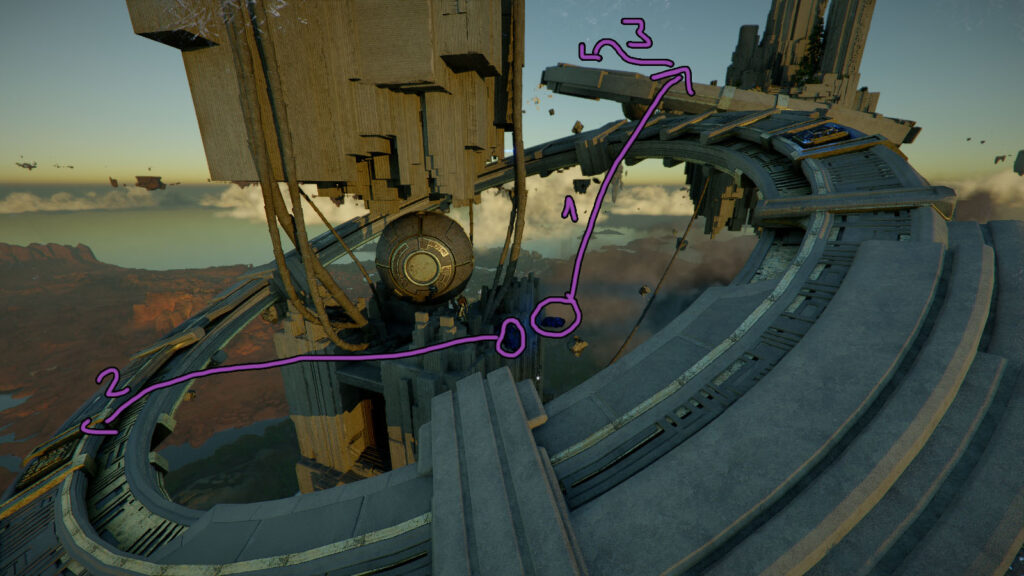
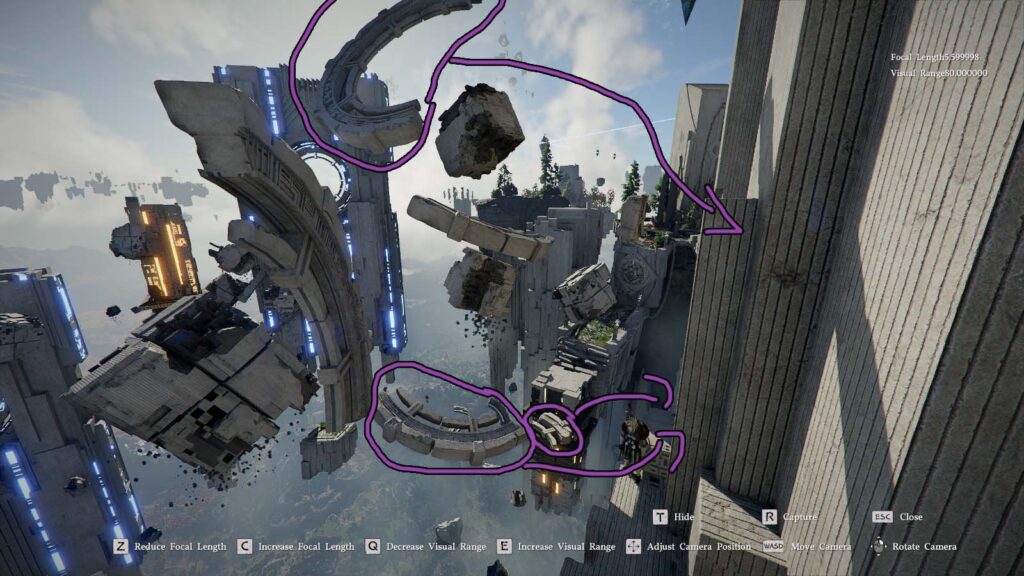
The platforming part to the teleporter is relatively straightforward until you reach a part where new platforms appear as you walk on them and the one you’re standing on breaks. Walk slowly and make sure to keep an eye out where a new platform appears. Not all the platforms will fall. You can see above how the route looks like at the end, looking from the back.
So 3 platforms to the front, then left 5, front 5, right 5, and then left 3 to finish.
Roots of Truth
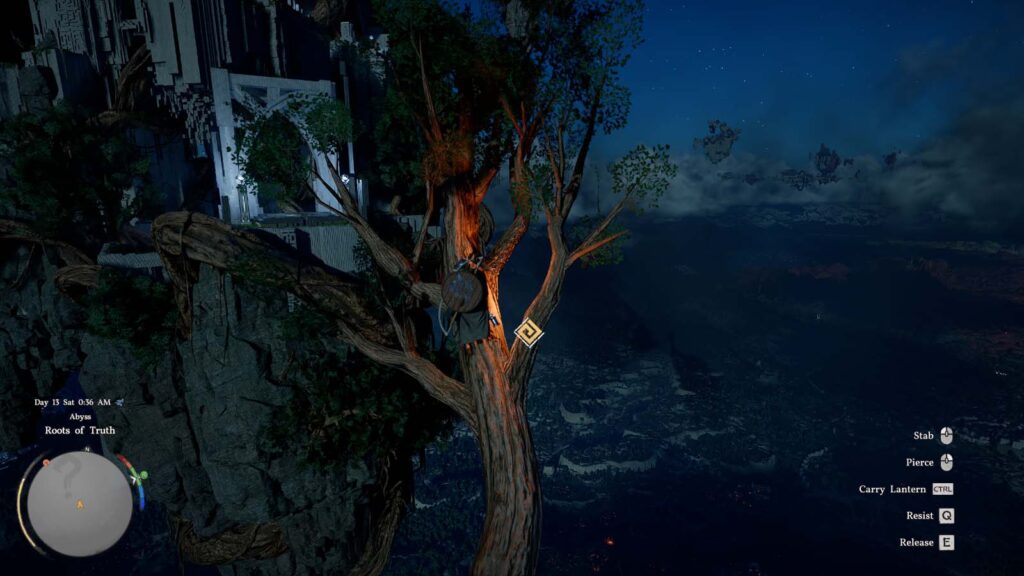
You start by climbing roots upwards. Reach the highest tree and glide across to grab the roots on the other side. Climb and you’ll reach the Nexus. You can now take a break.
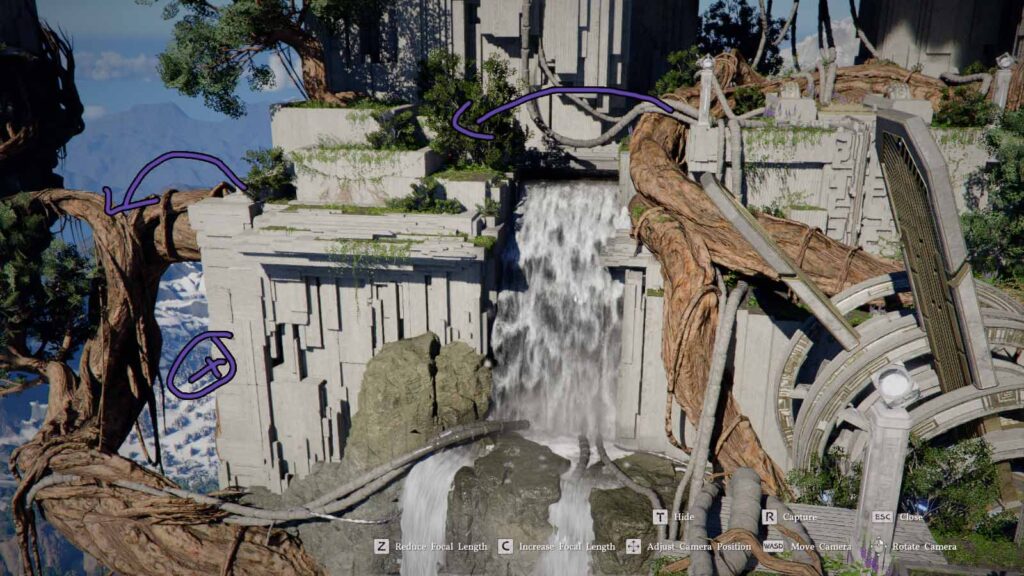
After a well-earned break, glide forward and you’ll reach a waterfall. There’s a little path right next to it, to the right, that you can climb. Climb all the way to the top (there’s also a chest on the way up, look on the right for it) where a laser is blocking the way forward. Crouch and pass below and start climbing the staircase.
For this next part I hope you’ve put some points into Stamina, cause you’ll need it. You’ll reach an enclosed room with 2 lasers going up and down next to some golden grates. Climb on the left wall, right next to the grates, until you reach a spot where you can rest.
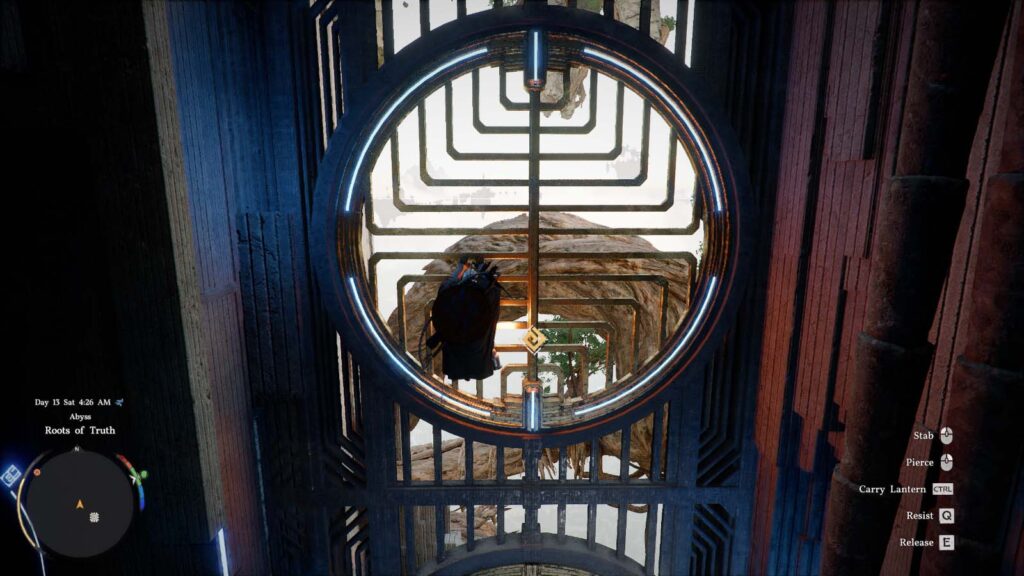
Then, jump down to the 2nd grate that doesn’t have a laser and Force Palm it to get through. You first have to press and hold Resist if you don’t want to push yourself off of the thing! You can also just use the first grate if you time it right with the laser and don’t have to climb anything.
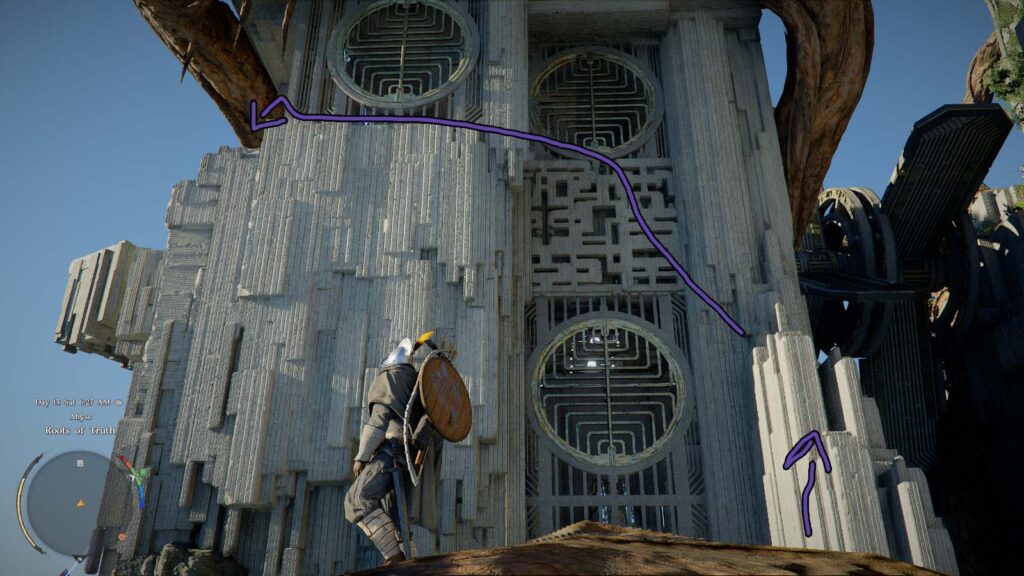
Now outside, climb on the right side, get across, and you’ll reach a part where you can stand and also grab the grate without fear of falling. If you don’t have the Stamina, just go through the highest grate above the ones you came out of.
Get the power slot and put it through the little hole in the wall facing the way you came in. Push it inside and leave it in there. Now get out though the grates with the lasers and continue up the platforms.
At the top, go to the right to pull the power slot out of the grate you placed it. You’ll need to rotate it so it can fit through the little hole. Then Force Palm it into place and you’ve completed a half of the puzzle.
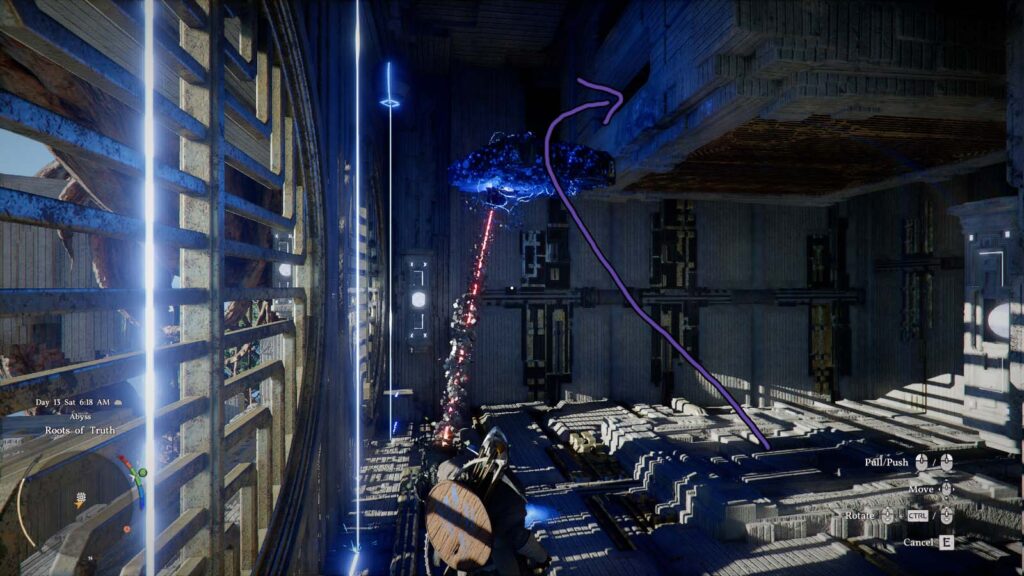
Now get across over the turbines. I recommend gliding directly to the one that isn’t moving, around the one that’s aggressively trying to push you off.
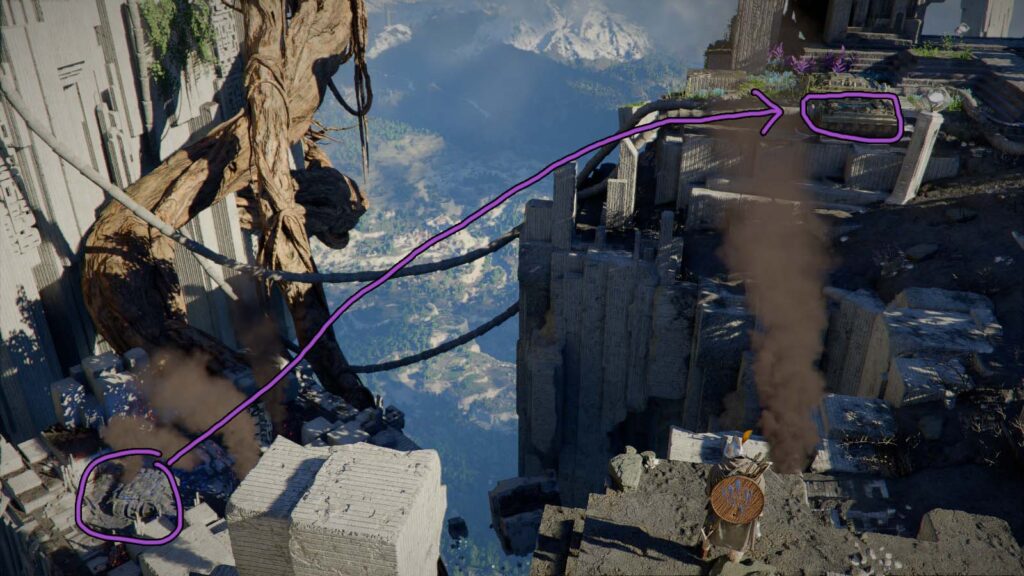
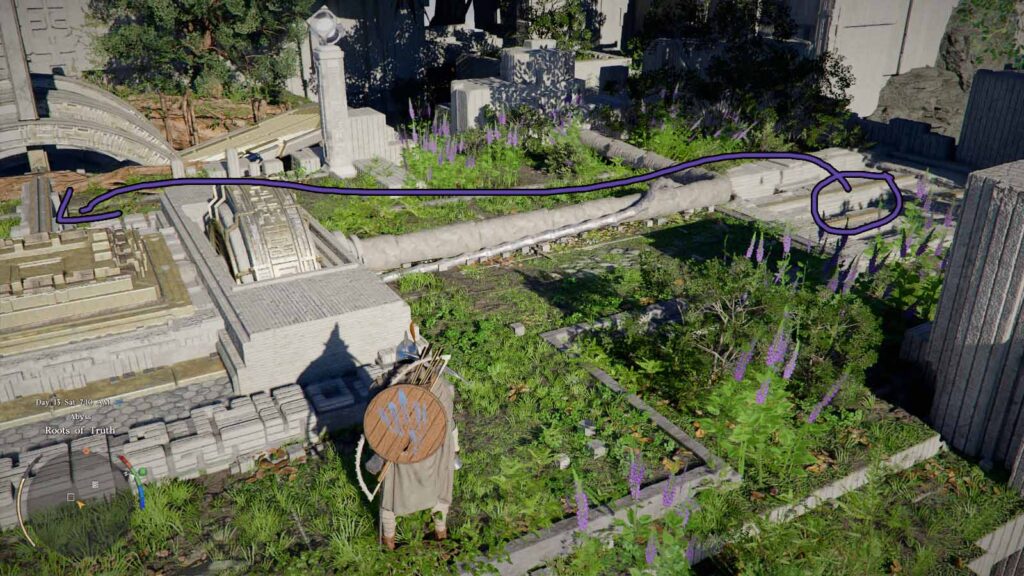
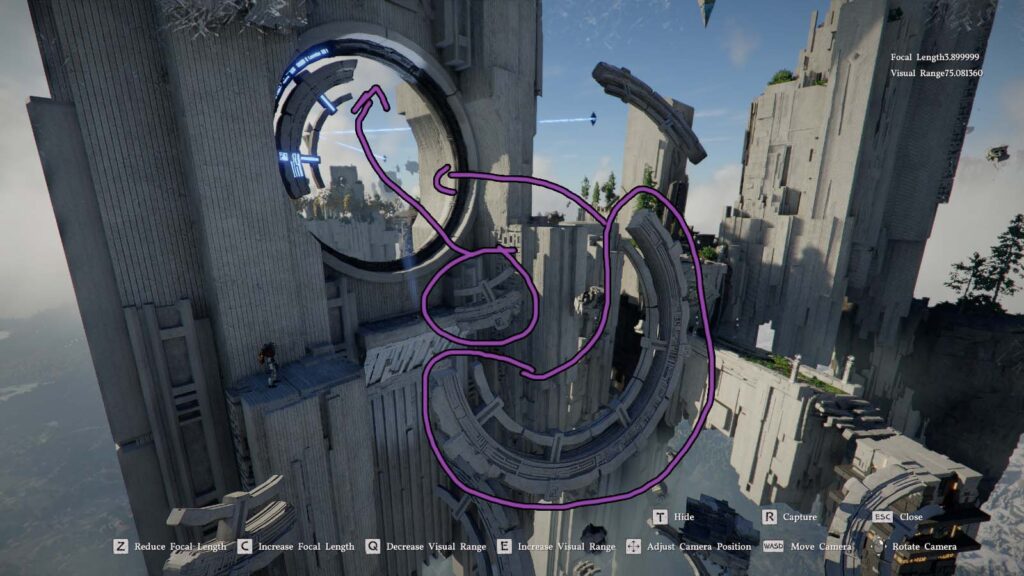
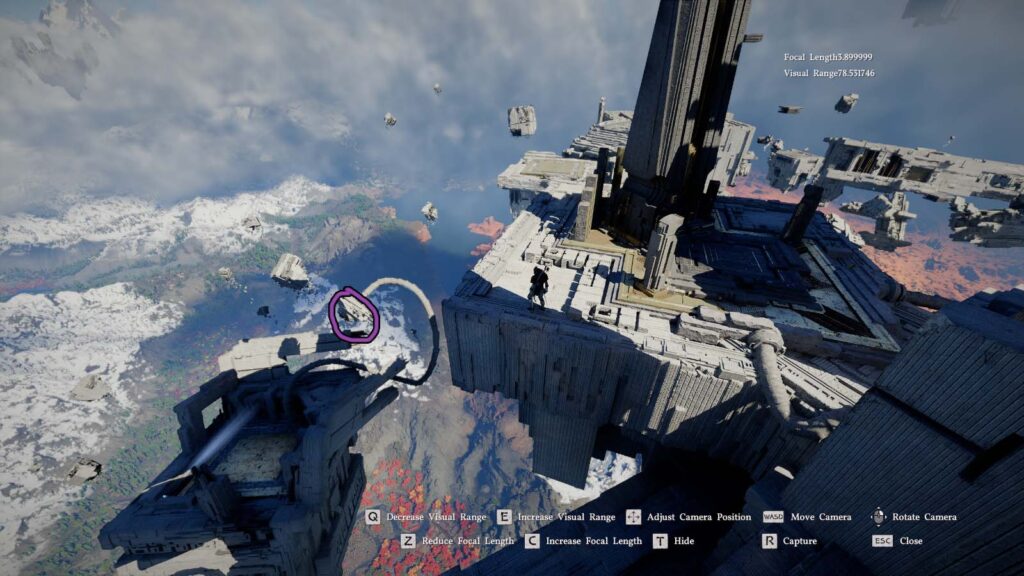
The next slot is in an awkward position. You’ll see it on the map as you approach it. Walk to the left and glide on the roots. Look back and down and you’ll see a little dark hole where the power slot is floating. You can see a general route you can take to get there and see it. Move it to a better position up and take it back where the first arrow on the right I drew starts. That’s where you need to insert it.
Now climb, Force Palm the circle, climb even higher, and get your reward. Another gate is waiting for you right behind the Abyss Artifact. The way to the next portal is relatively easy and not that special, so I won’t mention it. Mainly because you don’t actually have to get there. Because it will lead you back to the Precipice of Truth. And what’s waiting at the end can’t be accessed yet. So let’s see what the next set of Abyss regions await.
Spire of Ringing Truth / Sleet Isles
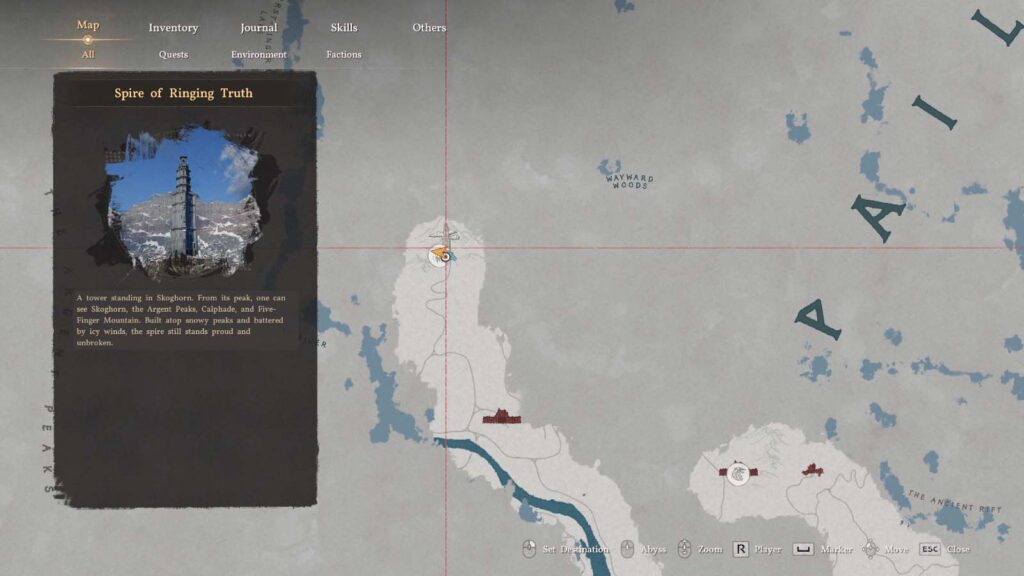
Here’s another one you can access at any time that has nothing to do with the main quest. You can find this spire in the western part of Pailune, surrounded by a bunch of enemy camps. You can just ride past everyone and make your way there.
The tower doesn’t present any actual real challenges, you just need to climb through the inside all the way to the top. The only “interesting” thing you’re going to do is occasionally shoot arrows at some wooden planks that are held in place by rope you need to cut.
There’s also a part close to the top where, if you don’t have enough Stamina due to the cold, you’ll need to go outside through a broken window and climb the outside to reach the end. When you reach the bell, shoot an arrow at the wooden part that is holding the bell. Jump down and you’ll reach the Abyss Gate.
There’s also a boss down there, Priscus the Ancient, so I suggest coming here when you’re actually powerful enough to defeat mid-game bosses. To actually beat him, you’ll need Nature’s Snare (from the green Spirit tree) to stop his ranged attacks and send them back this way. Otherwise you’re just gonna run in circles and hope for the best.
For Nature’s Snare, get at least the 2nd upgrade, since you can then send back the attacks he throws at you and knock him down, giving you the change to get a decent chunk of his HP.
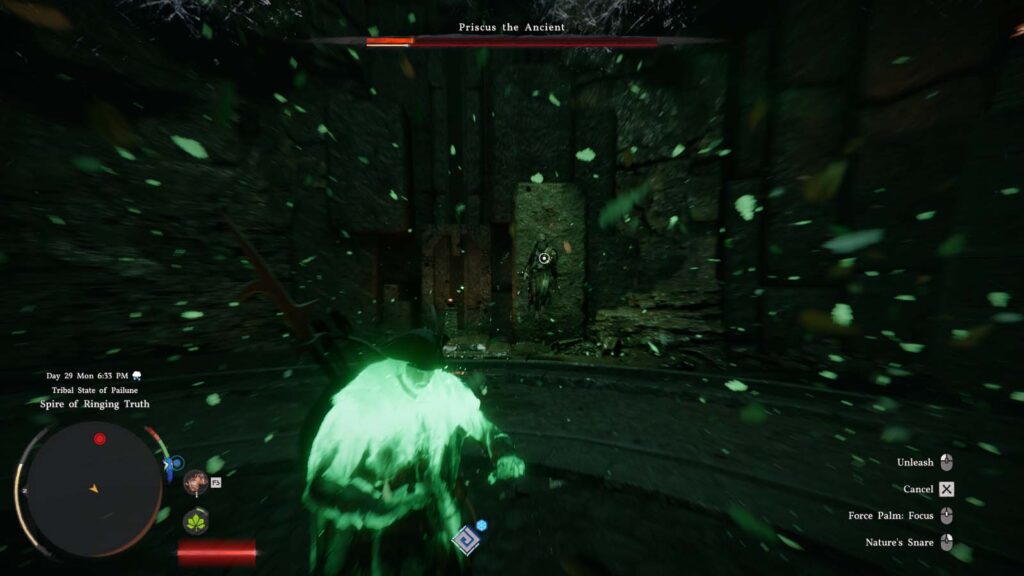
How I beat him? Just stay in Focus Mode almost all of the fight, since it will turn everything slow motion and give you a chance to prepare for all of his attacks. There are only two types of attacks: ranged and one where he charges you. If he charges, dodge while in Focus Mode.
An Abyss Gate will open down there and you can get to the next region in the Abyss.
Ether Rest
Glide your way to the top and enter the large building in the middle. It’s pretty self-explanatory.
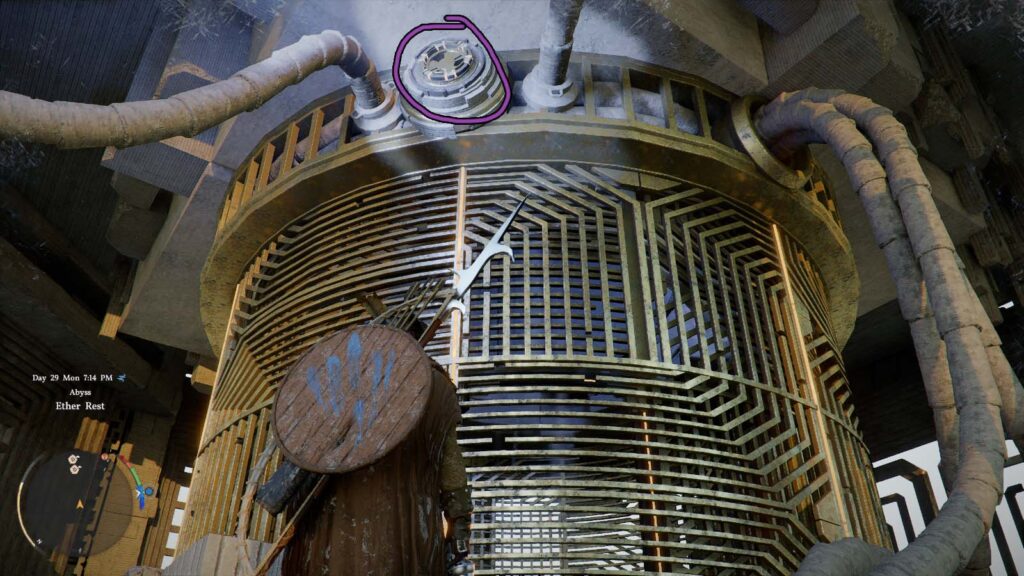
Inside find a part where a bunch of cables are going to the center. Look up and you’ll see a circular board you can connect to using Axiom Force. Turn it around until you have a way inside.
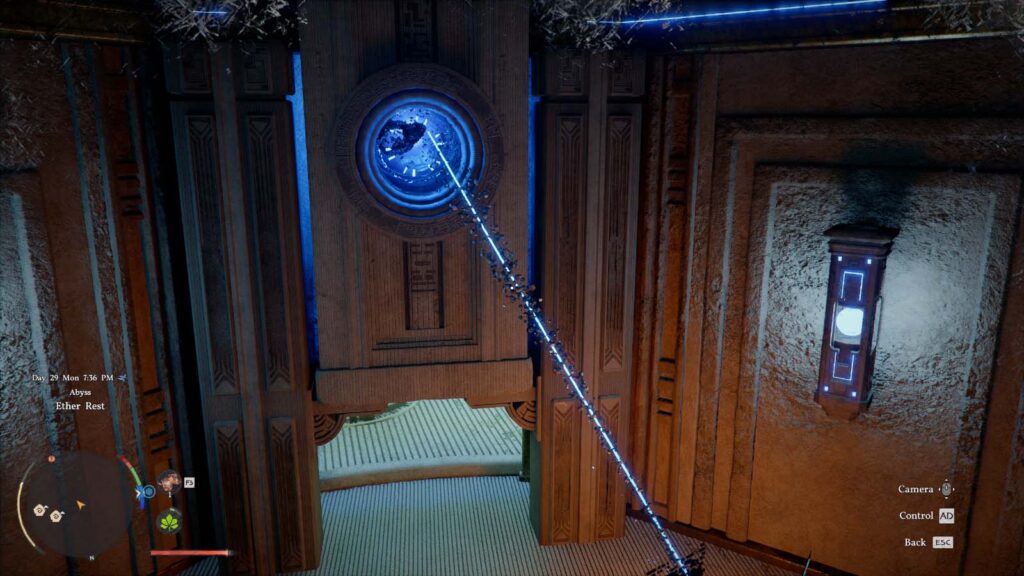
Glide to the next floor and Nature’s Grasp the wall with a hole in in. Now hit the hole with Axiom Force and turn around until you see a way outside through the space below it.
Now glide all the way to the top. Once there, look back the way you came and try to find a power core. Glide down, grab it with Axiom Force, and glide back up to use it and open the way higher. There’s nothing really to explain here, it’s more of a “skill” thing. No tricks this time.
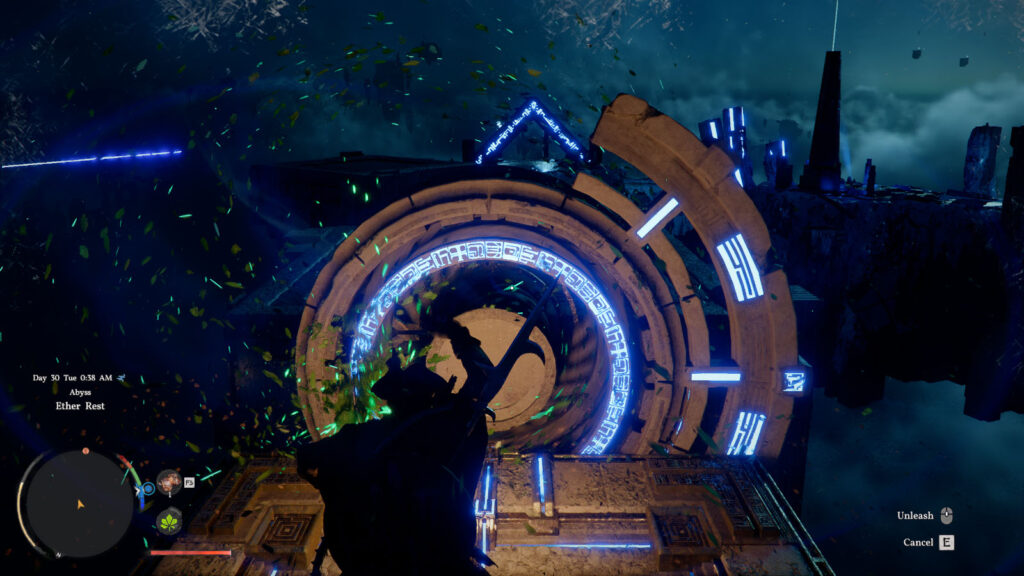
For the last part just climb to the top and glide across to the circular power station which, by now, you should know to Force Palm. Make sure to jump up and glide, not forward, because you can miss the destination. I know this from experience.
Also make sure to Resist before Force Palming, so you don’t drop yourself off from the island.
You’ve got another Artifact. Now let’s get to the next island. Platform a bit and you’ll get to a powered-off fan. If you’ve listened to my advice, you have Nature’s Snare now. So jump on the platform past the fan, turn around to look at it, and use Nature’s Snare on it. It will make the fan start turning and bring you all the way to the end.
If you don’t have the Snare, you can triple jump by hitting Force Palms after jumping and gliding all the way across.
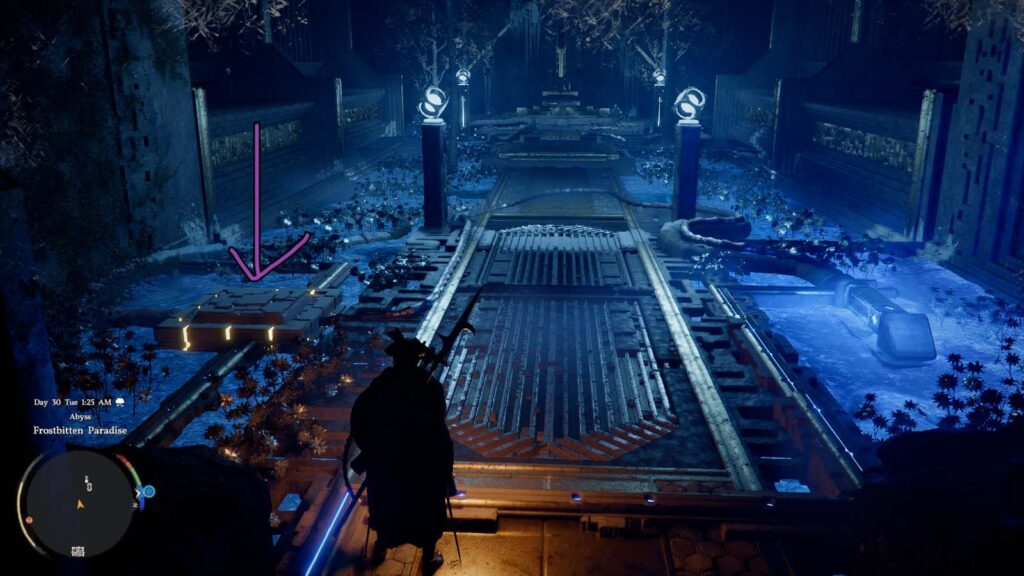
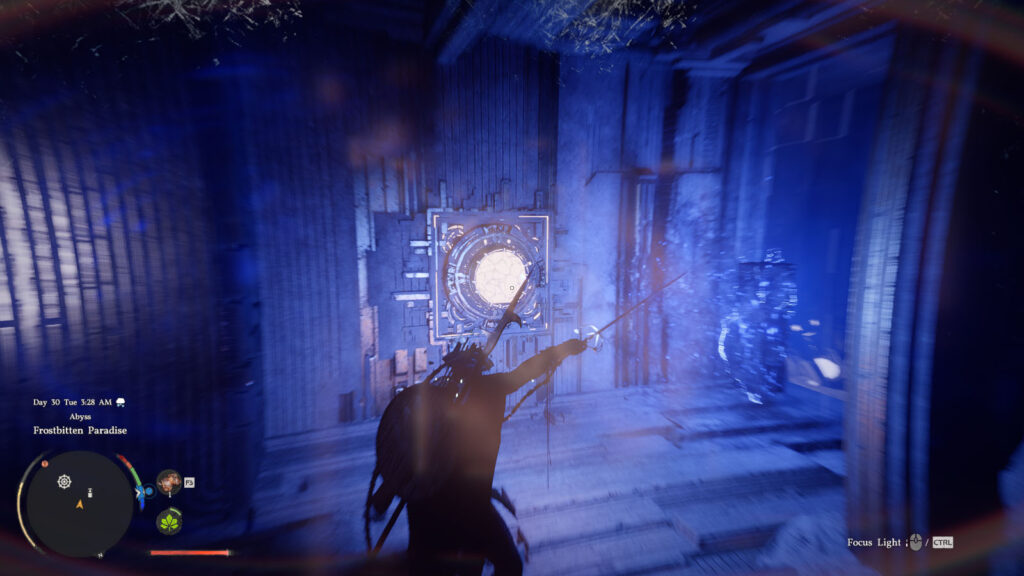
Frostbitten Paradise
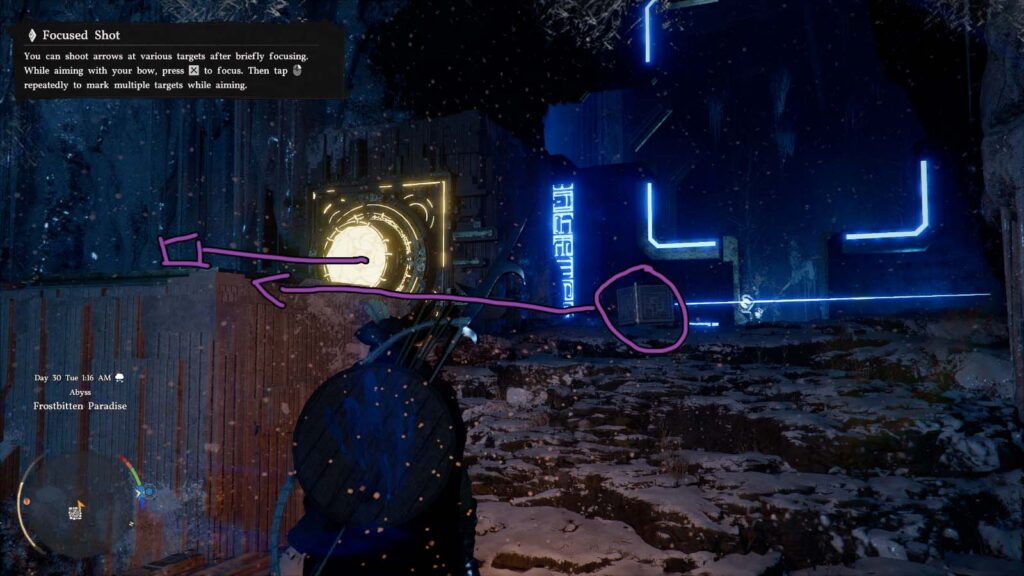
The section starts relatively simple. Pick up the Lightning Cube (carry it, not use Axiom Force on it) and place it on the platform to hit the yellow sphere.
Now, I’m gonna start by saying that this puzzle is incredibly complicated, but incredibly satisfying to figure out yourself. I recommend getting the Kuku Pot before doing this puzzle, as it will make the whole experience a 1000 times easier. But, if you came here straight out the gate, let’s see what solutions you got.
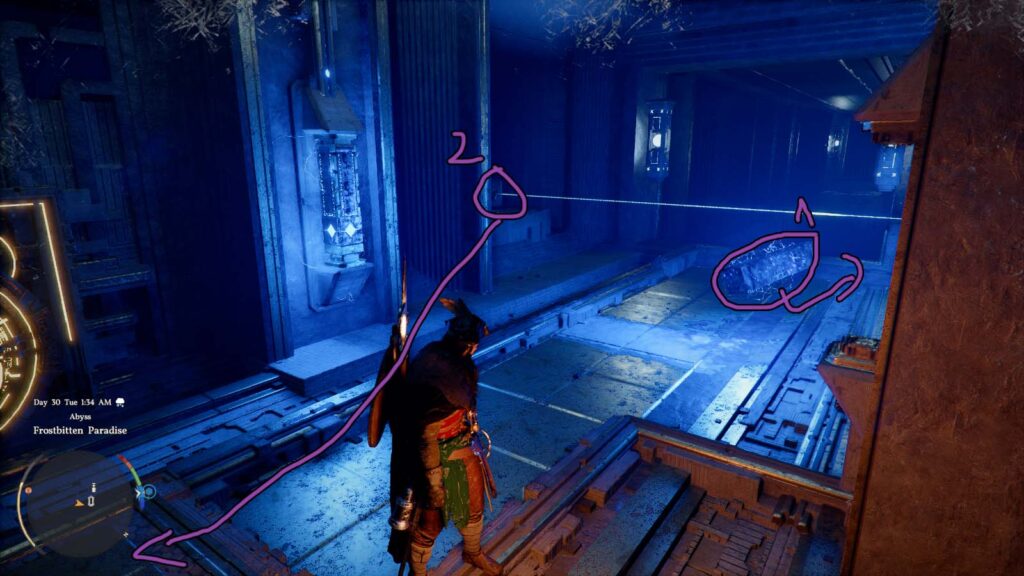
Right past the gate, stand on the yellow-ish chip to the right. Now jump down. Insert the power stick into its slot right next to it and move the laser cube to hit the other sphere.
The the moving platform to the other room where you can see a laser hitting the hallway. Move the Lightning Cube on the little black space under the grate, opposite of the sphere, pointing to the right. Make sure the laser is pointing to the right, otherwise you’ll have to do this again.
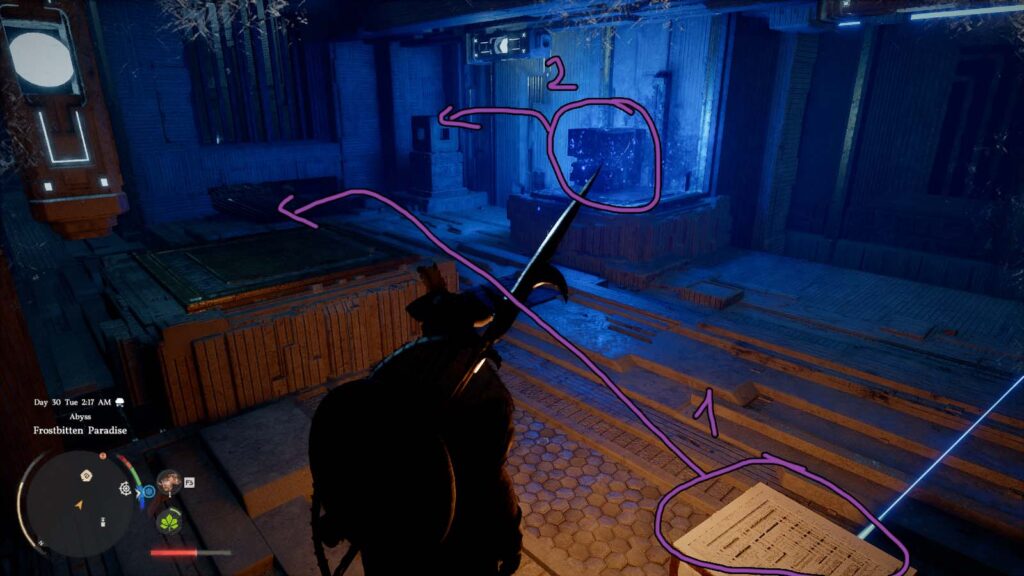
Then place the power cube in position and the Lightning Cube will start moving to hit the sphere from the previous room that you deactivated. This will open up a path to the left that will allow you to go and pick up the previous Lighting Cube you used. Take it and bring it to the room with the two new spheres.
Place the Lightning Cube to hit one of the sphere, remove the power cube from earlier to bring back the previous cube, and place the 2nd cube to hit the sphere.
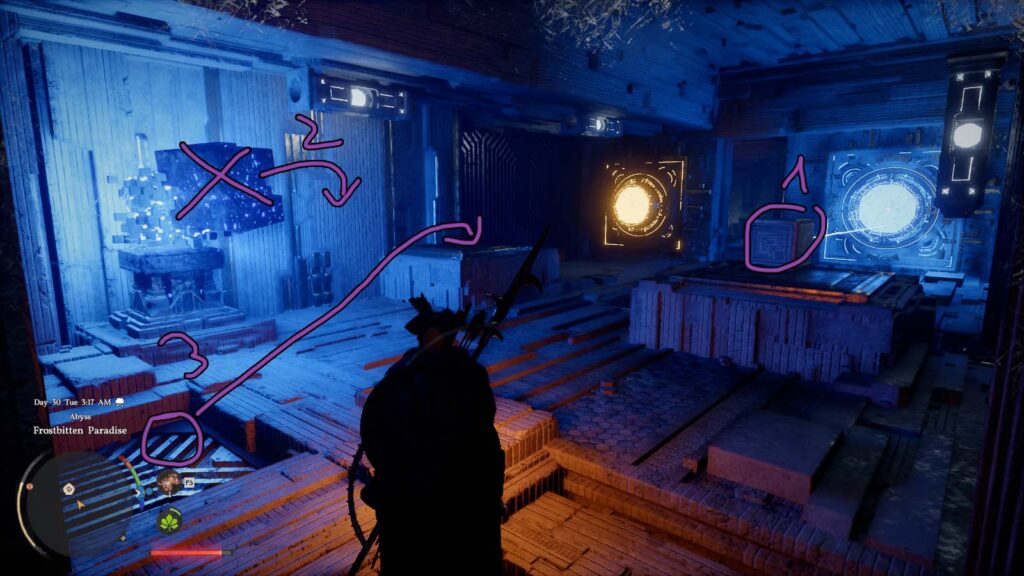
Go through the path that opened. Here the Kuku Pot would be very useful. If you don’t have it, here’s what to do. Place the power cell close to the invisible wall, use Blinding Light Focus Light on the sphere, quickly grab the power cell with Axiom Force and push into the other room. Focus Light the sphere again and walk into the room while keeping the light on the sphere.
Insert and push the cell through the little hole on the left and crouch walk through there to reach another room. Insert the cell in its slot next to the portal, enter the portal, hit the circle at the end, and get the Artifact.
Walk to the right through the gate and glide all the way to the portal. The path to take is very obvious. To glide properly just make sure to not move to much and let the fans do most of the work. The only part where you personally need to glide is at the end to reach the portal.
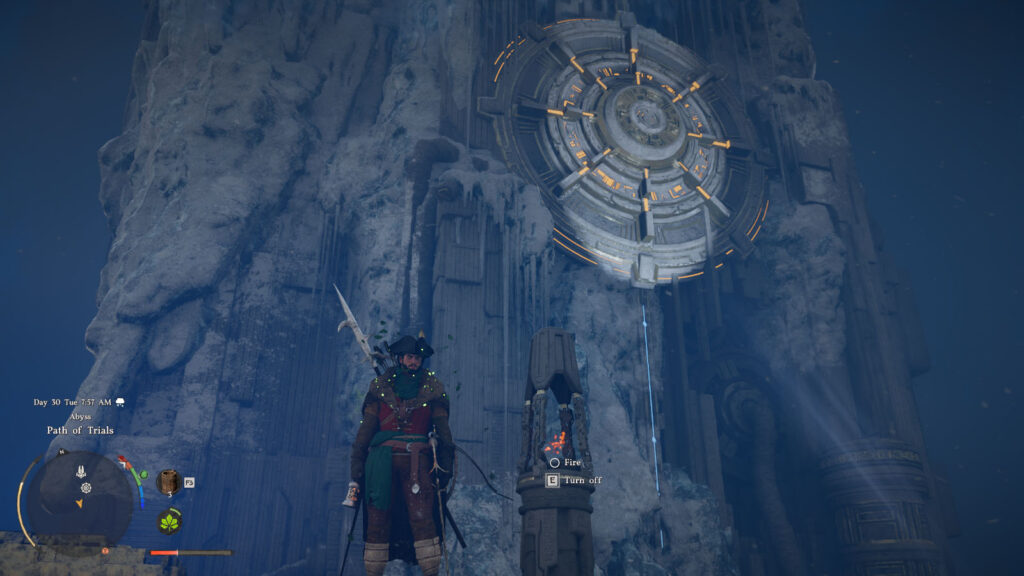
Path of Trials
This one is a bit special since it also unlocks a skill at the end of it.
The greatest trial here is the cold. You’ll take damage from the cold, which means you need to stay close to bodies of heat. There’s beacons that you can light up everywhere, so you’re safe on that front. Fun fact, inside the water it’s perfect temperature for some reason.
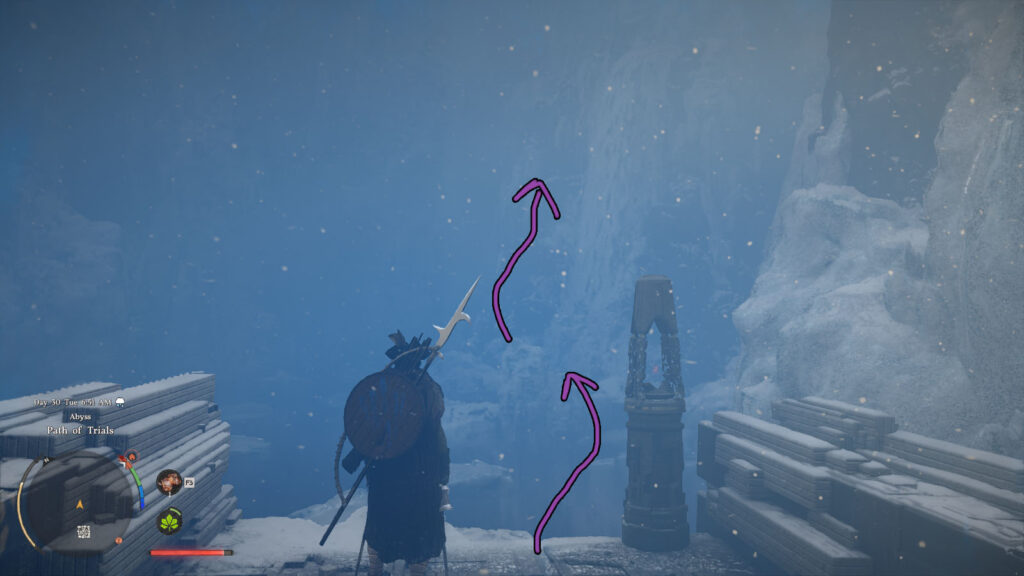
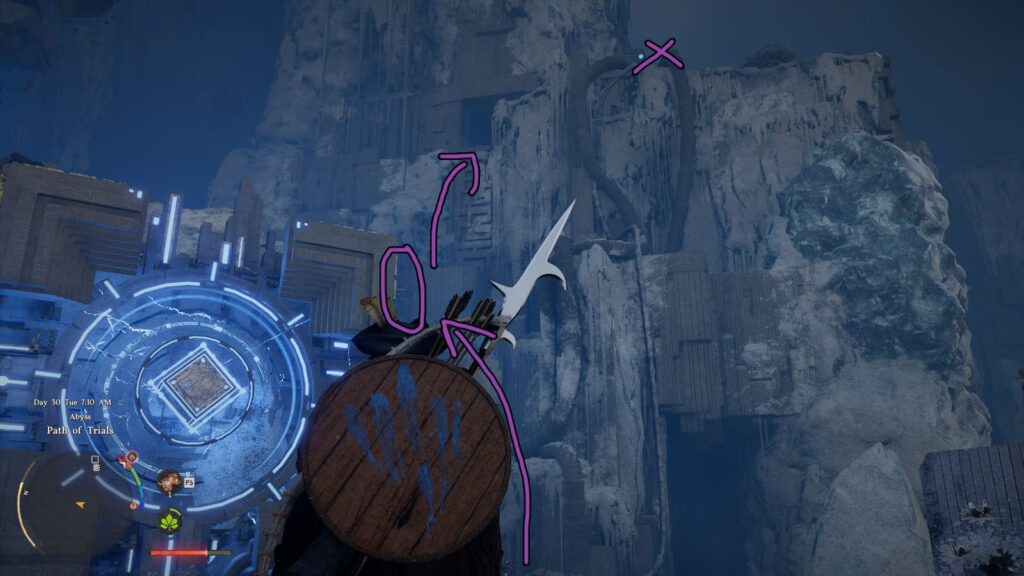
There’s two paths you can take: one to the left on top of ice sheets, or to the right through the water to a platform. Go to the right next to the beacon. Look up and you’ll see another beacon on the edge of the rocks. Climb there and fire it up so you can take a break from the cold. Then climb to the top and to the next beacon.
Aim for the black-looking rocks, not the ice ones, since you’ll slip on those.
Go through the corridor, take a left through the icy corridor, and take out the power cell. This is the easier way to do the puzzle. You can also just climb the outside to reach the top. Here’s how to do that. Look behind the power conductor. There’s a a torch there. Axiom Force Maneuver your way there, if you have the skill, and then to the next level to reach the top.
If you can’t climb, remove the power cell, go back through the icy corridor, and climb through the warm room to the top. The door there will be open now.
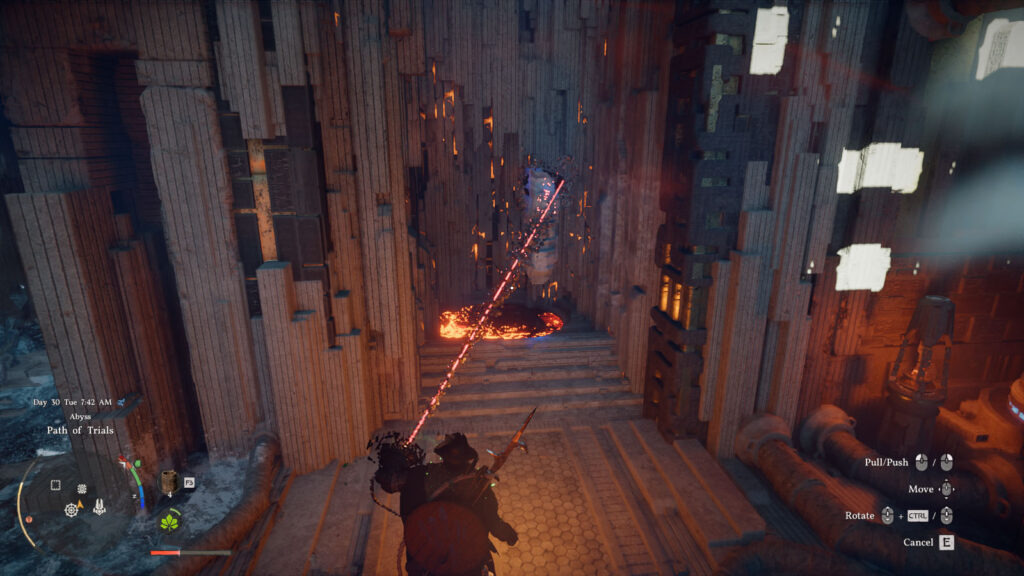
Take the power chip from the top and bring it into the warm room downstairs to hold it over the little spot of lava. The chip will turn to normal now, so bring back to the top and insert it in its slot.
The circle is right next to the slot, so climb and finish the puzzle. Climb to the top and you also got the Artifact. Plus, a new skill called Frozen Mantle, which allows you to create a barrier of ice around you and burst it to freeze enemies. It’s in the red Health tree.
To reach the next portal, you’ll just need patience. Nothing else. Don’t try anything too smart, you’ll likely fall.
Sanctorum of Darkness
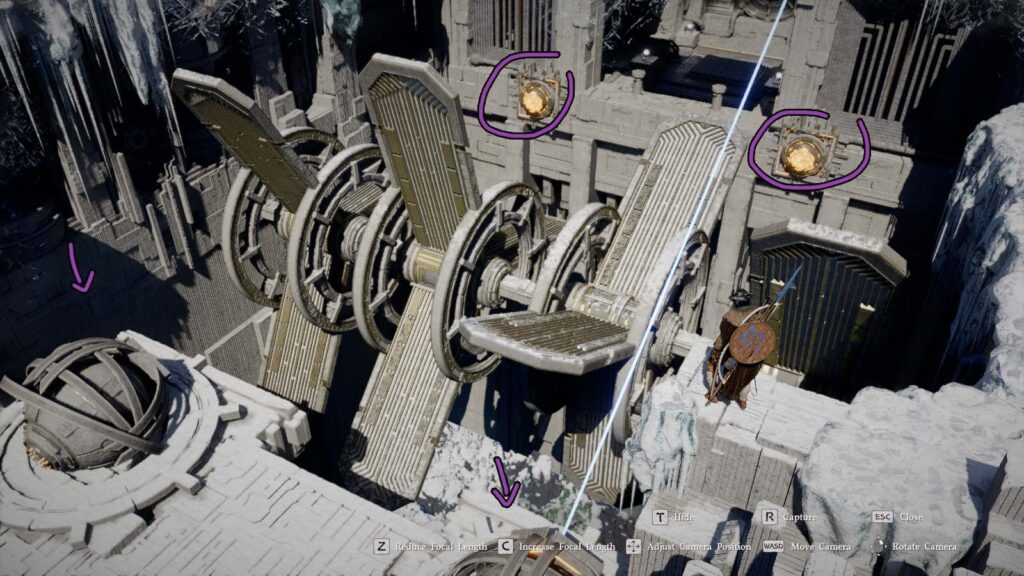
The gist of the puzzle is simple. Use the big sphere lasers and hit the smaller spheres across the giant fans. You can move the already active laser sphere by attaching to its back with Axiom Force and moving it to hit the target.
Now, under the Nexus (the fast travel point), there’s power cell. Go down, either on the left or right, and walk on the path to reach a grate. Jump on it and Force Palm it while resisting to get inside. Remove the power cell from its socket and raise it as high as you can.
The electrical wall at the top will disappear now. Go to the top, grab it, and insert it in the socket to the left of the Nexus, down on the lower floor.
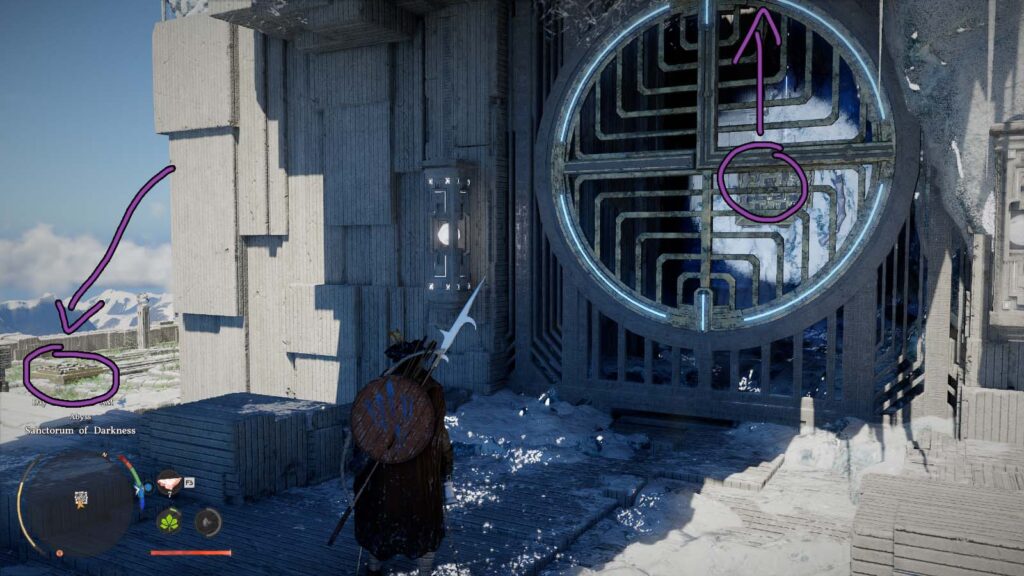
Go back up, aim the laser properly, and make your way, either climbing to the left or right, to the circular power station that you’ve probably learned by now you need to Force Palm. Climb up and get the Artifact. The gate to the next region is to the right of the Abyss Artifact.
Loop of Life
The idea here is simple in principle. You need to insert the chips into their slots and get all three loops moving. Once you do that, you can Force Palm the round button at the end and finish the course.
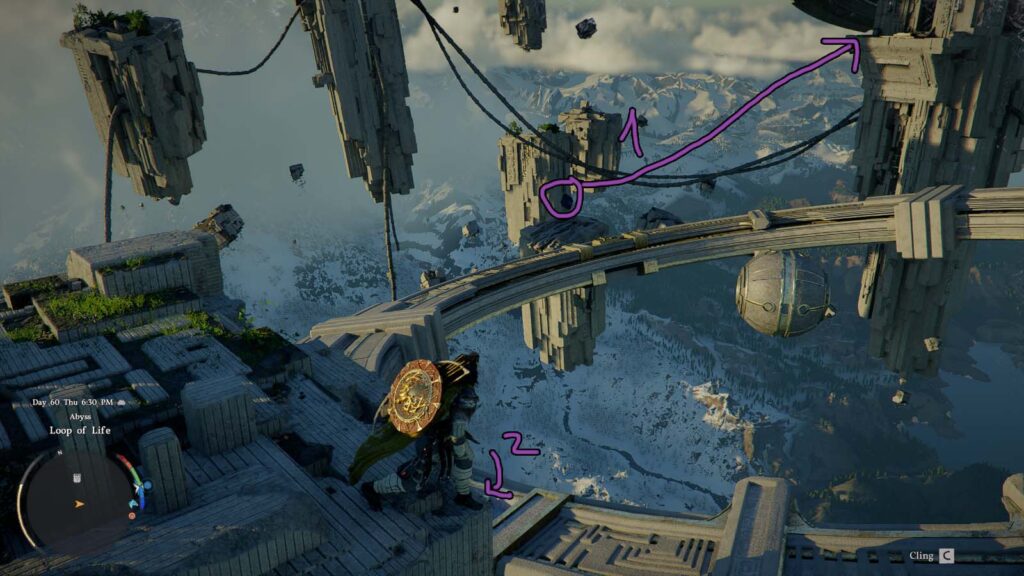
For the first loop, you just need to drag the chip into its slot and jump Force Palm it into place. However, I suggest first moving the chip in the distance up where you’ll need to get it, since the loop will start moving and make the second part a bit more difficult.
To get up where I told you to bring the chip do a triple Force Palm jump and glide there from up close. Then pull the chip and insert it to get another chip hidden behind a barrier. Get the chip behind the barrier out and get it up high. Then pull the previous chip from the slot you inserted it into and put it up with the other one.
One of them bring them up and put them close to the 2nd loop. Then insert the one left behind in the slot of the 2nd loop and the 2nd chip into the slot of the 3rd loop. And you’re done. Force Palm the button and get your Fragment.
The gate to the next part is on the left, next to the Fragment. The path is relatively simple and basic. There’s a part where the platforms turn around but you can use Axiom Force to jump around forward and skip the platforms that are more annoying.
Tree of Slumber
Based on the lava all over the place, you guessed it, this location will unlock a new elemental skill.
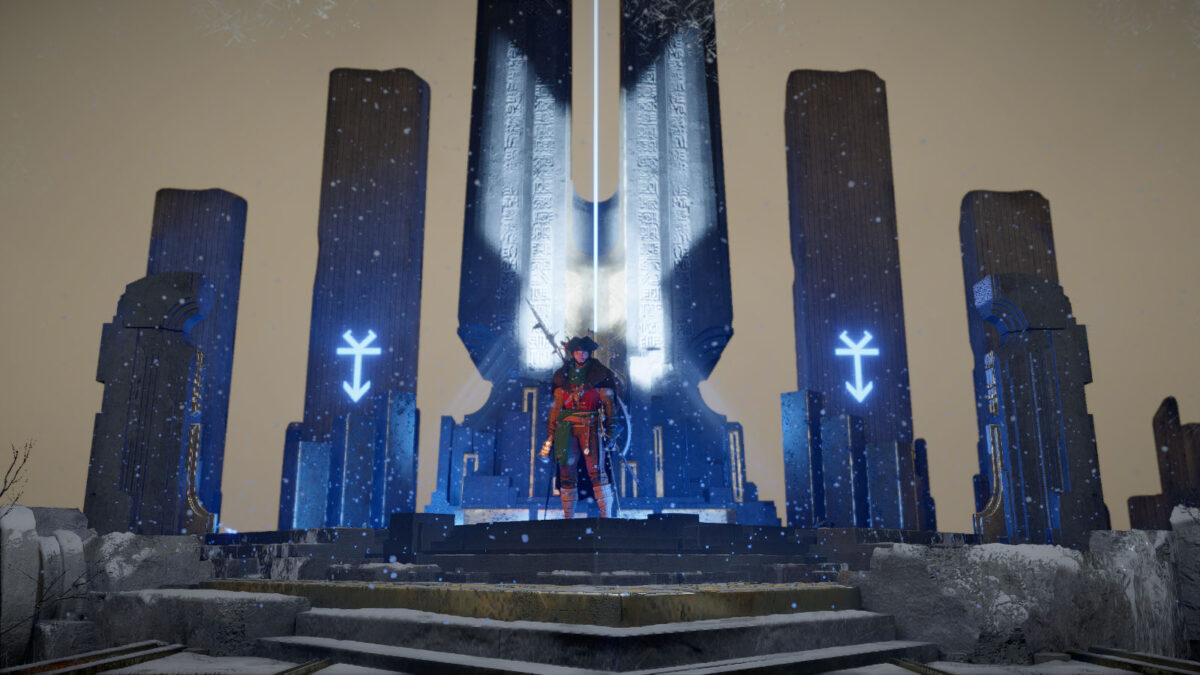
This one’s a bit silly. So, go out and you’ll find a circular “thing” with 5 pillars surrounding it. One of them is down and shining yellow while the other ones are tall and bland. Go to the one that’s yellow and insert your sword in the slot facing this pillar.
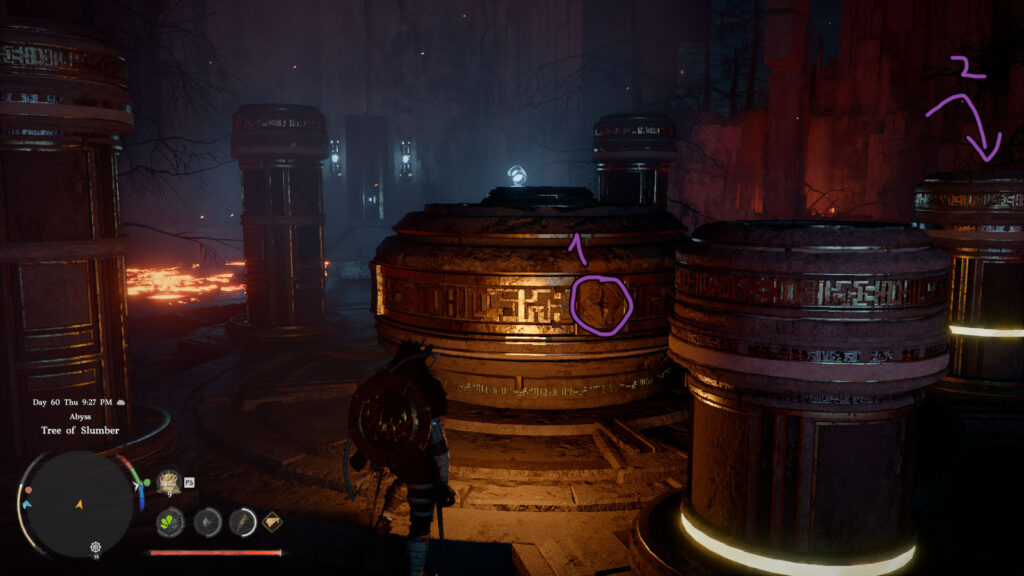
You can do that by pressing Shift + Right Click or RB + Y while looking at the slot in it. You’ll see that all of the pillars besides the one on the right are highlighted. Turn to the left until all of the highlighted pillars reach the same height as the one next to you and shine yellow as well.
Now, in theory, you’re supposed to do something smart here. But we’ll do something easy. Climb on the only pillar left, crouch, and hit the pillar from the top using Force Palm like 10-12 times until it shines blue and the puzzle is solved.
Force Palm the final button and get your fragment. On top of that you’ll also get the Flame power, which will unlock Flame Strike ability.
Go through the gate. Instead of doing the whole course, just triple Force Palm jump and glide to the part where you’ll glide to the top.
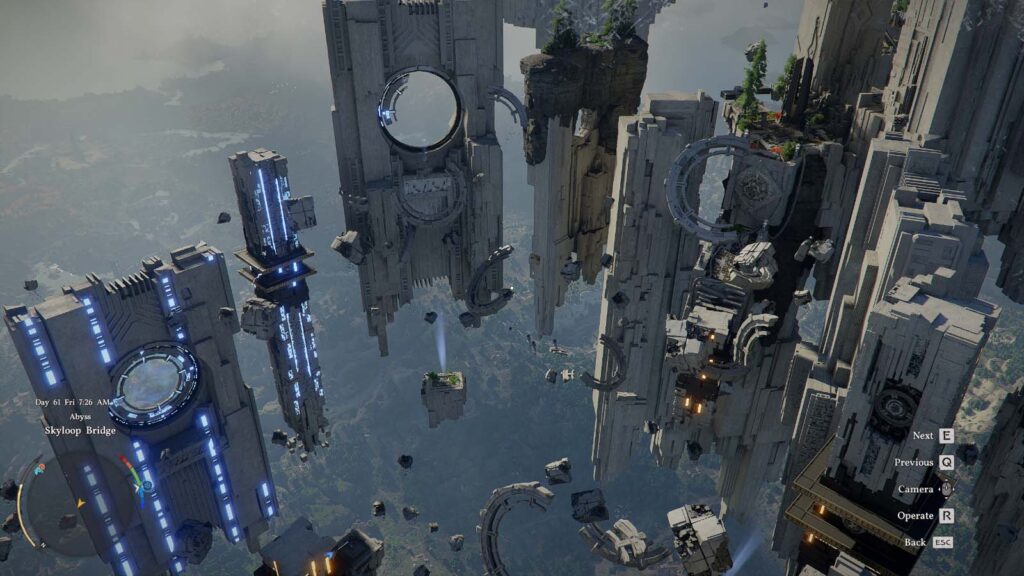
Skyloop Bridge
Can’t say I’m a fan of this one. You’ll notice there are 4 circles on the map, one of the is activated and looks like a portal, while the others don’t. You need to activate all 4 to finish this puzzle.
In the middle of the area, there’s a yellow platform. Go and jump on the normal platform standing in front of it and hit the round yellow spot on it with Axiom Force. You’ll notice you can now “control” and choose one of the other yellow locations and make them blue. Once they’re blue, you can move the platform you’re standing on to move to them.
Yeah, sorry, not the best explanation but this is how you get around this map. You’re supposed to use the platform to get to the loop on the left, and then to the two on the right. Once you’re there, you’re supposed to pick up the flying debris using Axiom Force and put it in the circle to repair the loop.
For the first loop on the left, you use the small one right next to the circle and the really large one. The mechanic is a bit finicky and you might have to force the debris into the slots.
For the second one, the one on the right that’s higher up, you’ll need to get the very large piece that’s high up, and then finish up with the two smaller pieces that are right in front and below the circle.
The last one is the easiest one as it’s partially made and it needs the medium and small pieces that are right in front of it.
Activate the button and get the Fragment. The gate to the next one is behind the fragment. This is the end of the path as the portal will take you to the Sage’s Peak back on the ground.
Twisted Thicketway / Sage’s Peak
From the place you spawned at in Sage’s Peak, follow the cables down into a cave to the side of the mountain. Inside the cave, go to the left and interact with the button there to take the elevator up.
Here you’ll reach the actual puzzle location. Axiom Force the yellow button there and you’ll control the pillar in the middle. What you have to do is move the pillar under the 3 circles and press operate to attach to them. Once you do, rotate them until you hear a magical sound and the gear will click into place (it will stop you from rotating). This “clicking into place” happens several times while you rotate, so you’ll know you’re right when it happens right after hearing the sound.
The direction you rotate doesn’t matter. You won’t know you did it right until you do all 3 of them and the circle in the middle lights up. If you’re still struggling, reset it by fast traveling and do this: turn left the down circle and the upper left one 3 clicks, then turn the upper right one 2 clicks.
Now move the pillar to the middle, operate the newly lit up blue circle, and the fan at the top outside will activate.
At the top, to win the boss fight with the Abyss Kutum, you need to use Axiom Force on the red gem in the middle of its face and pull hard. You need to do this a couple of times until it falls out and you can hit the gem. Do this probably 2 times and the fight is done.
Activate the circle up high and get your Artifact, then go on to the Ice Cradle. Just a heads up, you can still follow the path, but go upward through the guide after jumping to the Ice Cradle section.
Spire of Frost
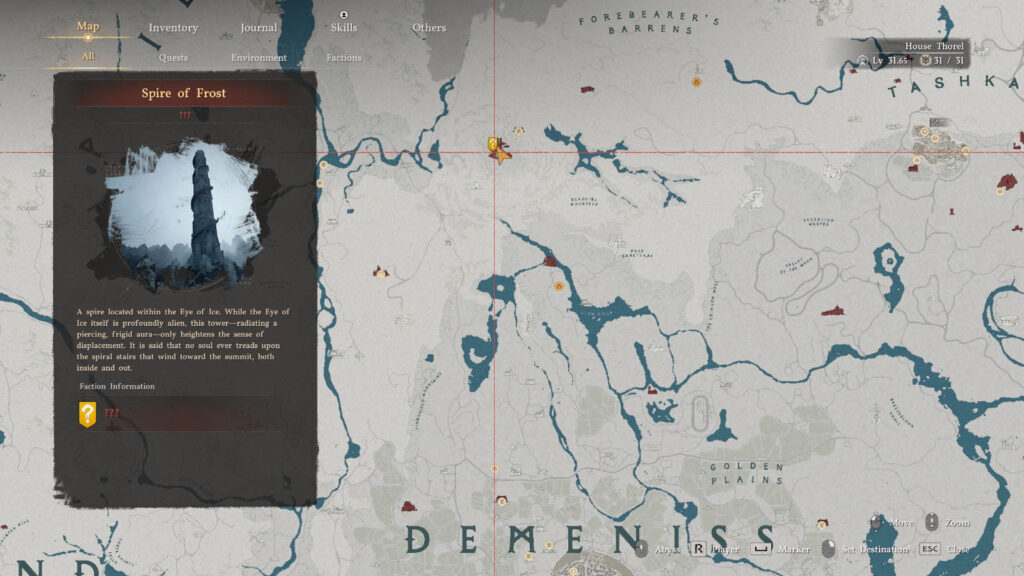
The last optional spire that’s not story related accessible without main story progression is the Spire of Frost in northern Demeniss, close to Pailune and Crimson Desert.
All you need to do here is light some lanterns throughout the spire. They’re all frozen, so you need to use Turning Slash (the heavy + light attack) on it to break the ice and then interact with them to light them. Make sure to bring a lot of Health consumables since you’ll take a lot of damage as you walk around here.
First one is at the entrance. Second one is up the stairs, illuminated in a way you can’t miss it. The third one is outside, after the first set of stairs. Fourth one is right when you enter back in the Spire, at the end of the outside staircase.
Fifth one is at the top of the new set of stairs, right before going out. Sixth is outside after the first set of stars. The last one is inside when you come back in. This will make the Abyss Gate appear and give you access to a new set of Abyss Challenges.
Passage of Malice
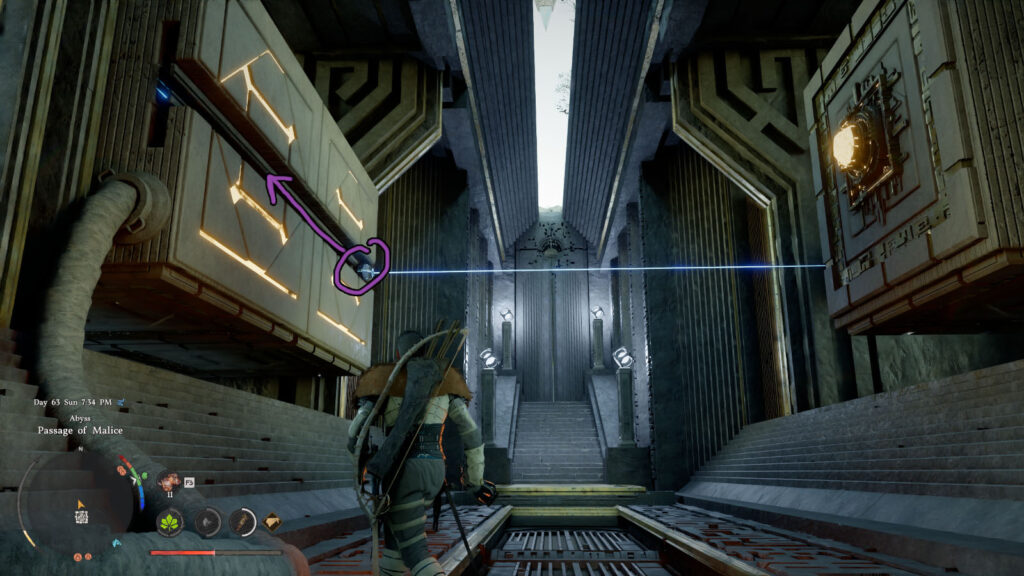
Start the puzzle by grabbing the ball shooting lasers with Axiom Force and pulling it to hit the yellow ball on the right. You can also just hit the yellow ball with Focus Light to do the same thing, but you kinda learn what you’ll have to do for the next puzzle by doing it right.
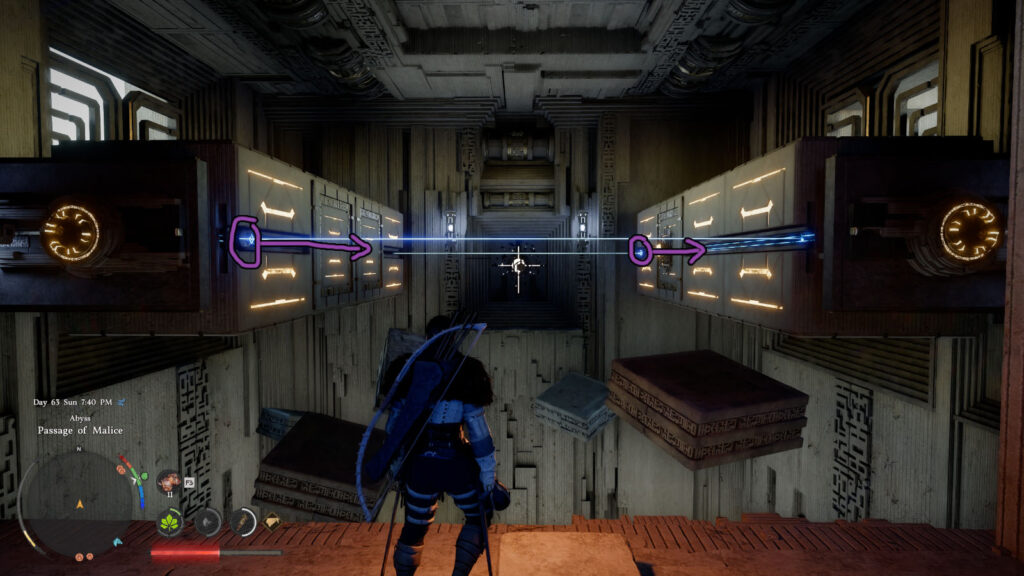
Now, the actual puzzle which is down stairs is actually incredibly easy. There’s two lasers and two yellow balls you need to hit, like for the puzzle above. However, you need to set up the scene first. You’ll see there’s two yellow buttons on the sides. Connect to the one on the left with Axiom Force.
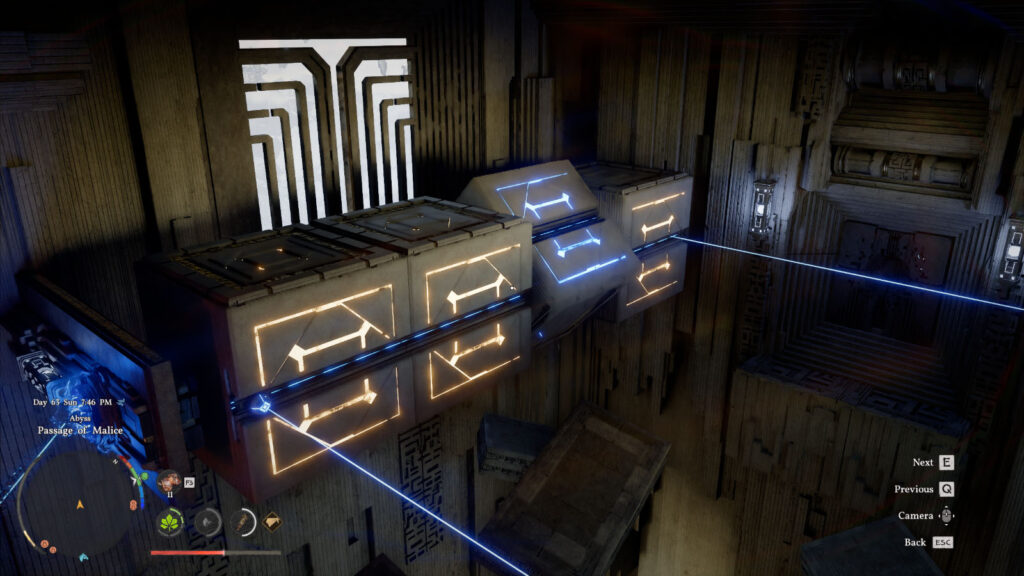
What you’ll need to do is turn around the cubes in the middle to create a long line. This will allow you to move the laser ball where the third cube is using Axiom Force while standing on the other side, so it can hit the yellow ball.
Do the same thing on the right, and bring the laser to the second cube next to the start, and then rotate the yellow balls back so they can be hit by the lasers. Go through the opened door, put the floating battery in the empty slot using Force Palm, Force Palm the ring above that activated, take the portal, and finish the area by getting the Artifact.
By the way, behind the Artifact, there’s a thing called the “Fruit of Life.” DO NOT PICK IT UP! Only do it if you have a quest to get it, otherwise you’ll bug the quest.
Tomb of Perdition
This next puzzle is extremely easy and quick to do. I recommend getting the Force Current ability if you haven’t yet since it will make this 100 times quicker.
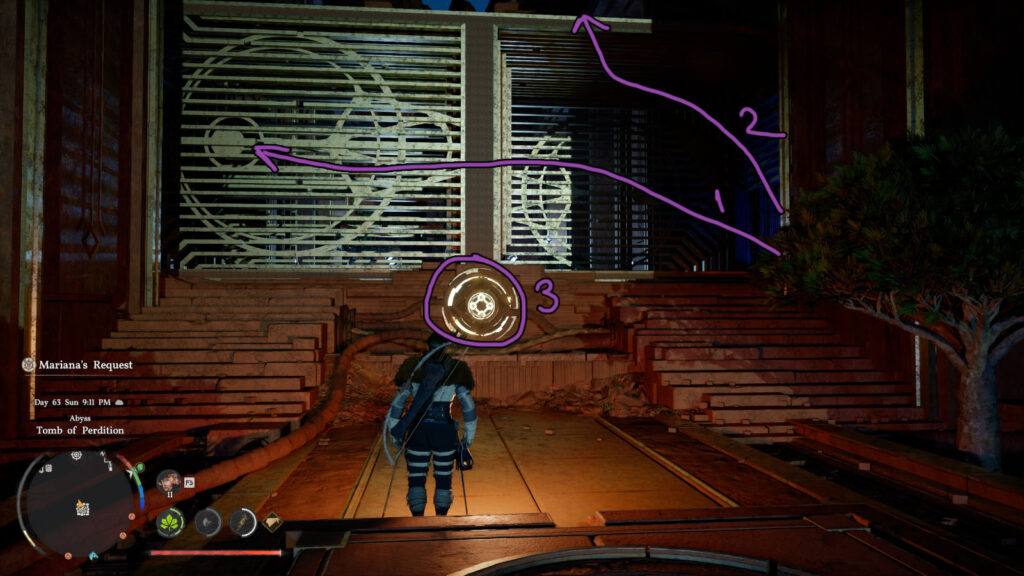
First pick up the two batteries in the room on the right. One of them put them on the left and the other put it above the golden contraption. Now use Axiom Force on the yellow button in front of the golden contraption, which will cause the thing to rotate and give you access to the room on the left.
Now put the battery in the empty slot in the room on the left and get the chip out of there. Hit the button again with Axiom Force and insert the chip in the room on the right. Jump above the golden rotating corridor (there’s a chest on the right up there) and bring the leftover battery with you to the other side. There will be a slot there to insert it. You can see it on the minimap, it’s closer to the altar than the ring.
Once that’s done, the ring will activate and you can Force Palm it to end the puzzle. The platforming to the next area is pretty easy, I just triple Force Palm jumped and glided to the end for most of the tracks.
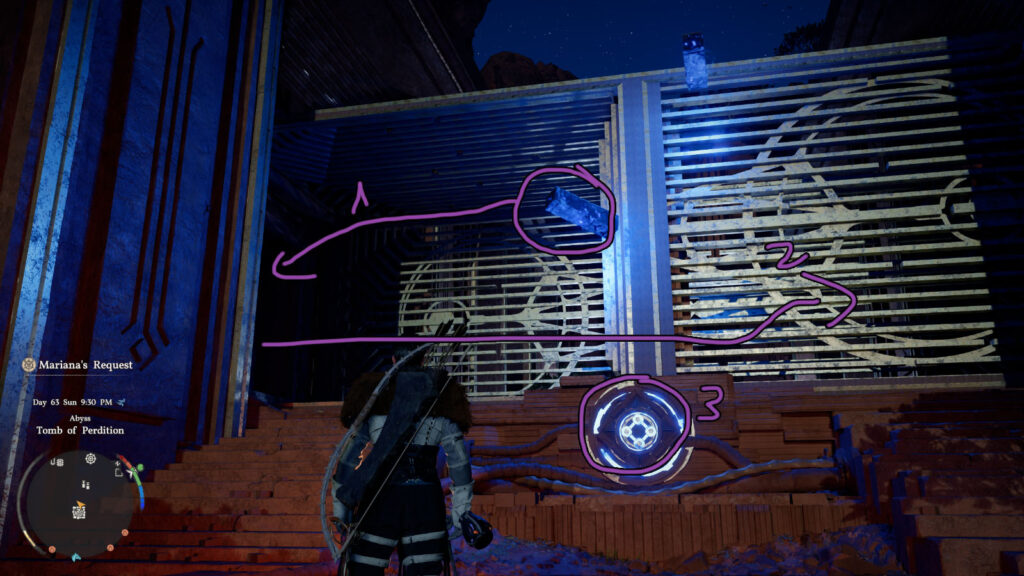
Desert Fragment
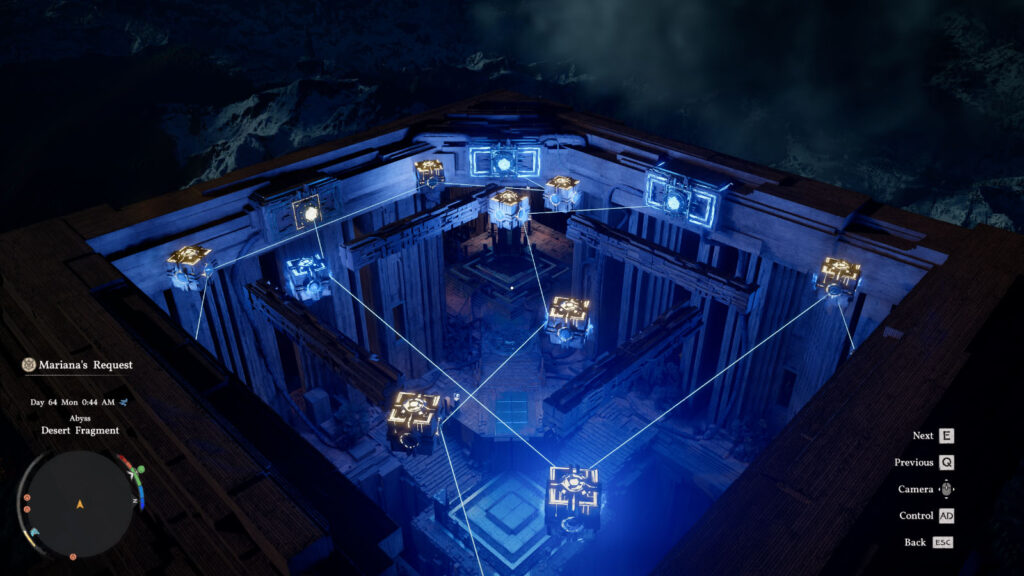
This puzzle is a bit of a joke. Connect to the yellow button and the camera will bring you up to some cubes and lasers. You can select different cubes and turn them around. Your goal? To hit the yellow balls with the lasers using the mirrors on the cubes. Extremely easy, really. You can just copy the solution from above.
The hardest part is actually selecting the cube you want to control as it’s a bit annoying to go through them, but otherwise it’s something you can do in less than a minute since the rotations of the cubes are set and you can’t actually mess this up.
The ring is in front of the altar, just hit it and get the Artifact. To get to the next region, activate the Skybridge, climb on top of the previous puzzle, and just glide to the portal in the distance.
By the way, there’s a Frostward III Abyss Gear hidden in a chest below the portal to the left. Drop off and land on the ore there and use Focused Force Palm on the glitchy wall when the leaf icon appears on the yellow bubble to break the wall and get to the Treasure Chest.
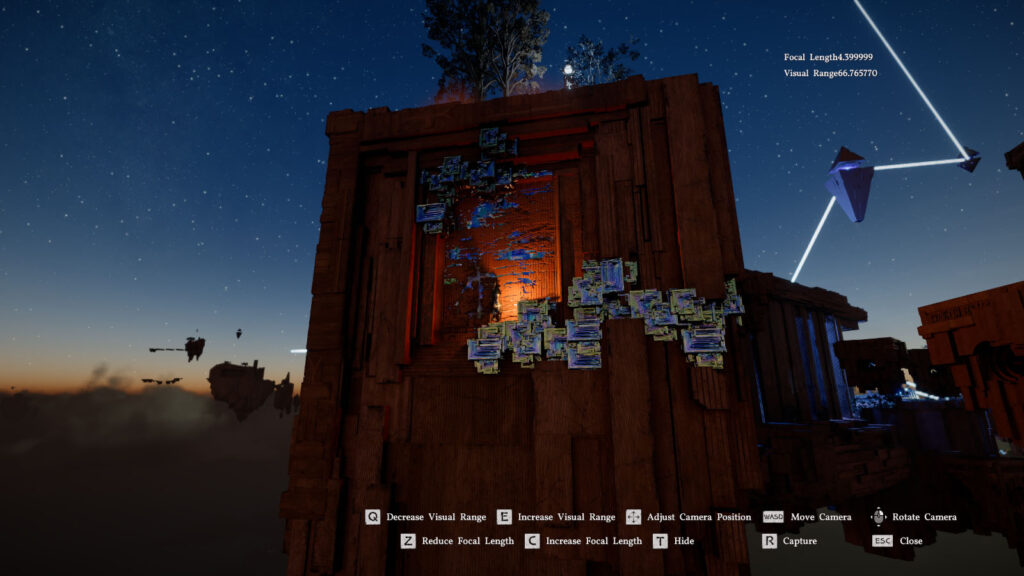
Cradle of Truth
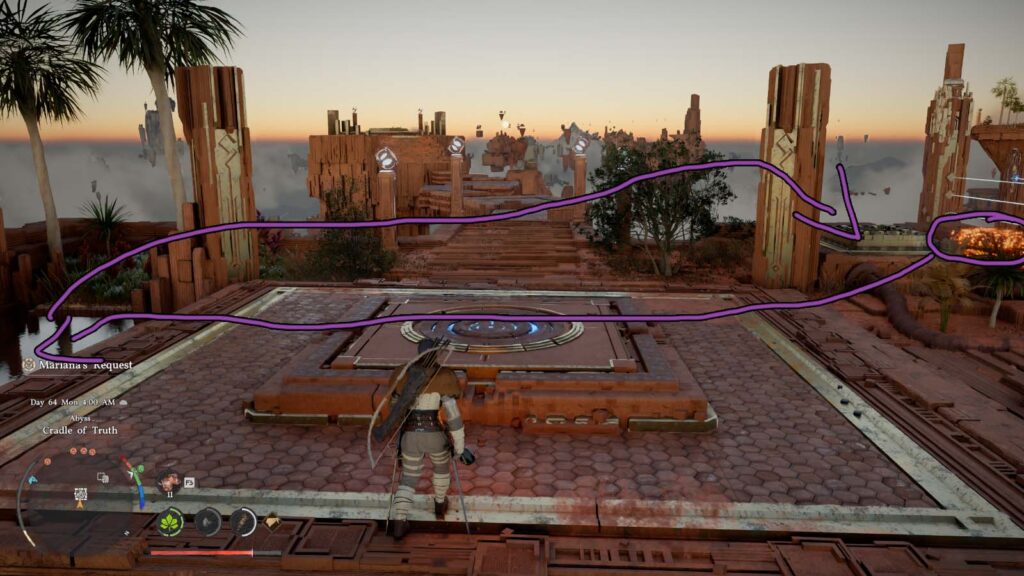
Start by putting the chip next to the Nexus in water to cool it off and then into its slot using Force Palm. This will make the platforms start moving around. Now we get to the real part, the lasers.

The way you’re supposed to do this puzzle is hit the yellow buttons on the pillars to the sides to turn around the lasers. This will allow you to stand on the platforms and advance without being hit by the lasers.
You can also, of course, just triple Force Palm jump and glide a lot and try to move the chip that way, but it’s more annoying.
So, hit the closest button twice and get on the platform. This should allow you to take the platforms safely all the way to the chip. Now, at the chip, hit the closes pillar button twice and pick up the chip to advance. At this point you can just push the chip as far as you can, then glide to the closest safe spot, push the chip again, and done, you’re at the end.
Insert it in the slot, push the ring at the end, and done. Get your Artifact.
This is the end, unfortunately, as you “can’t access this area next” for the end. This likely means we’ll be coming back here later. When later? No idea yet.
Spire of the Stars
You will automatically reach this location during the main story in Chapter 4. You can’t enter otherwise since you need a key from the dean.
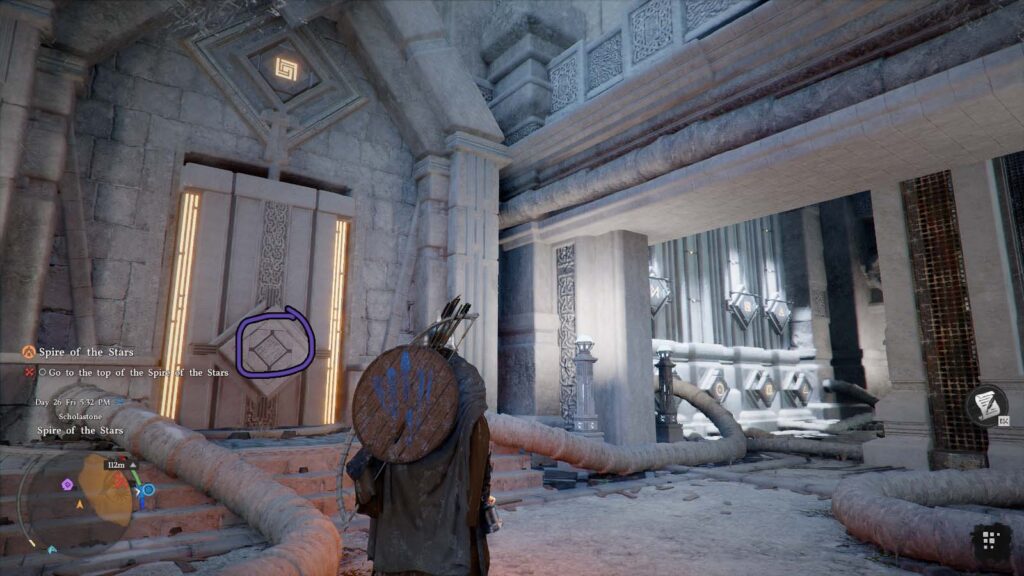
For the puzzle, you’ll need to Force Palm three squares on the walls. One on the left-side room and two on the right. Above the stone squares you can push there are different golden signs. You need to pick up the little Engraved Stone that appears after the Force Palm and put them in their respective slot in the main room.
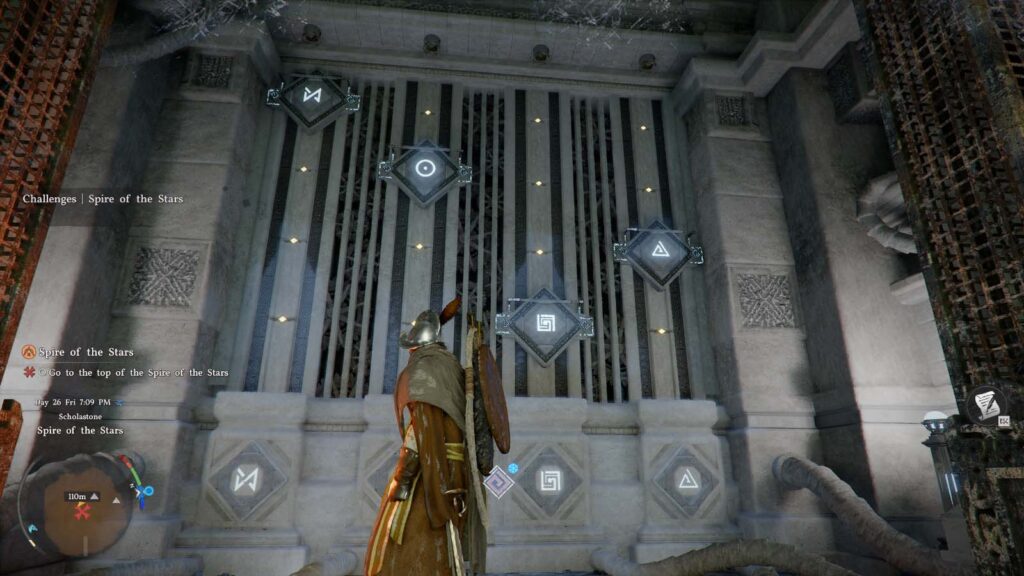
After that, you’ll need to make them reach the height shown on the walls in the rooms you got the Engraved Stones. To move them down, you actually need to jump and hang onto them until they reach their desired position. You can see the exact final positions in the image above.
If you mess any of them up and they fall lower than they should, just Force Palm the sign below where you inserted the Engraved Stone to push it back to the top.
Now walk on the middle of the elevator and get to the top. After a set of stairs, you’ll reach the Abyss Gate.
Sanctorum of Insight
For the first part there’s nothing special. Glide across and climb to get to the quest marker. Crouch Force Palm the circular power station and this part of the Abyss is restored.
After getting down thanks to the story, just fast travel back and let’s continue the journey in the Abyss. You’ve now got a portal that will skip the gliding and climbing. Go through the gate and pass an incredibly simple platforming part.
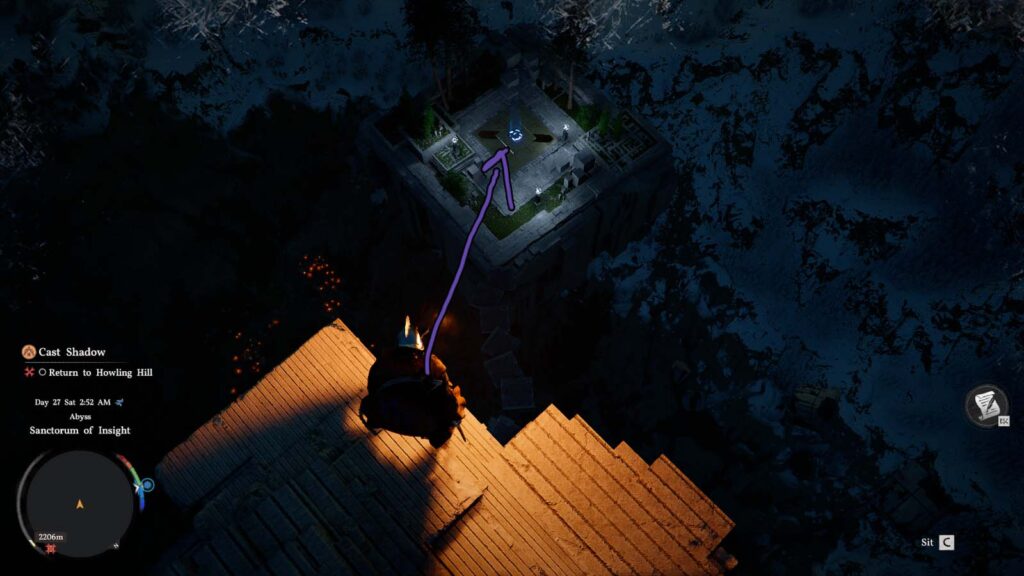
You’ll reach a bigger island with a large hole in the middle that will trick you to jump into it. Don’t. Walk to the edge at the front of the island and try to glide directly to the portal below. It’s a very short glide, so you don’t even need decent Stamina.
Secret Garden
There’s a bunch of stuff down here. First of all, ignore everything and climb using the platforms until you reach an elevator platform that takes you to the Nexus. Activate it to make sure you don’t go back if the game crashes or something.
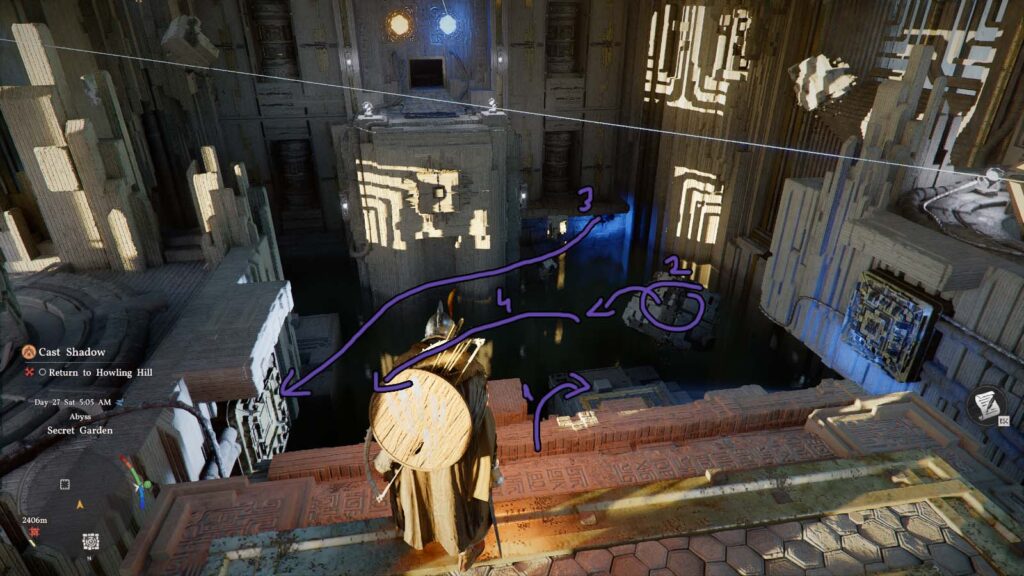
Now, for the first part. Insert the power chip into the socket. Classic Crimson Desert puzzle. My advice? Jump down on the platform close to the chip, and then drag the large fragment floating around to use as a secondary platform, since you won’t be close enough to grab the chip instantly.
Then put the chip on position for the Force Palm, but also place the large chunk as a floating platform to stand on so you can actually punch the thing (don’t forget you can rotate it to make it easier to stand on).
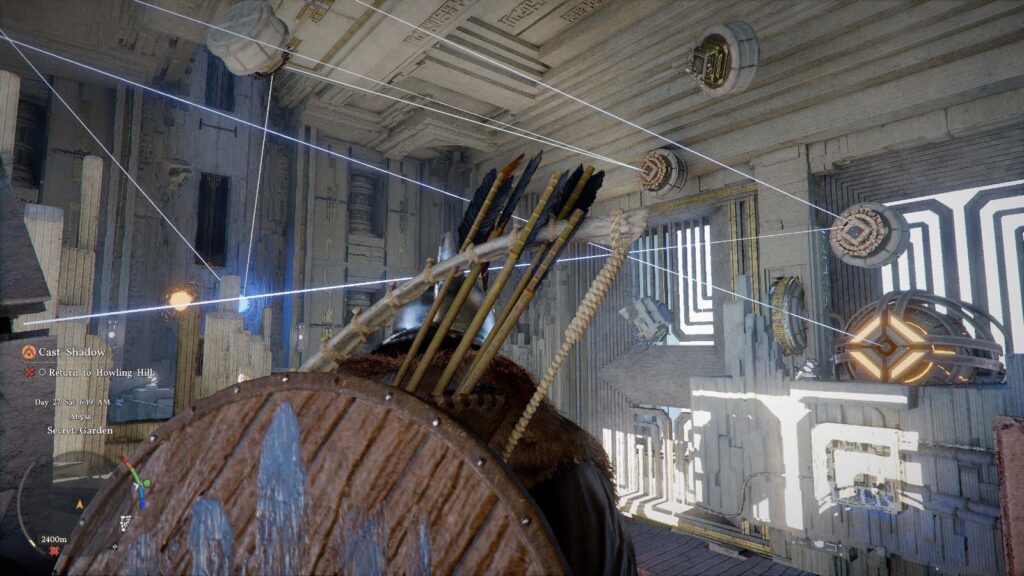
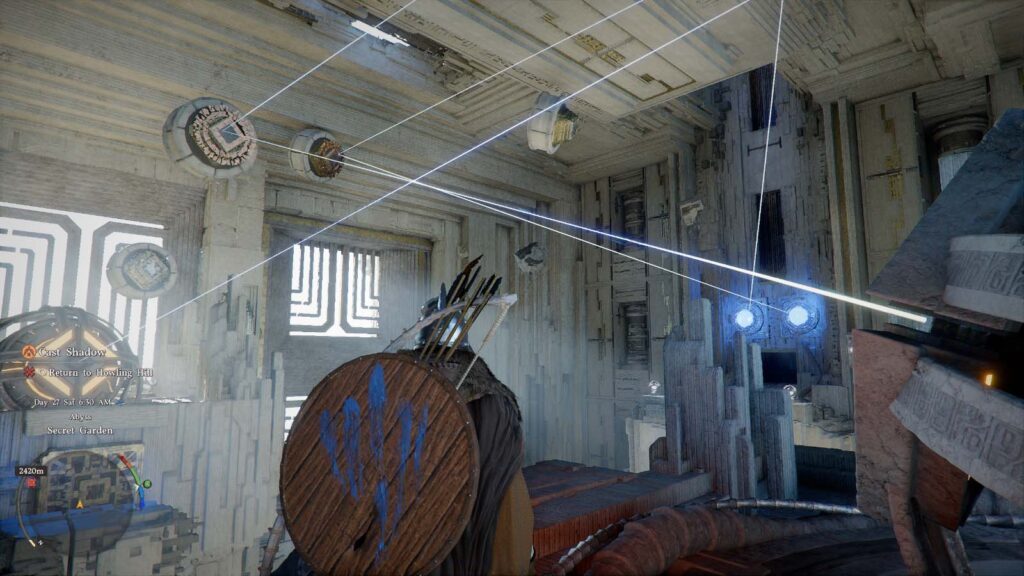
Go to the back of the newly activated laser and hit the small round spot with Axiom Force. Your goal is to hit the mirror above the laser on the right and make the laser hit the same ball as the other one. Why? Because you’ll then have to go to the other one and aim higher to the mirror above the one the right one is hitting to get the ball on the left. You can see the result in the images above.
Go through the hole in the wall under the balls and glide to the top. There, connect a Conduit right next to the hole you came out of, Force Palm the circular power station, and you’ve restored another part of the Abyss.
Vault of Vengeance
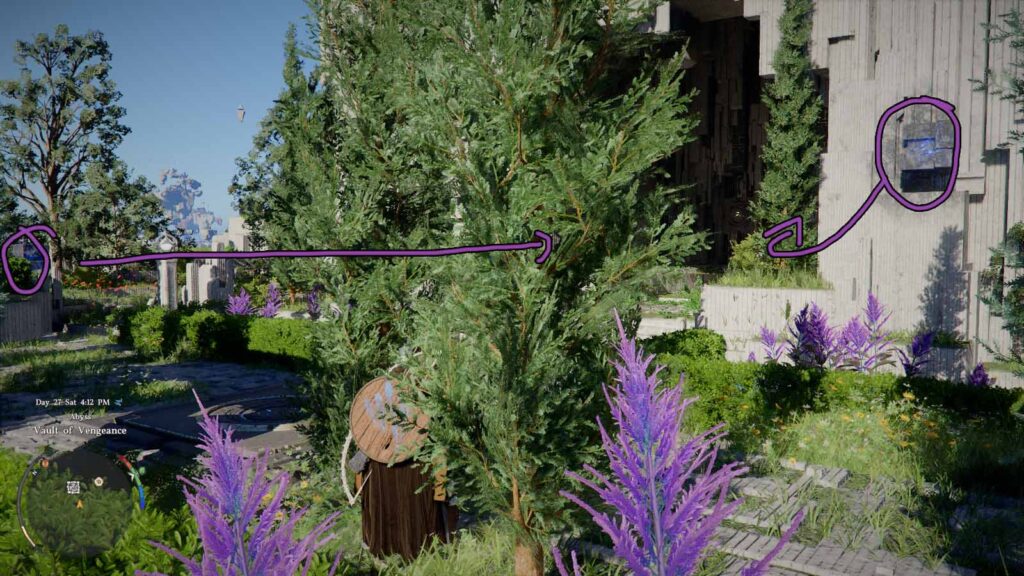
First thing you’ll need to to here is grab the power cores outside and put them in the slots next to archway. You’ll notice them when you try to approach the door and face an invisible wall.
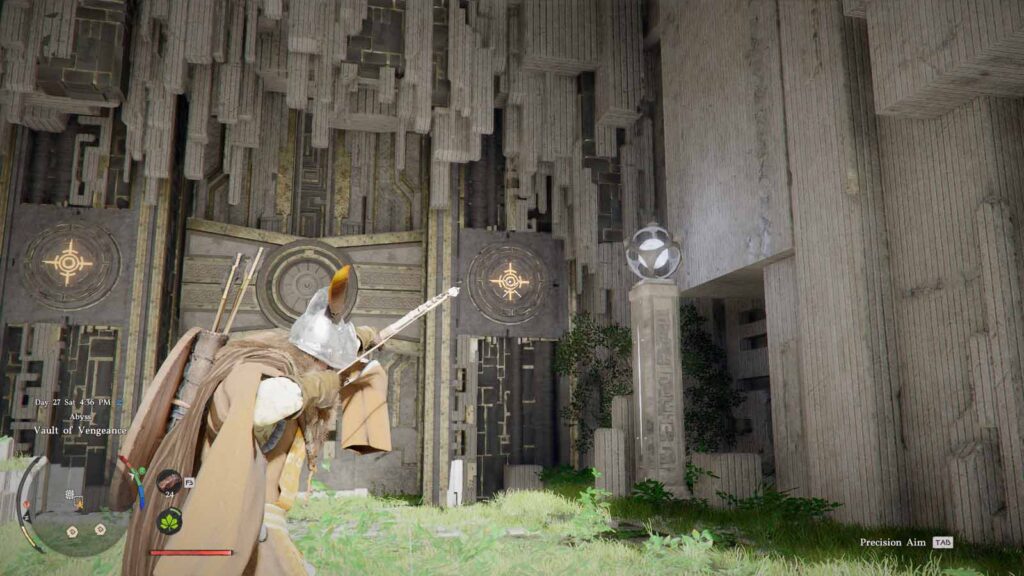
To open the door, you’ll need to shoot the circles next to the door with a bow. Then use Nature’s Grasp and continue.
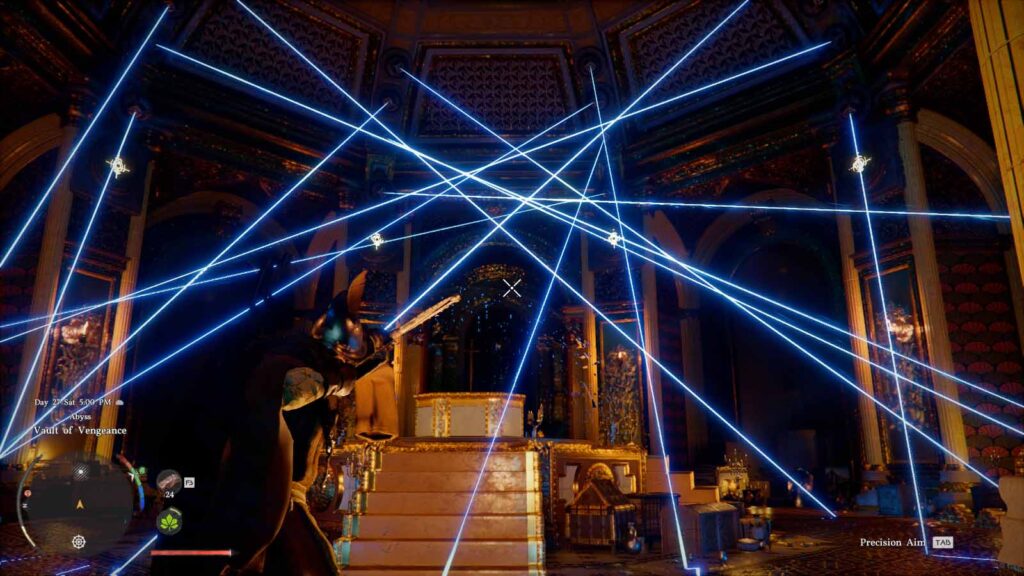
You’ll now reach a room full of lasers. To solve this puzzle, you’ll need to shoot the 4 circles above, as you did at the door, but at the same time. If you shoot them one by one they’ll deactivate by the time you finish. To do this, you’ll need Focus Shot from the green Spirit skill tree. Without it, you can’t solve this puzzle. Mark all of the 4 spots and shoot them at the same time.
The lasers will deactivate. Pick up the Golden Sword in the middle and wait for the platform to go down. To get past the lasers, just climb to the top, above the lasers, and walk on the beams to the electric chip. Insert the chip in its slot, take the portal to the top, insert the battery up there on the right in its slot, and push the button to solve the puzzle.
The only real problem with this puzzle is the Focus Shot part, otherwise you can finish this in under a minute.
Go take your Artifact. Across the Artifact, past the brambles, there’s also a hidden treasure chest. Go to the gate and let’s get another Artifact.
Courtyard of Precision
This one is a bit special since it also unlocks a skill at the end of it.
The previous puzzle was basically a prelude for this one. All you need to do here is use Focus Shot. A lot.
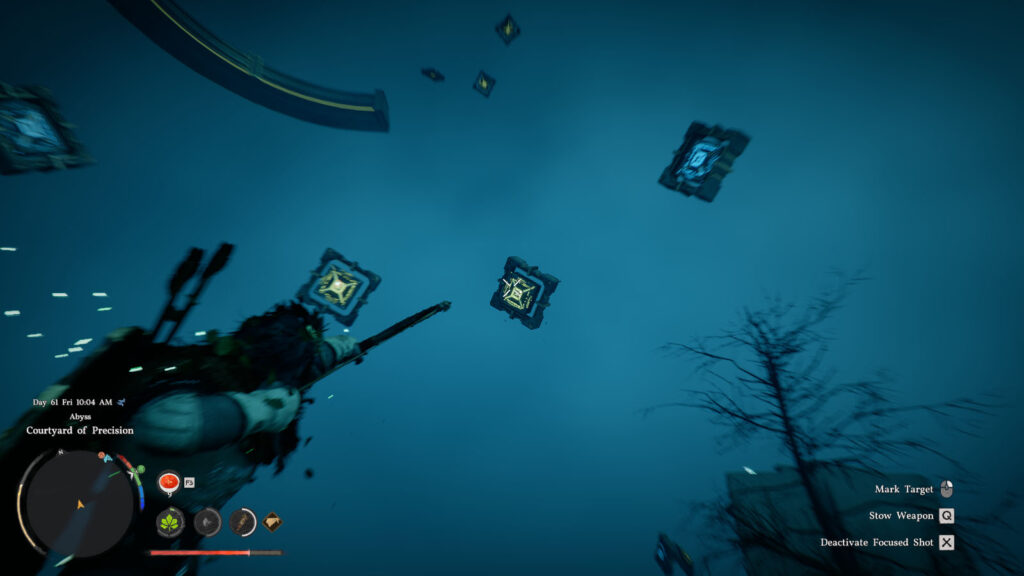
If you look up you’ll notice there’s 4 sets of flying squares. Some are blue, some are yellow. Go to each set and Focus Shoot the yellow ones in each set. Once you turn all of them blue, a giant fan in the middle of the map will activate. Jump and glide to the top.

While gliding up (and yes, while you’re going up, not down, since down will make things harder) press the bow button (Q on keyboard) to enter Focus Shot mode while in the air and shoot the two sets of flying squares in the yellow part. You could also land on the rings, but its slightly harder to hit the yellow spots since they’re aimed upward.
Once the two sets in the sky are also blue, the button below will activate. Hit it with Force Palm and get your Artifact. You’ll also unlock Lightning and the Lightning Surge skill.
Altar of Solitude
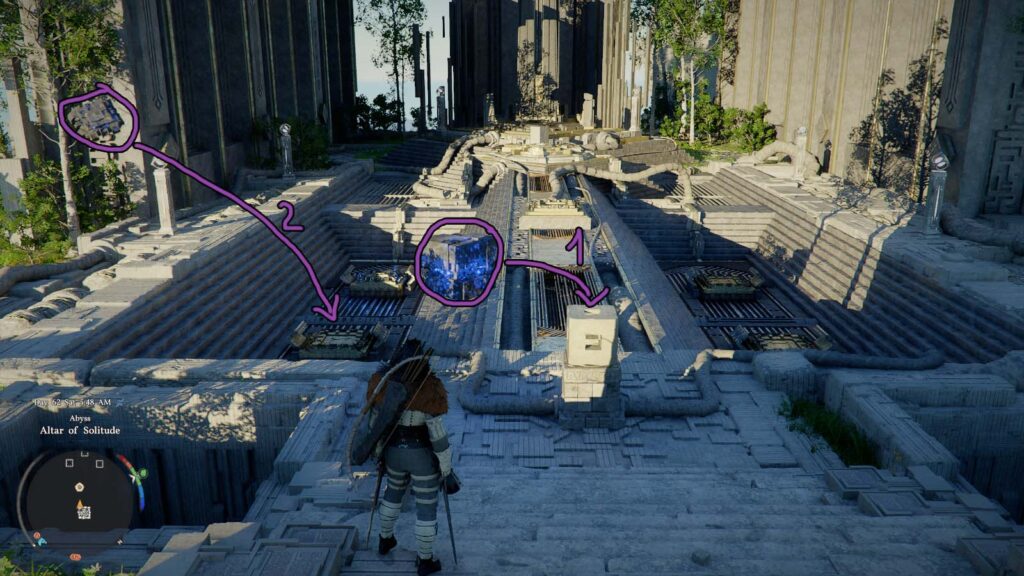
This one starts like a classic with the cube that you need to put on a pedestal. Then you’ll have to do the main puzzle of the location, which is to put the chips in the slots on the left and right to turn the floor around and reach the area underground. For now, just get the chip from the left and put it in the empty slot on the left. Stay on the platform so you can be there when it turns around.
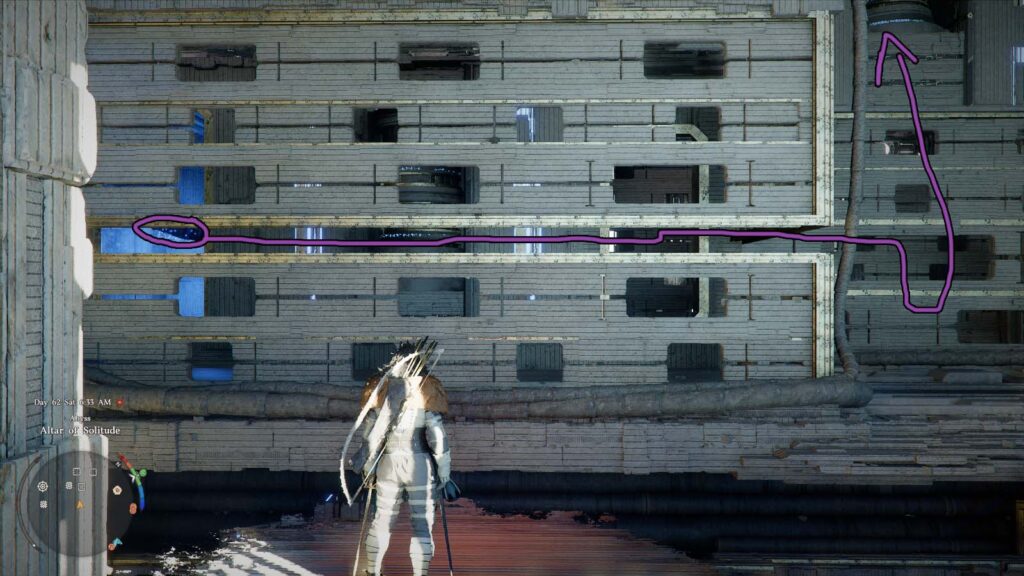
Down in the hole, you’ll see on the right a chip in the wall. You’ll need to grab it through that small hole using Axiom Force and drag it outside using the bigger hole on the right. Once outside, raise it next to the chips on the roof and leave it there. You’ll need to turn the platform around again to get the chip outside.
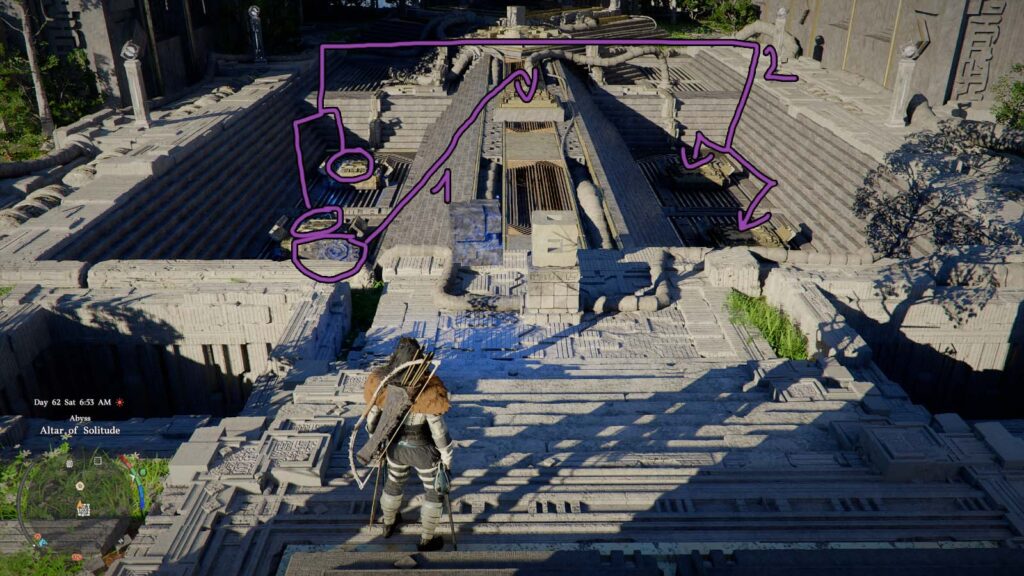
Use the portal behind you to get back outside and remove the cube to turn the platform around and get an extra chip outside. Insert the new chip in the middle and remove and put the other two chips on the right. Put the cube in it’s place while standing on the platform and get below to the new underground area.
Go to the front and you’ll find a chip there. If you didn’t put the chip in the middle in the previous step, the door here would be closed. Do the same thing from earlier to get the chip out.
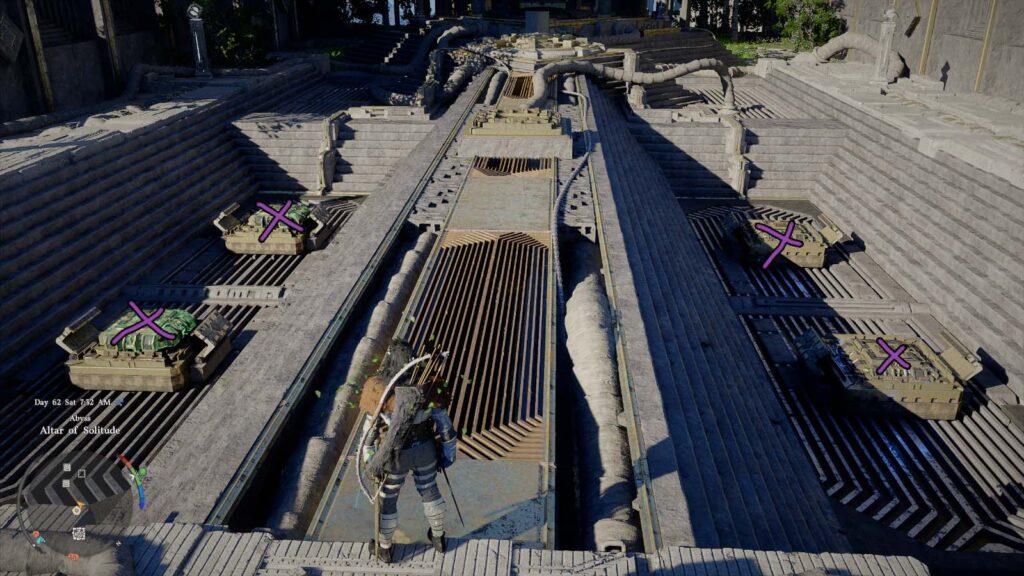
The last step is to put the new chip that you got out on the left and remove the one in the middle and put it on the left. Once you have two chips on the right and left, put the cube back in and both platforms will turn around, solving the puzzle.
The gate is behind the altar. The platforming is nothing really, you can just triple Force Palm jump and glide to the end.
Ice Cradle
You’ll only have one path to follow here, go to the right, following the cable from the ring down into an icy cavern. Down there take a right again and follow the path until you reach a room with 5 yellow bulbs and a melody playing. What you’re supposed to do for this puzzle is play the melody on the bulbs using Focus Light.
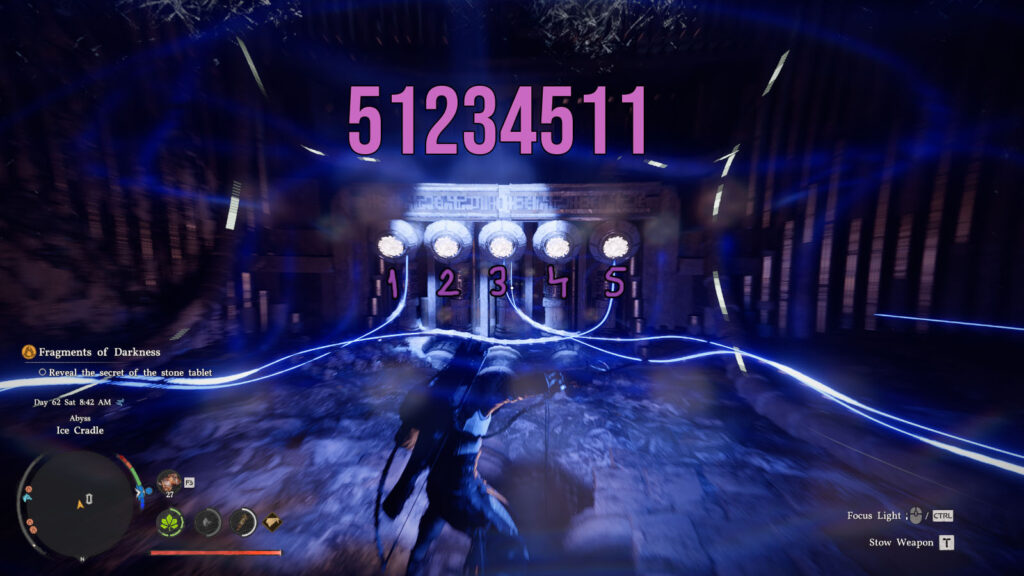
If we were to number the bulbs from left to right from 1 to 5, the solution to the puzzle is that you have to hit the bulbs with Focus Light in this exact order: 51234511. So start with the one on the right, then go around all the way to the one on the left, go through all of them from left to right, and then back to the first one on the left two times.
Make sure to give them a second to turn around after touching each one with the light since it can otherwise bug the sequence.

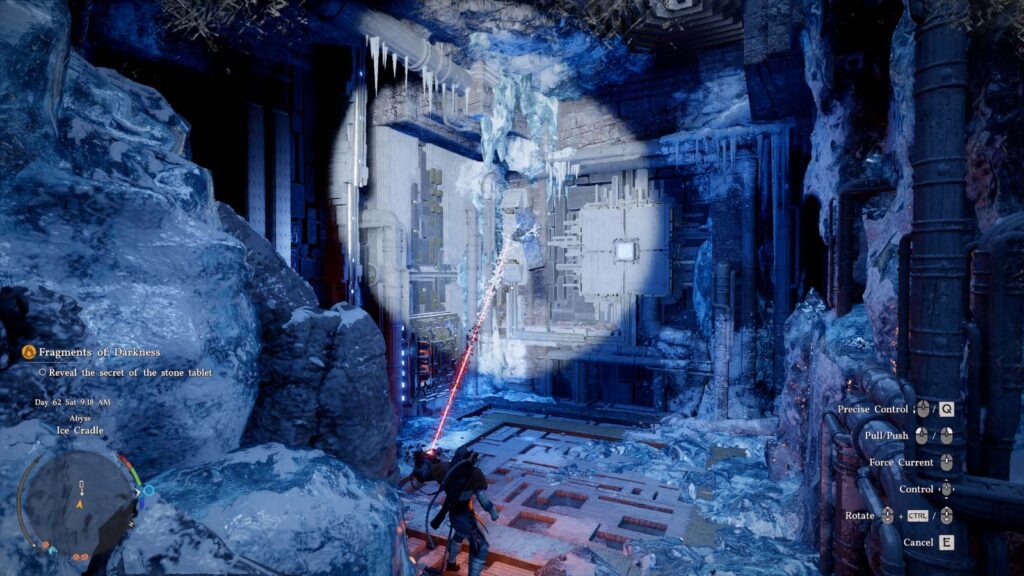
Now go back to the stairs. Instead of going up, look to the right. There’s a frozen waterfall there. You need to climb up to the area above the waterfall. Use Axiom Force jump to get there since it’s a bit hard otherwise. Right up the waterfall to the left you’ll find a battery. Pick it up and place it in the slot to the right up the very small staircase, in the room with a chip.
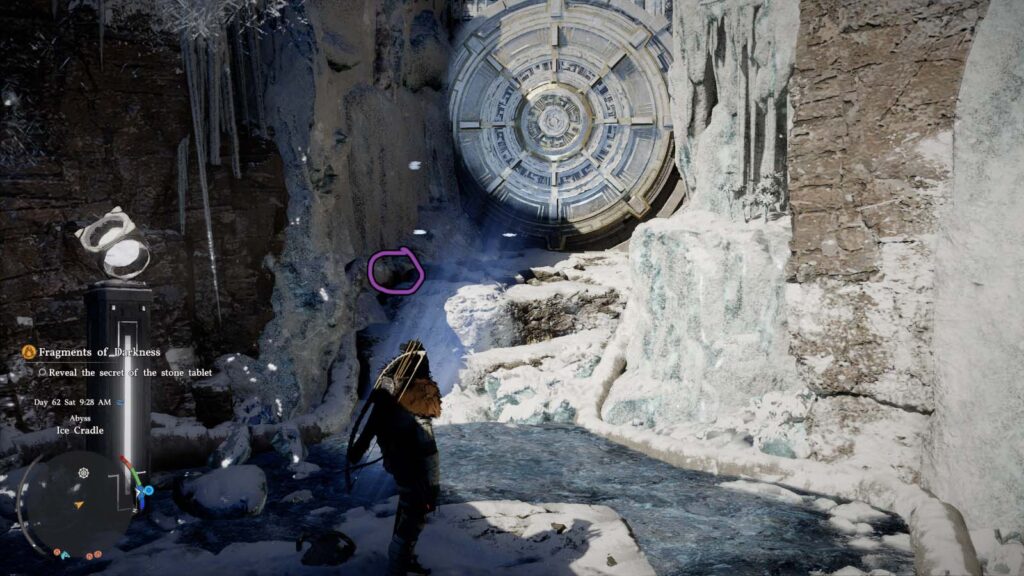
A door will open the to left right outside. Go through it, to the left then to the ring. You need to do one more thing. There’s a conduit you need to reconnect right next to the ring. The artifact and altar are above the ring, with the gate to the next part behind it.
You don’t actually need to continue, since you’ll reach a platforming region with a portal that will just lead you to Sage’s Peak back in Hernand.
Spire of Soaring / Triangle Ring
If you went all the way to the end of the Precipice of Truth and found the hidden location with an unavailable final destination, you can jump right down into Demeniss and ride a bit to the north to get to the Spire of Soaring, which you shouldn’t actually visit until Chapter 5.
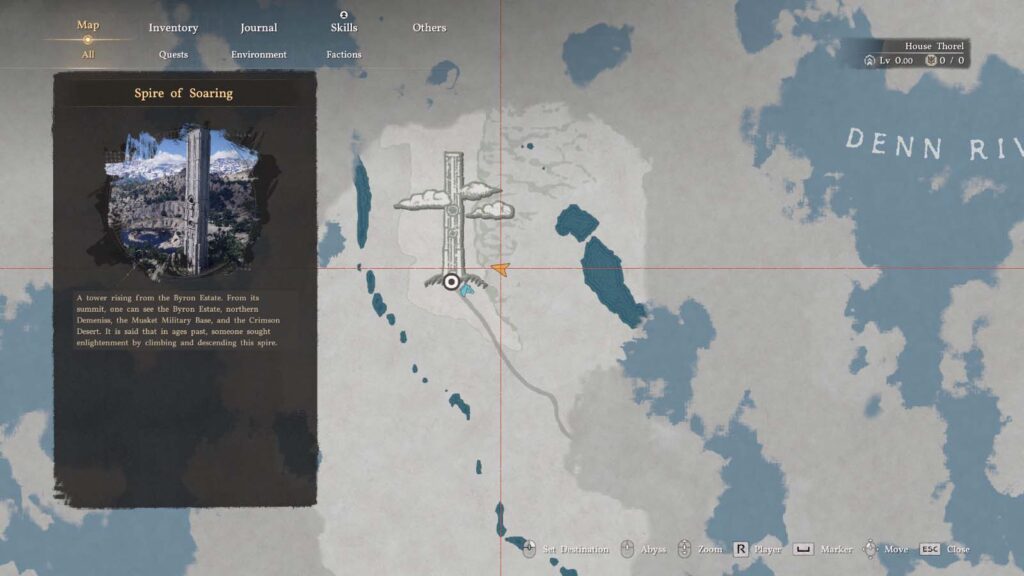

Once you reach the tower, you’ll notice the crumbled entrance. You actually have to enter through a cave underneath the spire to the right, where a cart and some wooden objects are sitting around. Go inside and glide all the way to the top.
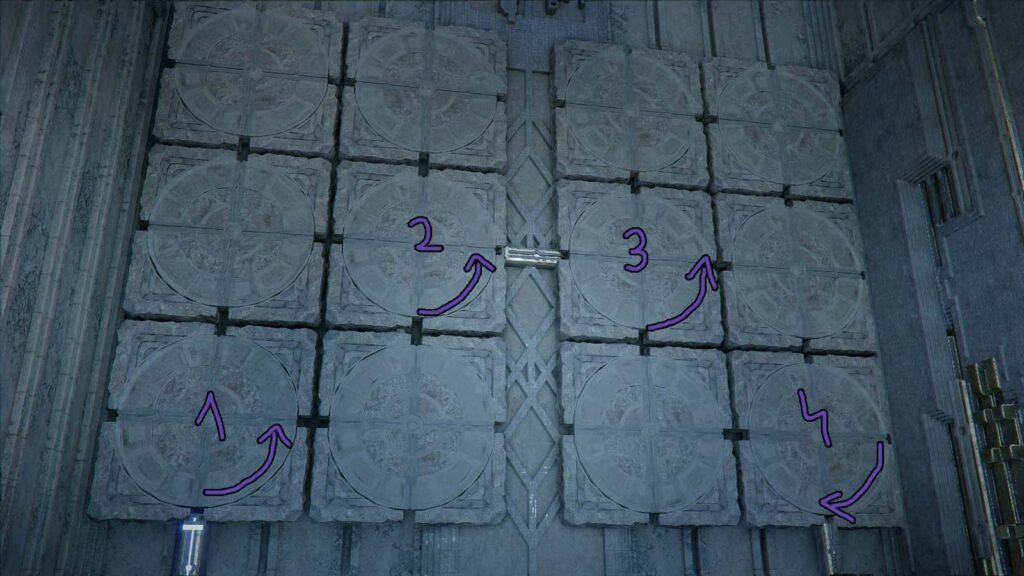
At the top you’ll find one of those rotating discs puzzles. You can see above the exact thing you need to do. Turn the one in the bottom left corner once to the left. Then the one in the middle left the same way. The the one in the middle right. And finally, the one in the bottom right once to the right (so the other way). Done. The only “tricky” part is that the game will make you think you’re supposed to not turn around disc number 3 and turn the one next to it.
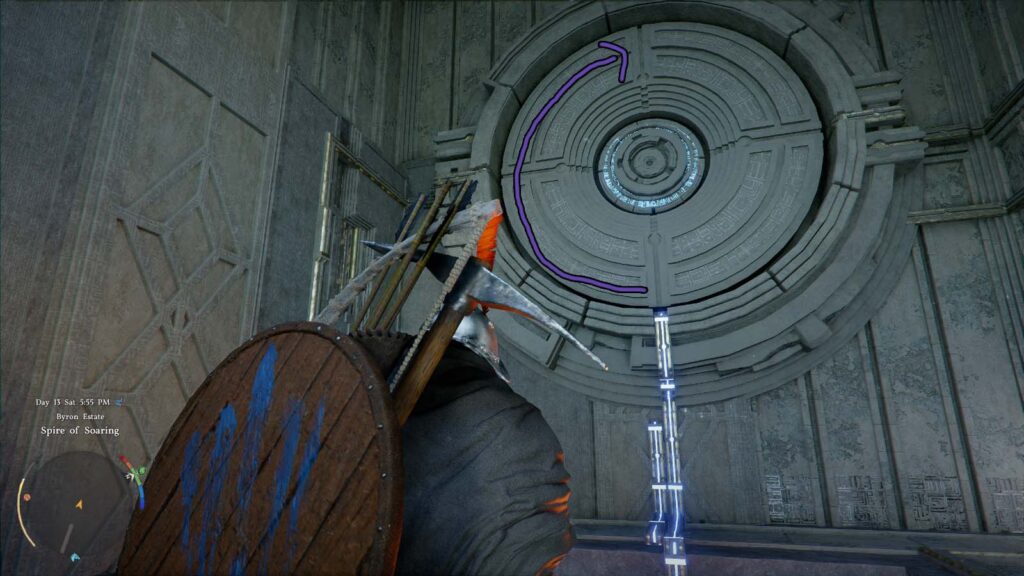
For the last giant disc, just turn it twice while standing on the elevator. The platform will take you up. Just patiently wait as you’ll slowly make your way to the Abyss.
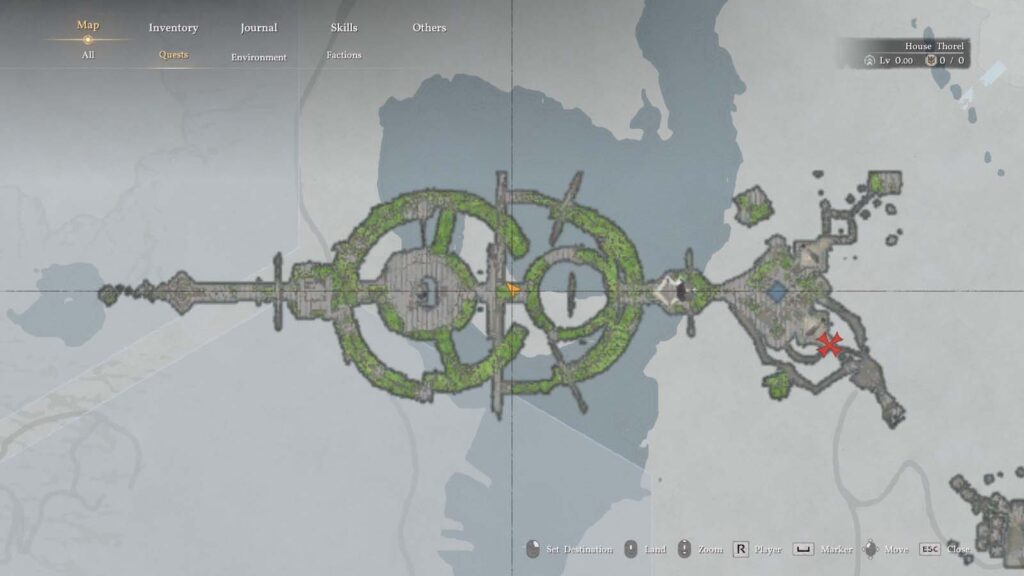
Crescent Skybridge
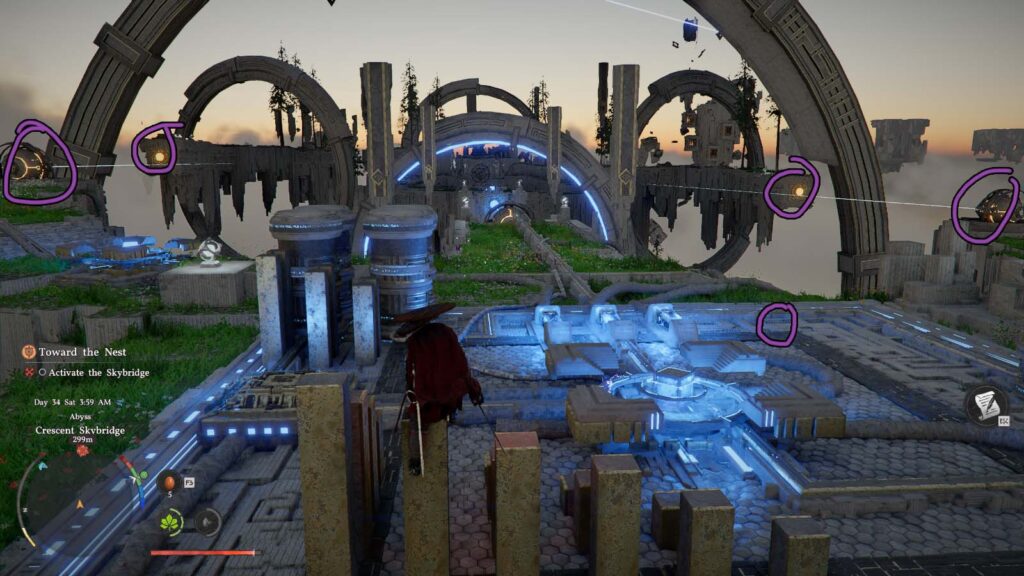
You get a hint right at the start here. You’ll see a laser hitting a target. That’s all you need to do, but a bit higher up. Go to the top structure to the west (so the opposite way of where the laser below is pointing) and you’ll find three spheres shooting lasers. The ones on the sides are pointing the wrong way.
Hit their back with Axiom Force and make them hit their yellow targets.

Last thing you need to do is glide where the middle laser is hitting. There, you’ll need to reconnect a conduit. After that, climb up where the right laser is hitting and find where another conduit needs reconnecting. After that, you can Force Palm the circular thing and you’re done. You can see the locations of the conduits in the images above.
The Skybridge to the south will lead to Crow’s Nest and the one to the north to Monolith Crown.
Crow’s Nest
Finished by winning the main story fight.
You can also get to Monolith Crown using the Skybridge Gate here.
Monolith Crown
Triple Force Palm and glide from platform to platform. No need to actually use any of the fans. I managed to glide all the way to the Nexus without pause using less than half of my Stamina.
Walk straight to the altar and jump down on the platform to the left. There’s a circle there you can connect to using Axiom Force to start the puzzle.
The main idea of the puzzle is that you have to hit all 4 yellow spheres using the lasers on the cube. The puzzle can actually be easily solved in just 5 simple moves.
Move the cube twice to the left (just A on the keyboard) and then move it once down (S on the keyboard). Let the lasers settle in positions. Then move it up once and then down once. Done. That’s the puzzle.
Climb back up and activate the circle to finish the puzzle and end the whole set of Triangle Ring puzzles.
Spire of Clockwork / The Wanderer’s Way
You’ll get the “key” to enter this Spire after finishing Chapter 8’s final battle.
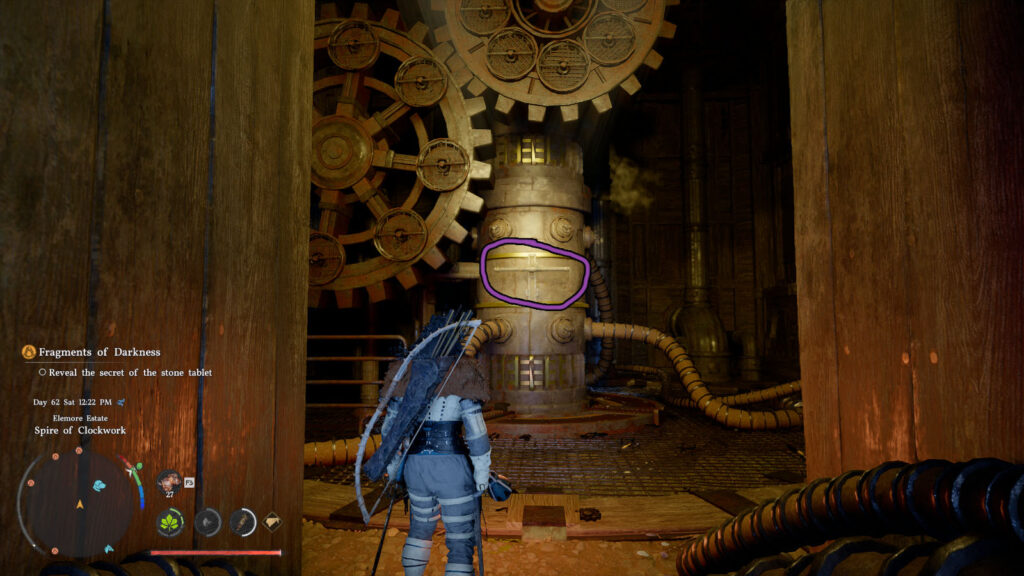
What you need to do to actually “activate” the Spire and get to the next challenges is that you need to pull some levers on the various floors of the Spire. Right as you enter, you’ll see a lever in the middle of the room. Jump and grab onto it. Stay still for a second and it will pull it.
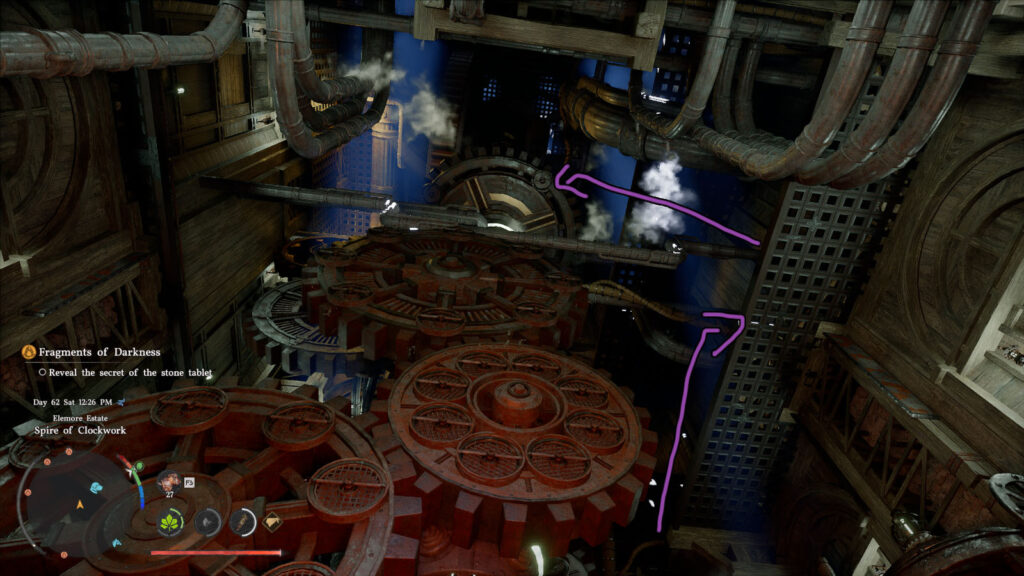
Axiom Force jump your way to the next “cog floor” where you’ll find another lever to pull, this time on the left side of the pillar in the middle.
Now just climb all the way to the top, go outside through the rotating clock, and take a right. You’ll find an elevator. Press the button and you’ll reach the top, where the Abyss Gate will appear once you enter the “room” there.
Riddle Square
This one is a bit special since it also unlocks a skill at the end of it.
I’m not sure why they named this one “riddle square” when it’s one of the only Abyss “puzzles” that has absolutely no puzzles. This whole bit is a platforming bit where you just need to fly through circles in a relatively quick succession.
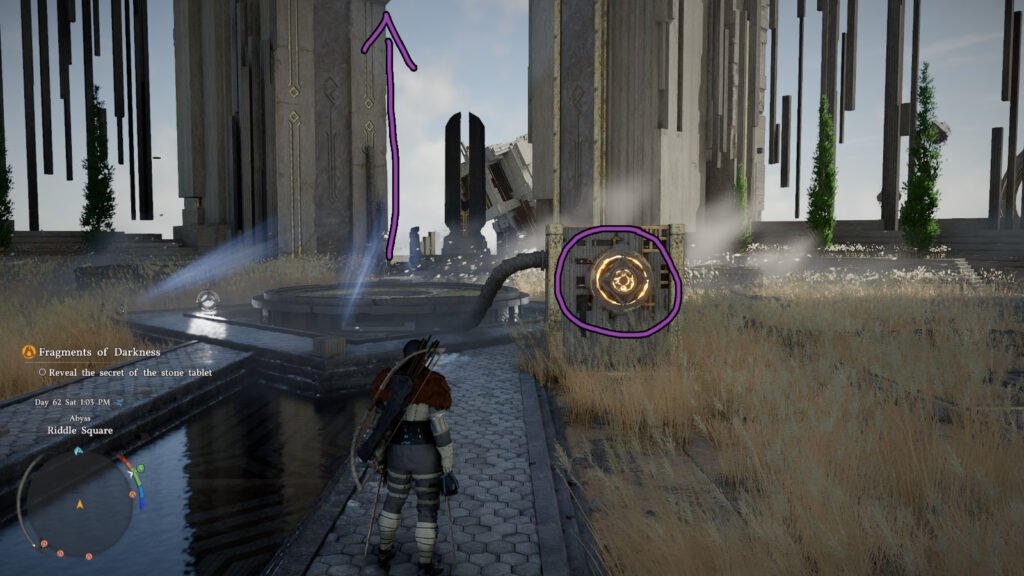
You activate the challenge by hitting the round yellow circle with Axiom Force that’s right next to the giant fan on the floor. Jump and glide to use the fan and start going through the circles.
For the first part you just need to slowly glide through each circle and go around the course. Don’t worry about the Stamina since you regenerate each time you pass through a circle.
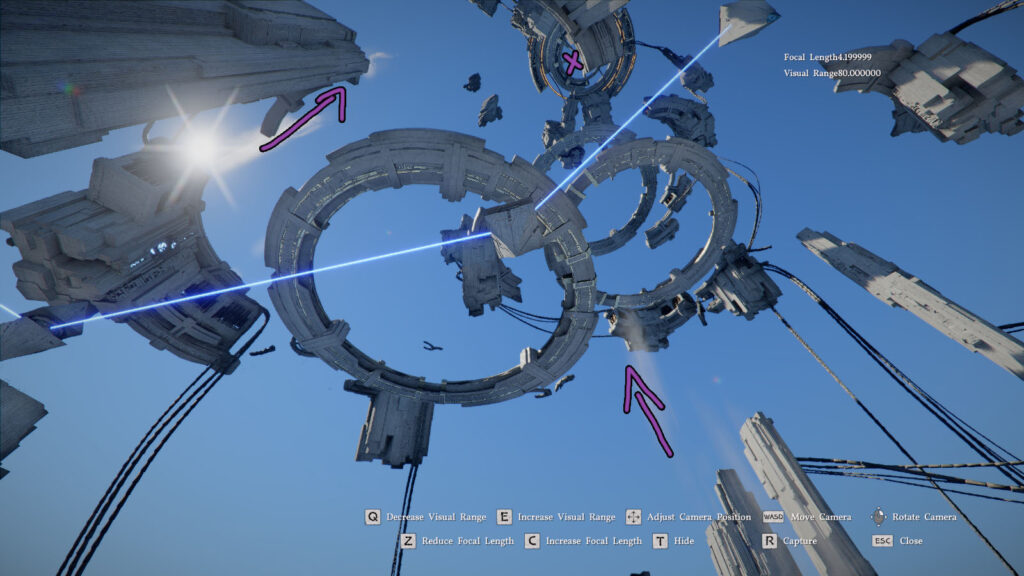
When you get to the part with the fans, just try to align perfectly with them. You’ll also have to cancel the glide and drop there to get faster, otherwise you might mess up the time limit. Try to get the fan from the lower side, rather than from the top, since you’ll end up gliding above the circles and you’ll mess up the challenge. It helps to deactivate glide from time to time to lower yourself.
For the last part, after the set of circles that were really close to one another, you’ll need to use Aerial Roll to quickly get through them straight. You’ll reach the activation ring at the end and end the challenge.
Remember that there’s a time limit and you’ll need to do this close to perfect, otherwise you’ll fail. All in all, 0/10 puzzle, hated it.
Unfortunately, if you want the Wind power, which will unlock Storm Veil ability, you’ll need to complete this.
To get to the next puzzle, just glide your way from the start using the fans from the challenge. There’s a part where one of the fans didn’t bring me close enough to the next set, so I had to use Axiom Force to get myself up on the platforms, so do keep that in mind.
Origin of Thoughts
Your goal at the start here is to use all of the turbines to glide as high as you can and try to get as close to the top circle as possible.
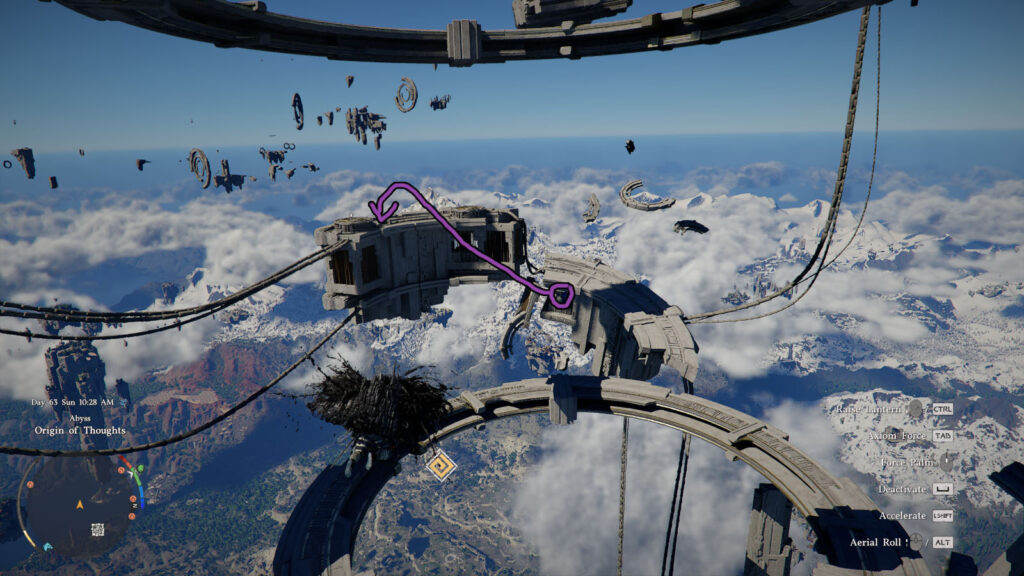
After two sets of turbines, you’ll reach a circle where the turbines don’t work. There’s a hidden battery close to the non-functional windmills you’ll need to pick up and insert using Force Palm to get the last set working. I suggest you go to the exact location of the battery, pick it up with Axiom Force, put it as high as possible, release, and then go up to the turbines. Once you insert it, get all the way to the top.
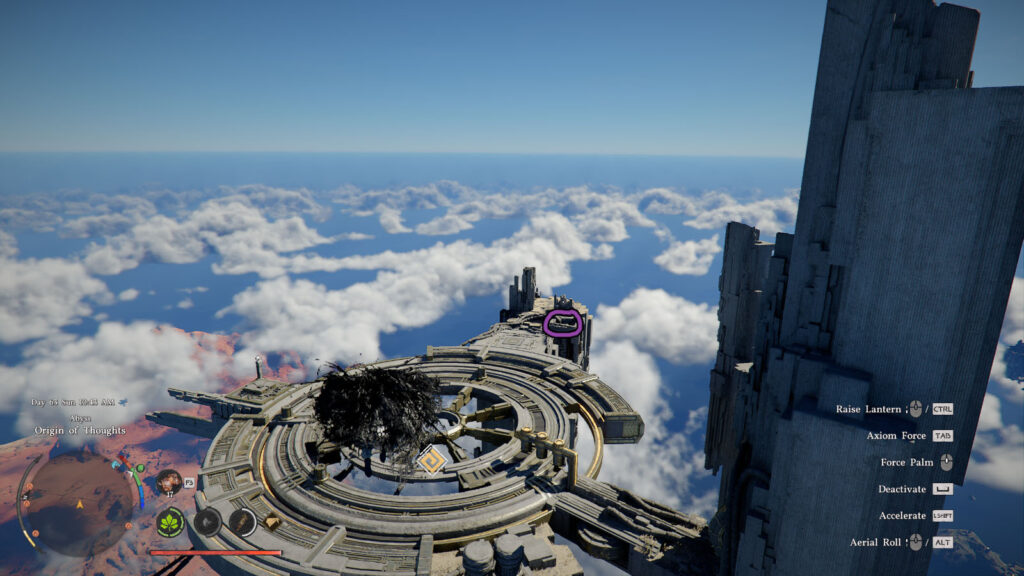
Your destination is at the end of the structure, where you will find a hole where all the cables are going. In there, there’s a yellow circle you can connect to using Axiom Force to start the puzzle.
The idea of the puzzle is that you have to align all of the circles. There is an extremely easy way to do this. First, look at bit at the puzzle. You’ll notice there’s a place in the upper left corner where 3 yellow dots are standing next to each other. You’ll then notice that for your “selected” circle there’s a blue dot. Just bring the blue dot all the way to the yellow ones and you’ll properly align your circle. Do that for all 3 circles and the puzzle is done!
Now jump through the hole in the middle, avoid the laser, and push the button at the end to finish the challenge and get your Artifact.
Take the portal that activates after using the Skybridge and parkour your way to the end. Nothing complicated here, just triple jump using Force Palm jump and glide from platform to platform. Then use the turbines to glide all the way to a portal, following the lasers above you in case you get lost.
Forgotten Altar
Just a heads up, you need Nature’s Snare for this one, so if you haven’t unlocked it yet, make sure to do it!
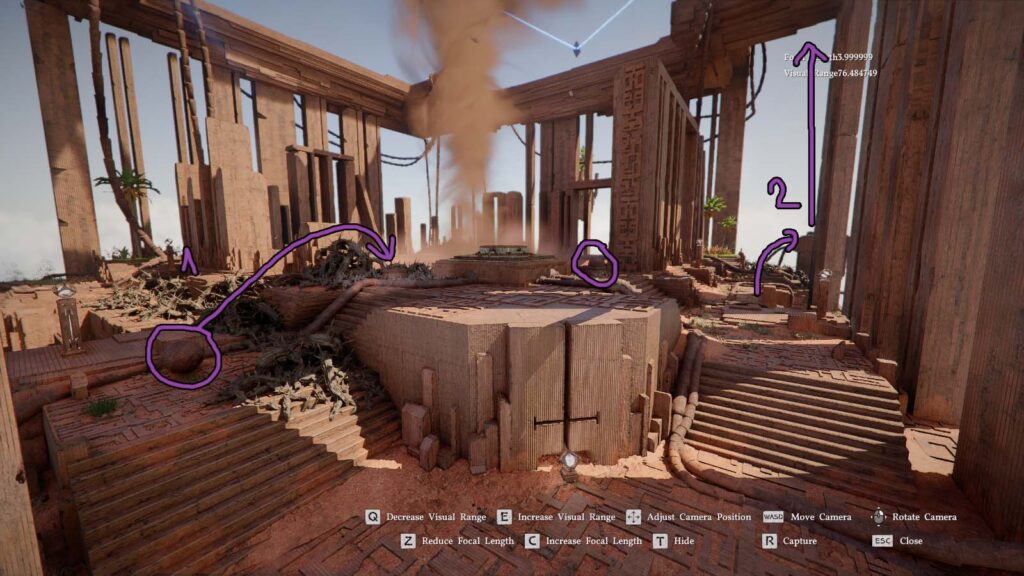
From the Nexus, go to the left and pick up the ball using Axiom Force, then drop it into its slot a bit to the right. No need to Force Palm. There’s a second one on the right that’s already inserted and you can see how it’s supposed to stand in there. Then go to the right from the Nexus and use the turbine to glide to the top. If the turbine hasn’t activated after you put the first ball in its socket, remove the 2nd one and put it back in. Might be a bug. You’ll know everything works if the mechanics between the balls activates.
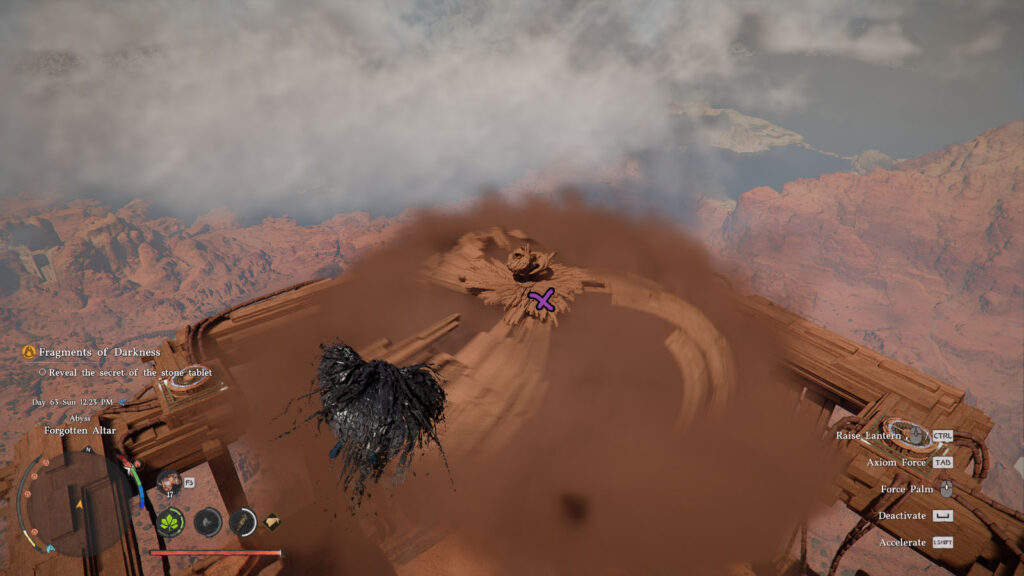
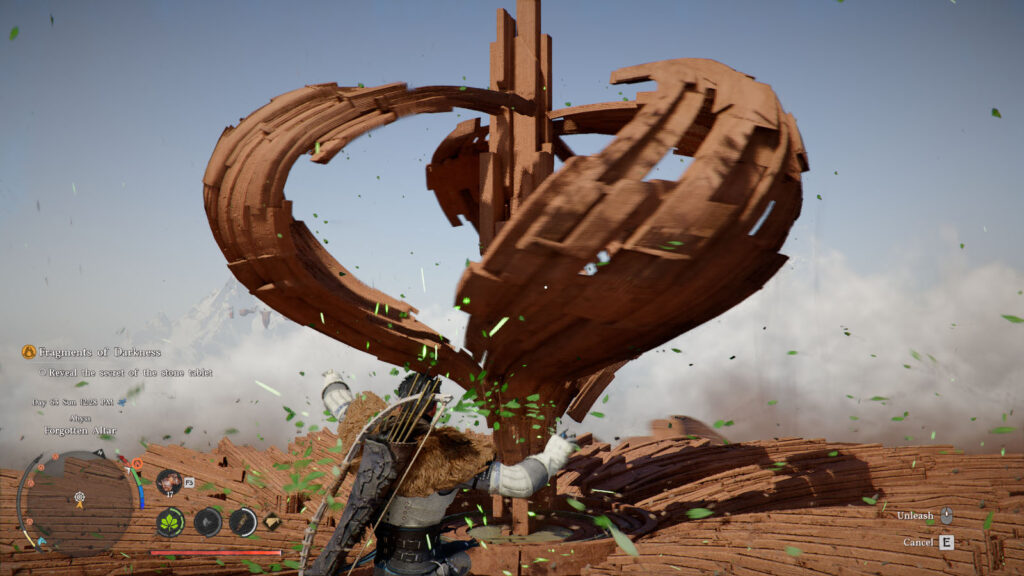
Now glide on the platform next to the spinning thing on top, try not to hit it cause you’ll be pushed off and have to restart, and use Nature’s Snare on it to stop it from spinning.
Now jump down to the center and you’ll find a box with grates on it. Grab onto it, resist, and Force Palm, like you did for some of those puzzles early on, to get inside the box and activate the button, finishing the puzzle.
Disconnected Truth
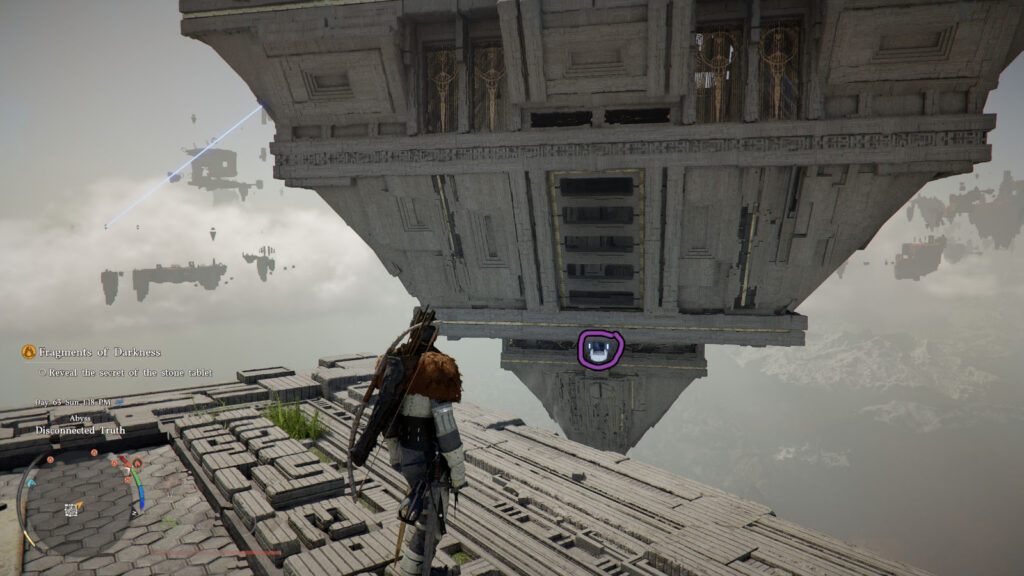
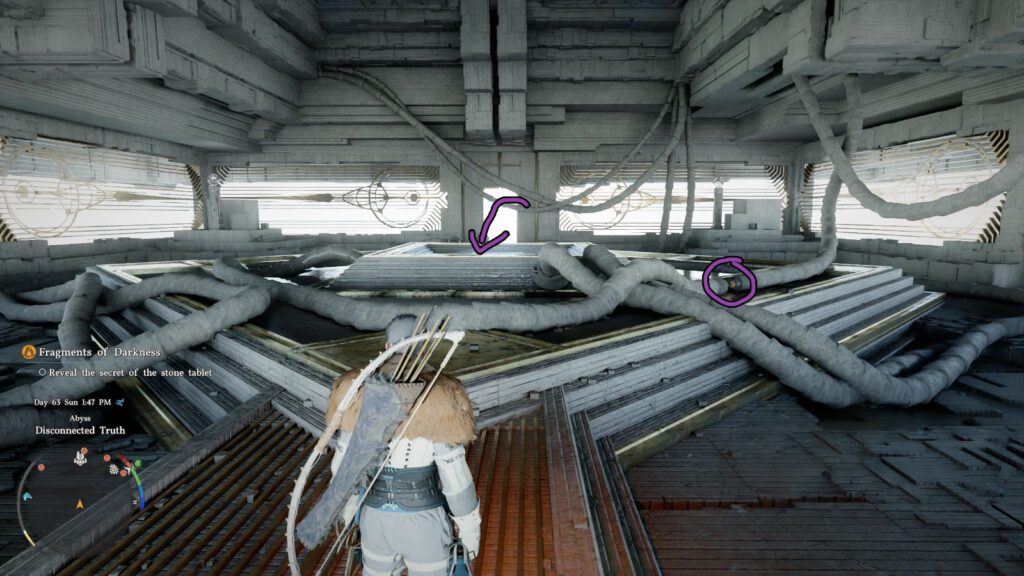
Start by gliding into the little lit-up opening on the lower part of the pyramid. Once inside, connect the conduit on the right and stand on the platform in the middle to get to the actual puzzle area.
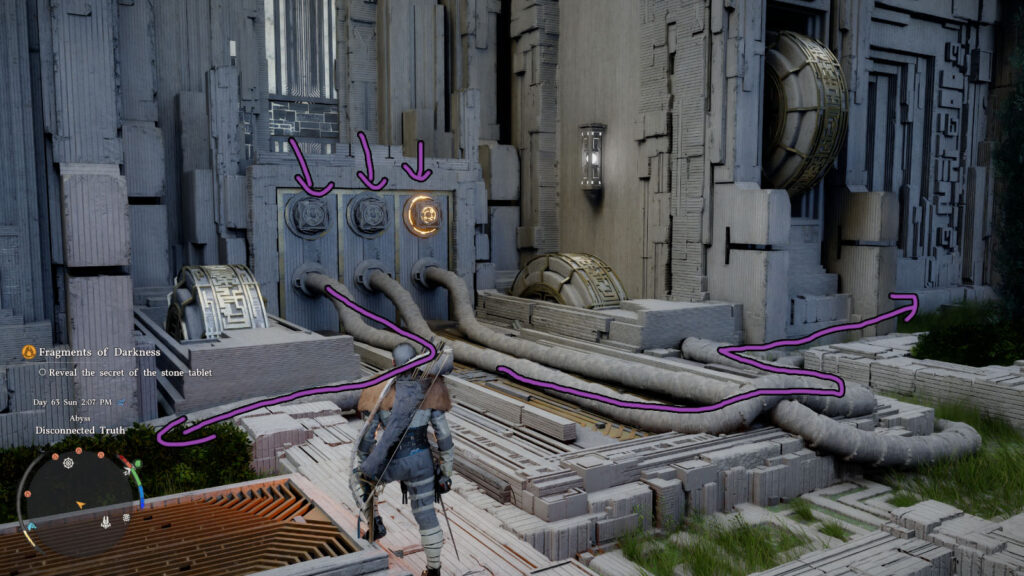
The main idea of the puzzle is that you have to hit the 3 yellow buttons with Axiom Force. However, as you probably noticed, only one is yellow. The other two don’t have energy either from disconnected conduits or missing chips.
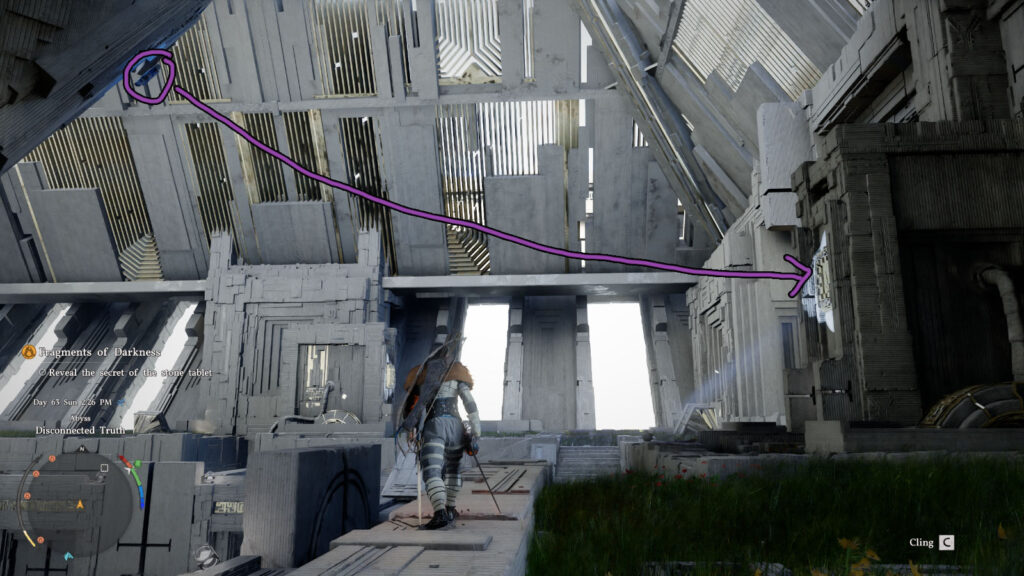
I recommend you start by following the cable that goes into the middle slot to the right, down into the underground. There’s one place, close to the exit, where you need to connect the conduit. Continue following the cable upstairs until you find an empty chip slot. The chip is floating above attached to the upside down pyramid. Triple Force Palm and glide towards it, then grab it while gliding with Axiom Force.
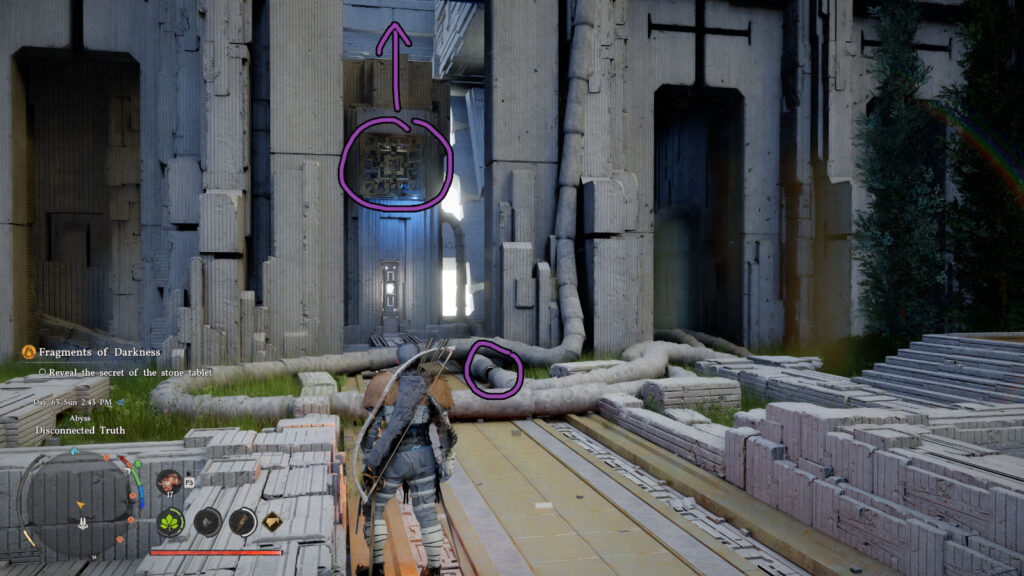
Put it in the slot and go down to start following the cable on the left. You’ll notice this one goes into a wall. Go to the left and you’ll first find a disconnected conduit on the ground. Reconnect it. Then remove the chip from the wall in front of you and bring it upwards. You’ll have to connect it to a slot above, same as with the previous part.

Go up and, before you start dragging the chip, reconnect another conduit right before the slot. Then grab the chip, put it in the slot, and hit all 3 yellow buttons with Axiom Force to activate them and finish the puzzle.
After activating the big ring, use the newly appeared platforms to get to the top to the Artifact. Then go to the west to the gate, which should have appeared on the map now.
Ether Fragment
The portal at the end of Disconnected Truth will take you down into a random cube on the ground. Remove the battery on the wall where the water is, put the chip inside the small room in the middle, put the battery back in.
Climb to the top, rotate two of the circles on the ground using Axiom Force to make sure energy gets to all 4 outlets, and climb on the roof. You’ll start flying. Wait and the puzzle is done. Activate the Nexus, then the ring, and get the Artifact.
I’m not sure what comes after since I’m getting the “can’t access this area yet” message after the Skybridge.
Spire of the Sun / Dry Valley

You’ll get to enter this one during Chapter 9’s main quest chain. If you come here before and solve everything, the Abyss Gate won’t appear at the top! To get inside, you’ll have to use the laser and mirrors on the side to hit the Spire with light.
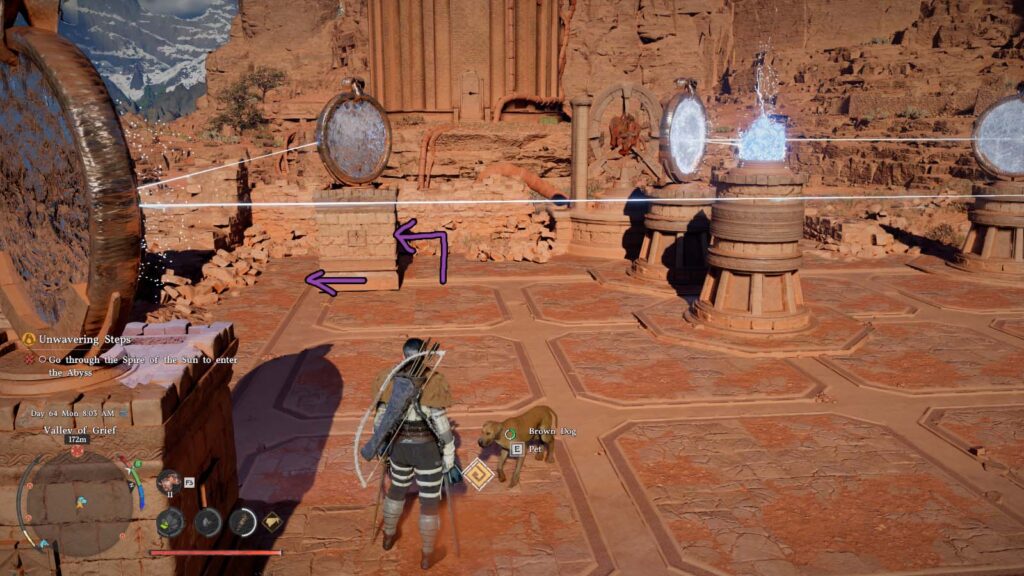
The start of the puzzle is to the east of the Spire. You’ll find a bunch of lasers hitting mirrors. Move the one that’s next to the crystal, that doesn’t have a light hitting it, to the south to get hit by the light and hit the main stone to the west. That stone will light up and send a laser to the southwest, where the actual puzzle is. This one is just a prelude to teach you how the puzzle works.
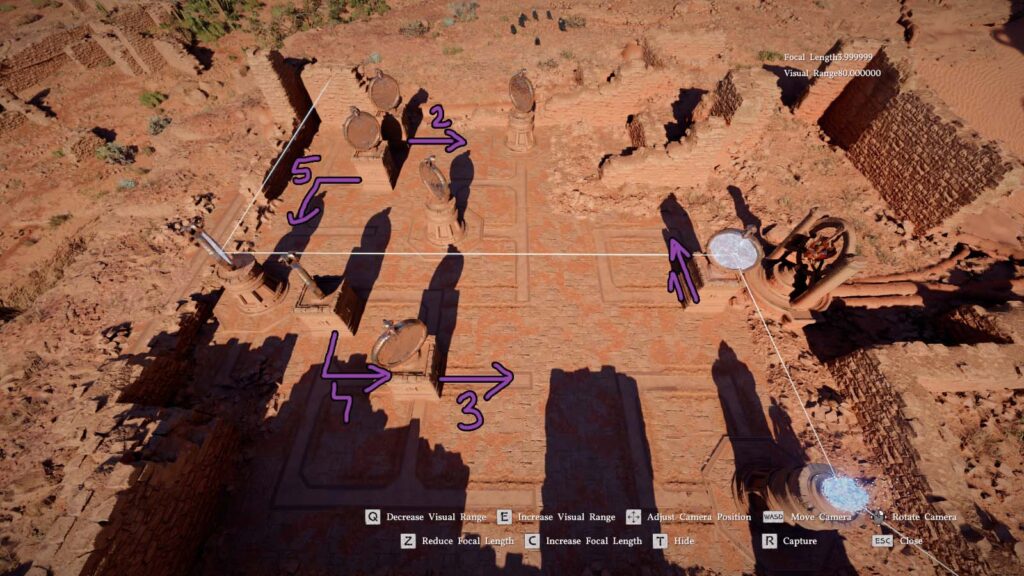
For the actual mirror moving puzzle, I’m just going to attach a picture because you need to move 5 of these and referring to them as the “south-western” and “northern” mirror will get confusing. Just follow the instructions from above and you’ll get it done quickly.
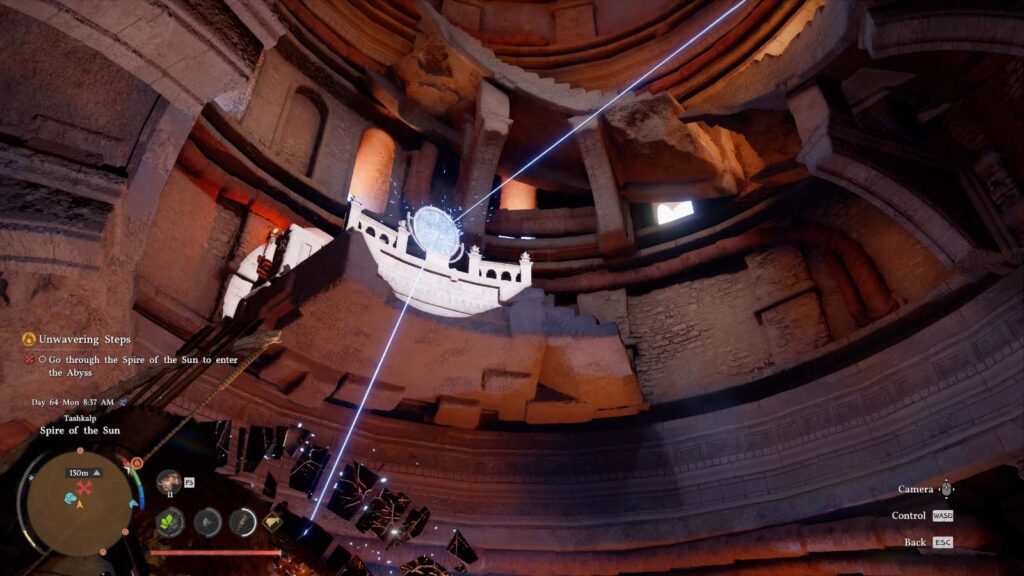
You can now go inside the Spire. Go up the stairs, “examine” the mirrors at the top, and move the laser to hit the mirror on the next floor. Do this until you reach the top of the Spire. At the top, point the mirror to the ceiling and hit the the ore there. Climb to the top and use the Abyss Gate.
Nest of Valor
Win the fight.
There’s two Skybridges in the Nest of Valor, we’ll start with the one on the left, since that one doesn’t have special requirements.
Throne of Truth
Instead of waiting for the things to come to you, you can just triple Force Palm jump and get farther faster here, toward the Nexus. By now you should have Focused Aerial Roll, so getting to the Nexus should be a breeze.

The puzzle itself is extremely easy, fall down the little hole in front of the ring where the cable is going down. Immediately as you fall down look in front of you. There will be a conduit you need to reconnect.
For the puzzle you need to hit some buttons to make the current flow properly through the cables. It’s similar to all those chest puzzles where you need to press the buttons in the correct order to make them all “sit” down.
In the image above you can see the exact ones you need to Force Palm to solve the puzzle. So, the second one on the right, the lower one on the left, the middle ones in the distance, and the one hidden below. Five buttons to hit in total. This will solve the puzzle. You can go back up, use the fan, and get to the next Skybridge. For some reason this area doesn’t have a ring and Artifact…
You’ll know you’ve done everything right if the buttons start shining blue. If you’ve messed up the puzzle before coming here and have reset it, don’t forget to reconnect the conduit.
Dimensional Labyrinth
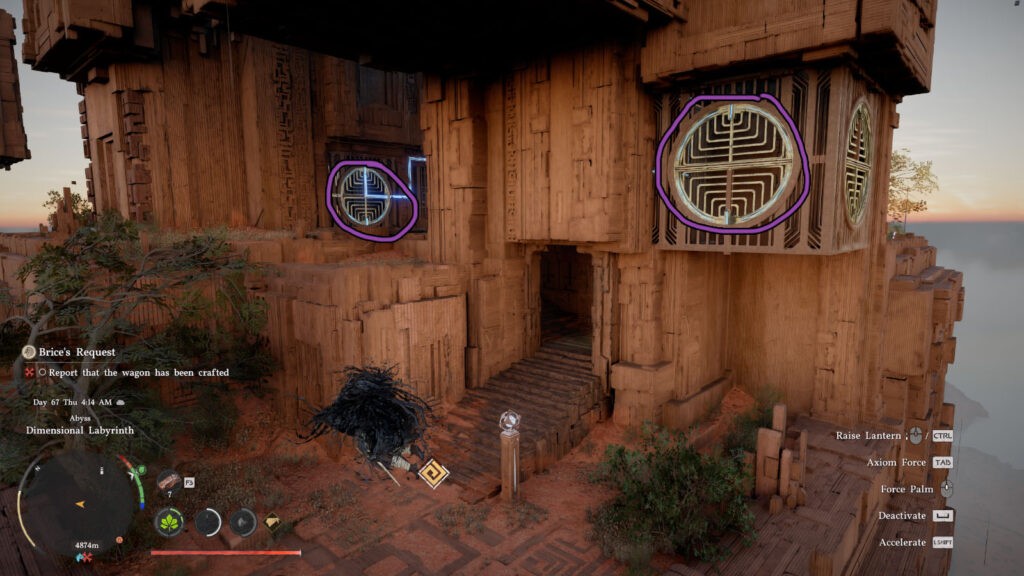
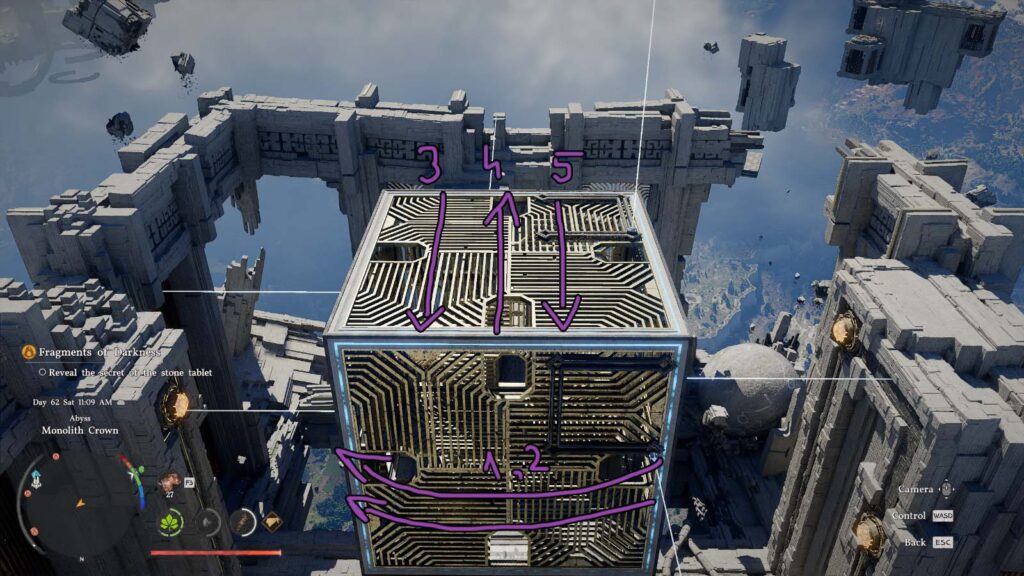
For this puzzle you just need to do a total of 5 things. First, right after the nexus, you’ll see a grate facing you. Either climb and use Resist Force Palm on it, or just Axiom Force Force Current it to turn it around. Then go up the stairs and Force Palm the grate with the current going into it.
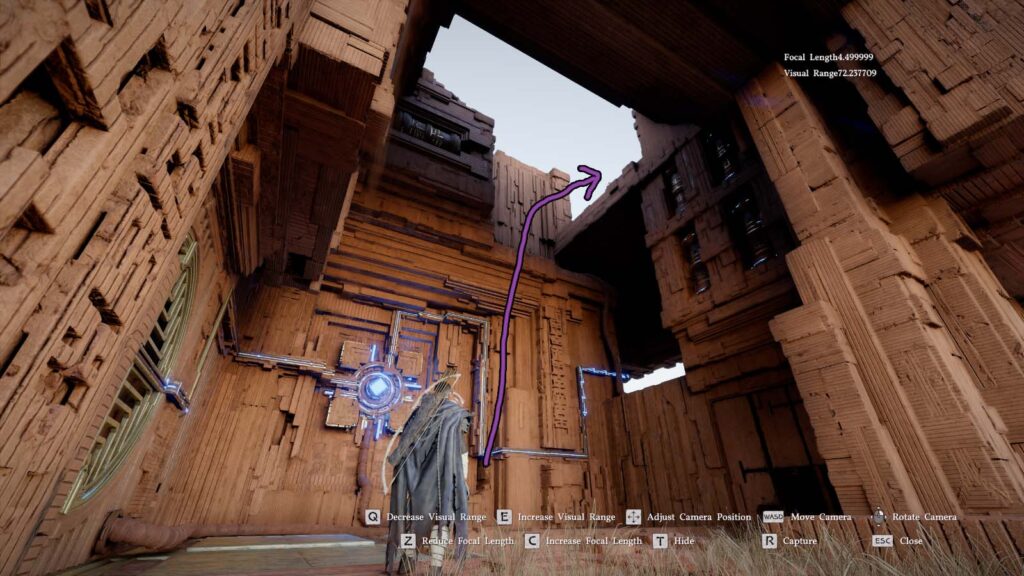
Now look to the right where the current is coming from and climb to the top. On the right you’ll find another grate. You don’t need to turn this one, you need to get inside, so grab onto it, press the Resist button, and Force Palm it to get to the other side.
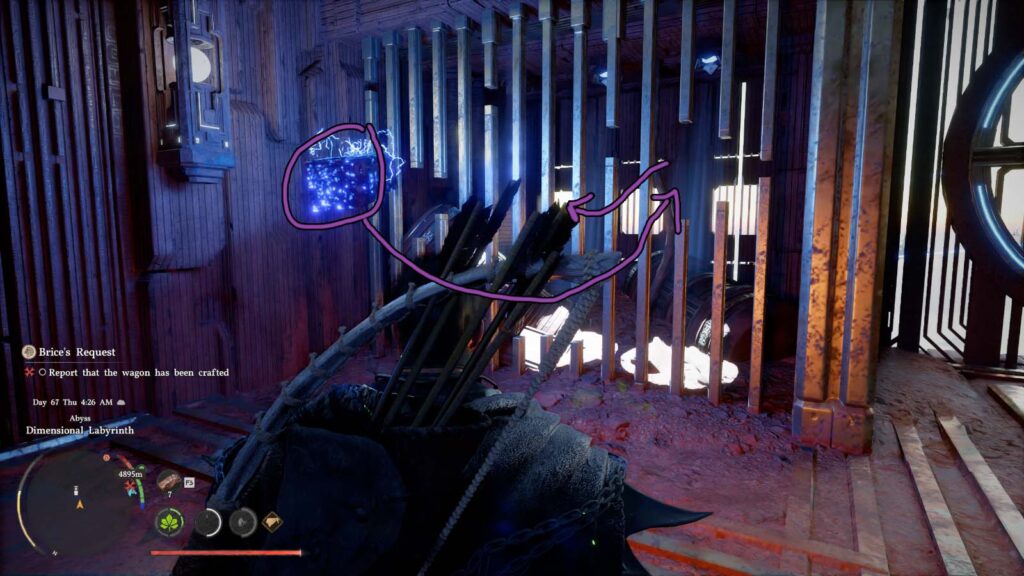
Grab the battery and put it through the hole in the grate next to it and then through the hole in the wall to get it outside. Then push it up to the grate where you came from. Go out back through that grate and carry the battery all the way to the ring to the northeast, following the stairs upward.
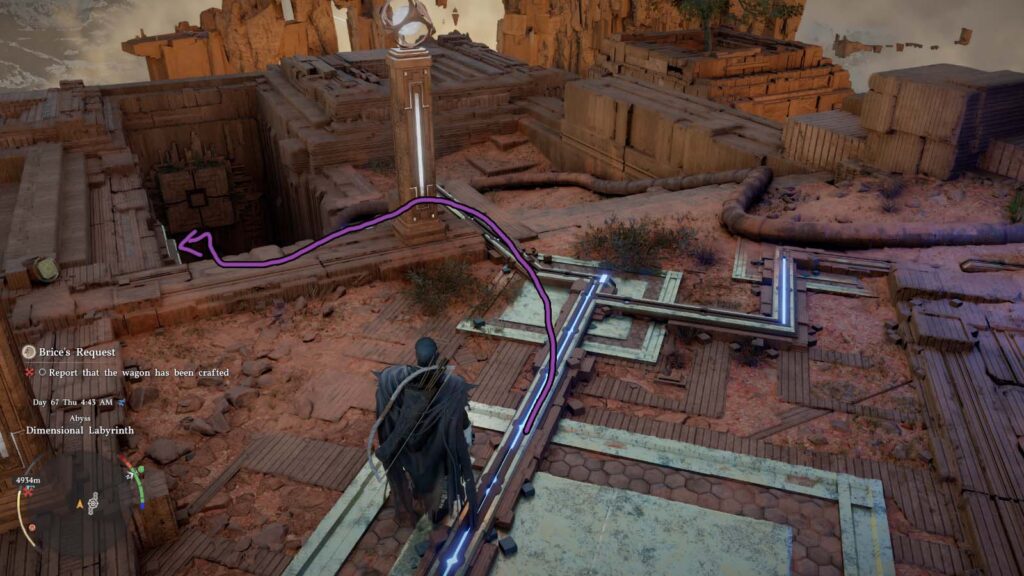
After inserting the batteries in their slots next to the ring, follow the current on the ground. You’ll reach another grate that needs to be turned around. Once you do that, go back, activate the ring, and get the Artifact.
Sanctum of Transcendence
We now got the easiest by far puzzle in the game. All you need to do here is learn how to use Focused Force Palm properly. At the main entrance “door”, you’ll have to do what you did back when we entered the Scholastone Institute. Enter meditation move (X on the keyboard) and hold the Force Palm button until a leaf appears. Aim the leaf at the ball in the middle of the door and wait until the leaf reaches the fall and makes the ball shine yellow.
The range on this is actually huge, so you don’t need to stand close to the door at all.
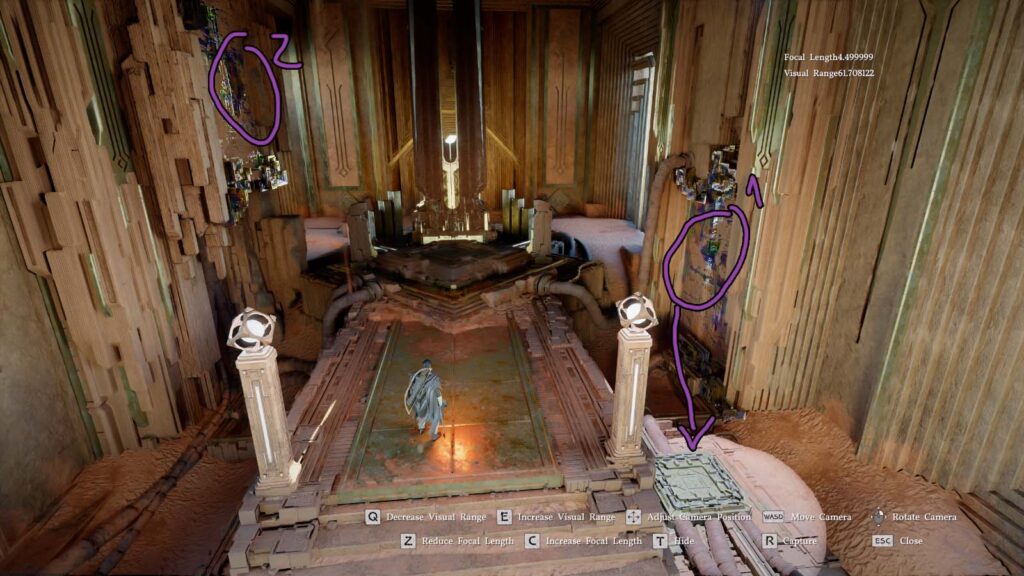
Now at the Altar, you’ll finish the puzzle in 3 moves. One, Focus Force Palm the wall on the right. Two, take the chip behind the wall and insert it in the slot next to it. Three, Focus Force Palm the wall to the left.
Now activate the ring and get the Artifact. Easiest. Puzzle. In. The. Game.
With this puzzle done, we can now return to the Nest of Valor and take the second Skybridge. Which doesn’t lead anywhere yet. So let’s head to the next Spire and finish this once and for all.
Jijeong Temple Pagoda
Same as the Spire of the Sun, you’ll get to enter this one during Chapter 9’s main quest chain.
Getting through this Abyss Gate will get you the Conqueror of the Spires achievement if you also went through the other ones.
Ascetic’s Rest
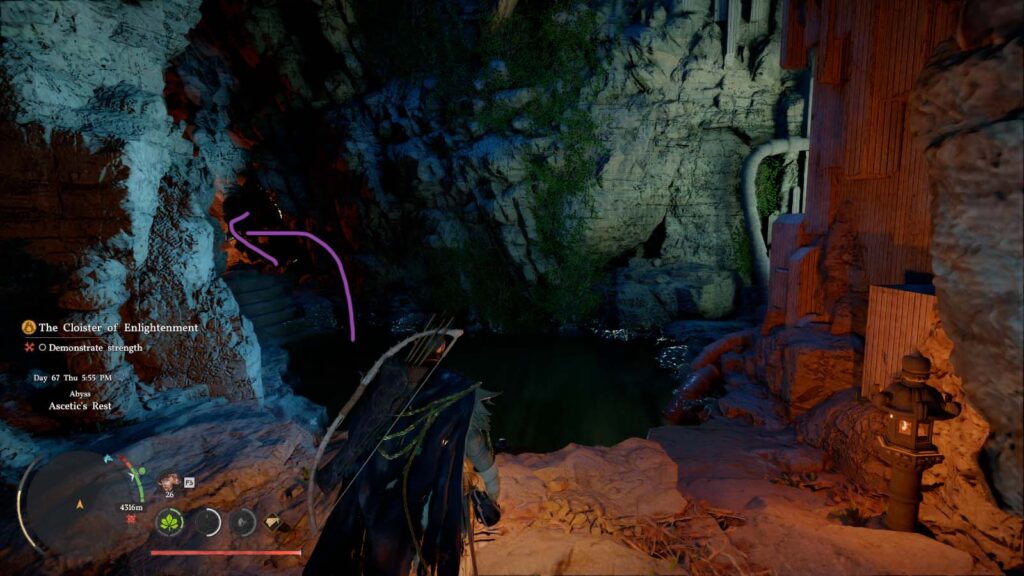
At the water, go to the left where the chest and small altar are and go out to the left, down the stairs.
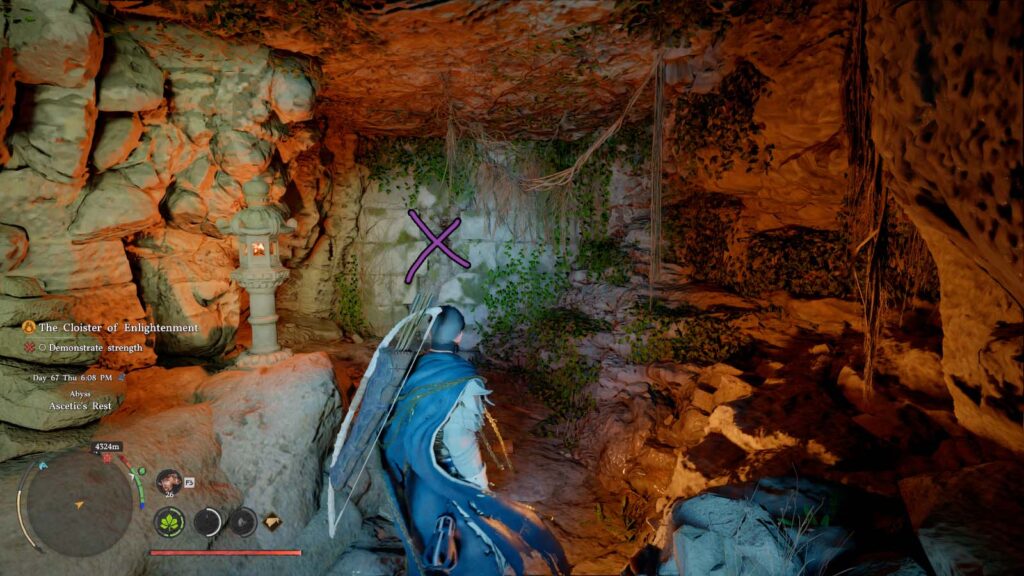
Down there, hit the wall with Turning Slash (left click + right click, or R1 + R2) and water will start to leak. The water upstairs will now disappear. Grab the chip from there, bring it up where the ring is, insert it in its slot, and puzzle done.
The Skybridge is all the way to the top, next to the temple, but you can just fast travel to it.
Path of Serpents / Bowsprit Cape
You’ve been teleported to a cube in the middle of nowhere. Nice. Now all you need to do is insert the three batteries in their slots and a chip in the empty slot. Two of the batteries are in the room with you, the third one is outside, out through the whole in the ceiling.
You can see their locations on the mini map, as well as the location where you need to insert them.
Now the chip, if you’re wondering where it is, just look up. It’s really high up above the cube. Triple Force Palm jump, glide, and grab it with Axiom Force while in air.
With everything inserted, wait a bit for it to fly. Mid air, after turning around, one of the chips will fall out of its slot. Pull it back with Axiom Force and then push it with jump Force Palm and you’re all good to get to the top. Just be careful not to fall through one of the holes.
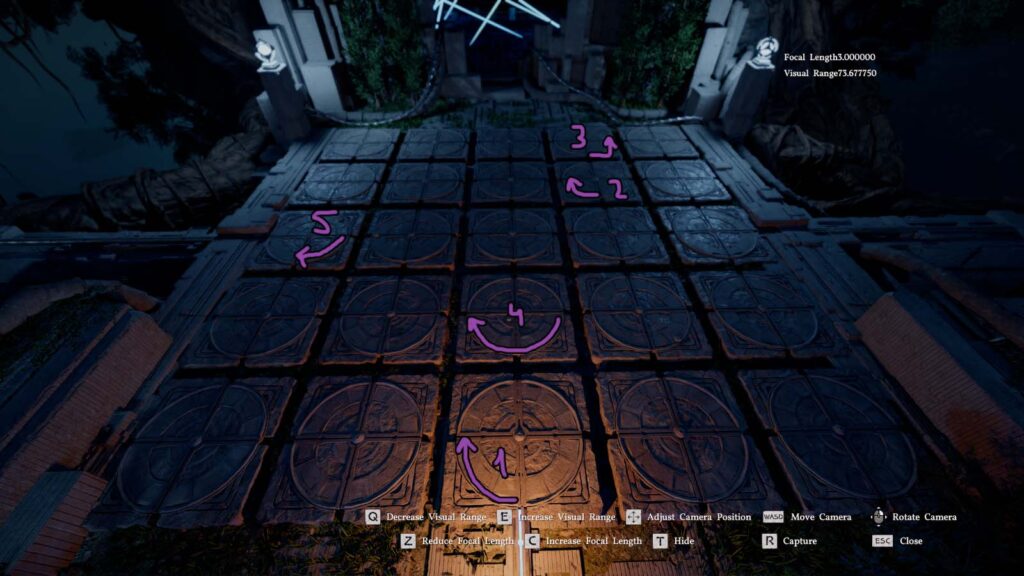
The puzzle itself at the top is not that hard, you just need to turn a few of the discs the right way to make the current flow properly. It takes just 5 moves, you need to make the current reach the source on both the left and right.
In the room with the lasers just pull the chips out of the walls on the left and right, then activate the ring and get the Artifact. The Skybridge is to the left, but you can fast travel to it on the map.
The path forward is simple with gliding, just keep in mind there’s a chest next to the portal that you can get after using Focus Light on the brambles.
Crossroads of Uncertainty
I hate this challenge. It’s a glide challenge. What you have to do is go through a bunch of rings while making sure the timer doesn’t run out until you reach the end, where you need to Force Palm the button.
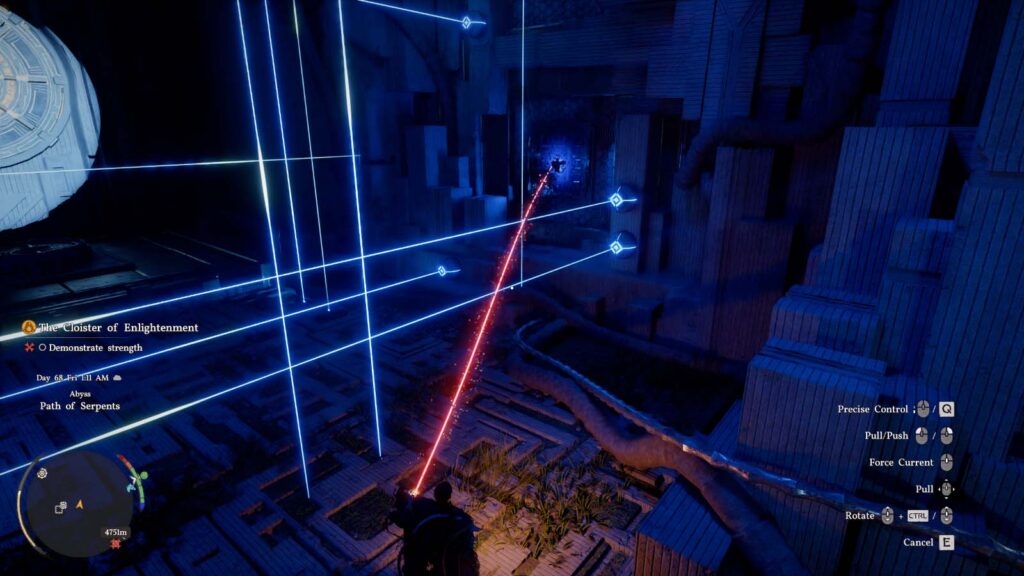
So, at the start, use Axiom Force on the yellow button and start gliding through the rings. You’ll see a yellow bar running out on the rings. That’s your timer. Keep an eye out for buttons similar to the one you pressed at the start as those will fill up your timer and allow you to actually do this.
Keep in mind you can’t do this challenge without Aerial Roll, since there’s parts where you will need to glide straight ahead. Using the fans and passing through the rings will get you extra Stamina, so don’t worry about that. I recommend getting the Aerial Stab (Stab) skill that allows you to get higher using Stamina, rather than Focus. This way you can spam Stamina potions and keep getting higher if you somehow fall!
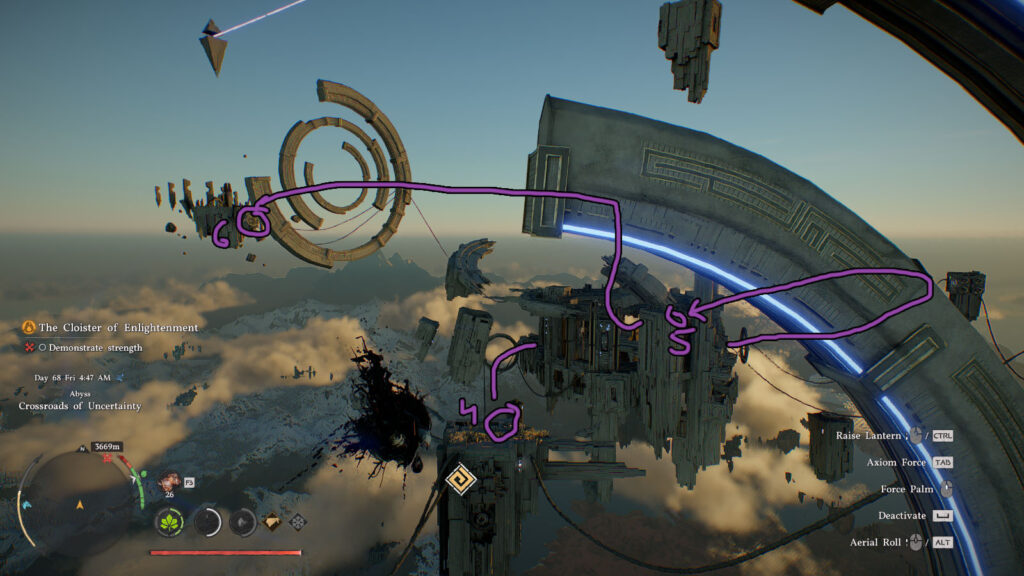
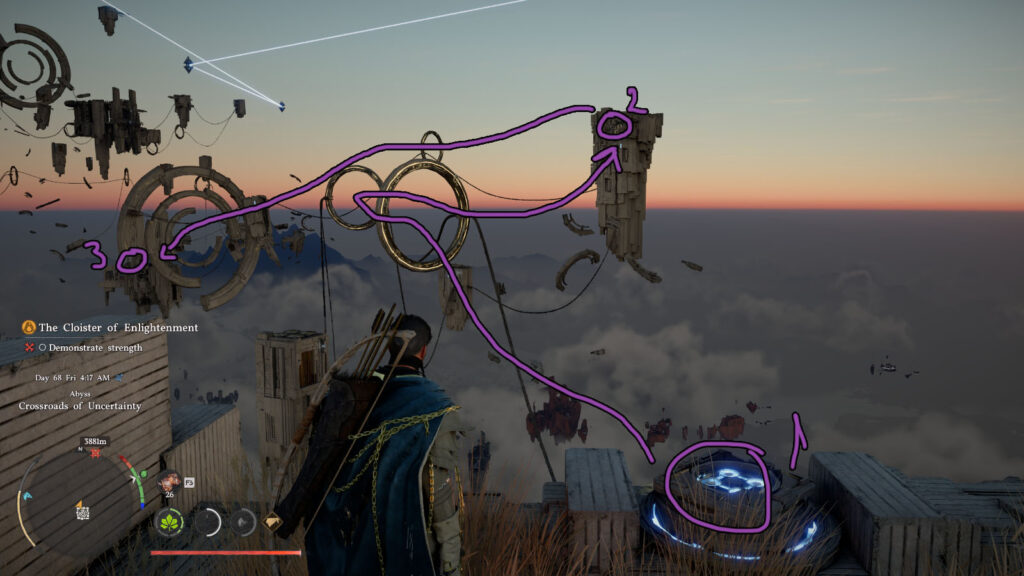
In the attached images I’ve noted the locations of the timer buttons, make sure to hit all of them with Axiom Force.
There’s 5 timer buttons in total, after the 3rd one there will be a long while until the next one, right after the giant rings on a platform, and the last one on a platform high up after you go around the big structure with lasers.
At the end, make sure to Resist when you hold onto the ring/button to finish the puzzle, since using Force Palm without that will push you off and restart everything if you can’t save yourself.

")
